
007 First Light puts Bond's spy toolkit front and center in a way most Bond games never bothered to do. You're not just picking up random weapons off the floor. Every gadget has a defined role, a resource cost, and a specific window where it shines. Get the loadout wrong and a stealth mission turns into a firefight. Get it right and you'll walk out of a guarded compound without firing a single shot. Here's everything you need to know about each tool and when to actually use it.
What is the Q-Lens and how does it work?
The Q-Lens is not a gadget in the traditional sense. Think of it as Bond's tactical HUD overlay that transforms the environment into a wireframe scanning interface, highlighting enemies through walls, flagging hackable electronics in orange, and revealing items carried by NPCs like keycards and cash bundles. Activating it is straightforward: hold L1 on PlayStation, LB on Xbox, or Alt on PC.
What makes the Q-Lens genuinely useful is that it gates access to the Q-Watch gadget system. You have to be inside Q-Lens view to fire off any gadget. That means every gadget deployment starts with reading the room first, which is exactly the right design decision for a spy game.
The Q-Lens also shows you exactly how a gadget will affect a specific target before you use it. Hovering over an enemy or object displays the projected effect, so you can confirm whether your Dart Phone will actually send that guard off their patrol path before burning the charge.


How does the Q-Watch gadget system work?
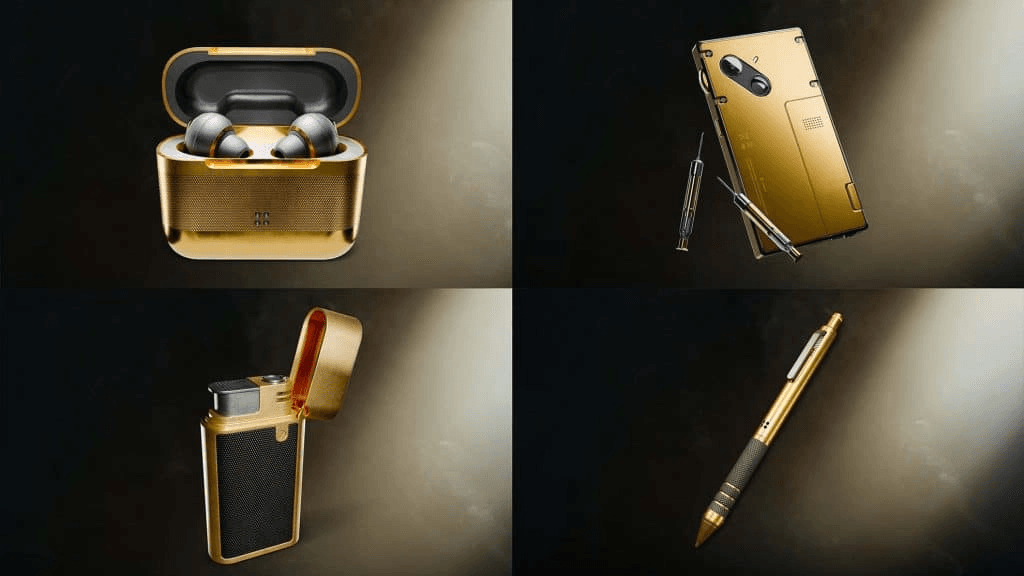
The Omega Q-Watch is the delivery system for every gadget Bond carries. Before each mission, you assign up to four gadgets to the Q-Watch slots. Once you're in the field, hold the Q-Lens button and press the assigned gadget button to deploy. Every use draws from either Battery or Chemical resources, tracked on the Q-Watch gauges. You can recharge Battery by interacting with electrical devices marked by a blue battery icon.
Resources also regenerate passively in certain situations. Larger open areas allow some resources to replenish over time, so circling back to previously looted locations when you're running low is worth doing before a tough section.
Choosing the right four gadgets before a mission matters more than anything else in your loadout. The game actively encourages you to match your tools to the environment rather than defaulting to the same setup every time.
Every gadget explained: what each one does and when to use it
| Gadget | Primary Use | Best Situation |
|---|---|---|
| Dart Phone | Disorients and disperses enemies, remote device activation | Long stealth sections, moving guards off patrol paths |
| Smoke Pod | Creates a blinding smoke cloud for groups | Crowded rooms, cover for repositioning |
| Laser Strap | Blinds enemies, cuts metal barrels, locks, and wires | Quick pickpockets, environmental takedowns |
| Flash Mine | Area stun, crowd control | Combat fallback, tight corridors |
| Missile Pen | Destroys heavily armored enemies and objects | Loud combat sections, armored targets |
| Shockwave Camera | Environmental explosion trigger | Combat, destroying grouped enemies |
| Shock Mine Earbuds | Placed traps on surfaces | Choke points, patrol route setups |
| Q-Watch Hack | Disables cameras, interacts with electronics | Disabling security, creating distractions |
Dart Phone
The Dart Phone is the most versatile stealth gadget in the game. Its stun duration outlasts every other gadget in the roster, which is what separates it from the Laser Strap. Use it when you need a guard out of position long enough to move through an area, grab an item, or set up a follow-up action. The extended incapacitation window makes it particularly effective against tougher targets who shrug off shorter stuns.
The Dart Phone also remotely activates objects in the environment. Combined with the Q-Lens, you can identify a hackable device, trigger it through the Dart Phone, and pull a guard away from a door without ever getting close.
Smoke Pod
The Smoke Pod is the group-control option. It creates a thick cloud that temporarily blinds enemies caught inside. The catch is that it works best when you can cluster enemies together first. Luring guards into a tight space before deploying it gets the most value out of each charge. In open areas with spread-out patrols, the Smoke Pod is harder to use efficiently.
The Smoke Pod also shines in mid-gunfight situations, cutting off enemy line of sight or creating a window to close the distance for melee. It's one of the few stealth gadgets that translates cleanly into combat scenarios.
Laser Strap
The Laser Strap is the jack-of-all-trades option. It blinds enemies (in and out of combat), slices metal barrels, cuts locks, and severs wires holding up chandeliers and hanging objects. The stun duration is shorter than the Dart Phone, but the environmental interaction options make it worth bringing on missions with complex layouts. It's particularly good for quick pickpocket windows.
Missile Pen
The Missile Pen is explicitly combat-focused. It's the go-to gadget for blowing up heavily armored enemies, functioning as a reliable answer to the enemies that soak up regular bullets. The Missile Pen sits alongside the Shockwave Camera as a gadget mostly designed for loud, fast takedowns. If you're running a stealth loadout, leave this one behind. If you're heading into a section where combat is unavoidable, it's the right tool for the job.
Watch Laser and environmental interactions
The laser watch is another combat-capable tool. You can push enemies into electronic devices like laptops and then trigger the watch laser to produce a stunning burst of electricity. Bond uses the watch laser more freely in First Light than in the films, where it typically appears as a one-time plot device. Here, it's a repeatable tactical option.
How to pick the right gadget loadout
The loadout decision comes down to what the mission is actually asking you to do. Here's a practical breakdown based on playstyle:
For stealth-focused missions:
- Dart Phone (guard dispersal and remote activation)
- Smoke Pod (group cover and movement)
- Laser Strap (environmental interaction and quick blinds)
- Q-Watch Hack (camera disabling and distractions)
For missions where combat is likely:
- Missile Pen (armored enemy removal)
- Flash Mine (area crowd control)
- Shockwave Camera (grouped enemy damage)
- Smoke Pod (mid-fight repositioning)
For a deeper look at cosmetic unlocks tied to missions and TacSim completions, check the 007 First Light suits and outfit unlock guide.
How does the Licence to Kill mechanic affect gadget use?
Bond cannot draw a firearm unless enemies are actively shooting at him. The Licence to Kill indicator appears at the top of the screen with a red glow when firearms become available. Outside of that window, gadgets are your primary offensive tools.
This is the design reason gadgets need to carry real weight. You can go over an hour between proper firefights depending on your approach, so relying on gadgets to handle threats quietly is not optional. It's the default mode of play.
The game also encourages swapping firearms with fallen enemies rather than stockpiling ammo. Once the threat is cleared, Bond holsters the weapon automatically and returns to spy mode.
The instinct system and how it connects to gadgets
Bond's instinct meter powers the social and tactical skills: Bluff, Lure, Confrontation, and Focus (bullet time). You build instinct by doing spy work. Eavesdropping on conversations, silently knocking out enemies, and clean kills all feed the meter.
Gadgets and instinct work together. You might use the Dart Phone to remove a guard, then spend instinct to bluff your way past a second one who got suspicious. This combination makes failed stealth recoverable rather than punishing. Instead of restarting because one guard turned at the wrong moment, you have a chain of tools to improvise with.
Managing gadget resources efficiently
Every gadget use draws from Battery or Chemical reserves. The Q-Watch gauges track both. Running out mid-mission is a real problem, so resource management matters.
Practical rules for keeping your reserves topped off:
- Recharge Battery at any electrical device showing a blue battery icon
- In large open areas, some resources replenish passively over time
- Revisit looted areas when running low before entering a new section
- Greyed-out resource icons mean you're already full for that type, so don't bother picking up more
The Q-Lens helps here too. Hovering over objects shows whether they're chargeable before you walk over to them.
Using gadgets to handle the radio backup problem
If your cover breaks and an enemy tries to call for backup, you have a brief window to stop the transmission. Look for the yellow antenna icon above the radioing enemy's head and neutralize them before the bar fills. Gadgets work for breaking the transmission alongside direct attacks.
This is one of the most time-sensitive situations in the game, and having a fast-acting gadget like the Flash Mine or Missile Pen ready can make the difference between a recoverable situation and a full compound alert.
For the complete picture on stealth mechanics including pickpocketing guards and neutralizing Watchers without combat, the 007 First Light pickpocket guide covers the full process.
Collectibles, challenges, and the TacSim
The Q-Lens has one more practical use beyond combat: collectible hunting. It highlights all interactable items in orange, which includes the game's 36 Cards, 23 Intel, 14 Mementos, 10 Postcards, and 9 Legacy items. A bookmark-style HUD tag appears near collectibles specifically, making them distinguishable from regular interactables.
The TacSim mode, unlocked after visiting Q's Lab at the end of Chapter 2, is where gadget mastery gets tested properly. It functions as the game's online component with leaderboards, escalating challenge missions, and unlockable cosmetics. IO Interactive has confirmed post-launch support for TacSim content, so the gadget sandbox extends well beyond the main campaign.
Completing all chapter challenges unlocks Bond's mission outfit for TacSim use. Many of those challenges require specific gadget approaches, so knowing your toolkit before attempting them saves significant backtracking.
For everything else the game has to offer, the full 007 First Light guides collection covers trophies, suits, playtime estimates, and more in one place.