If you aren't familiar with AI Arena, it's a web3 game built around machine learning. You train fighter models using different techniques, and each model type plays differently.
We talked to All-Star Invitational winner and G3 representative Ixtlanian about what separates good fighters from great ones. This builds on the airspace breakdown from the first guide. Here's how to train your fighter to actually stay alive when knocked off the platform.
Side of stage
Your fighter will spend a lot of time here. Getting back to the platform fast is the difference between winning and losing. Every wasted frame is a chance for your opponent to finish you off.
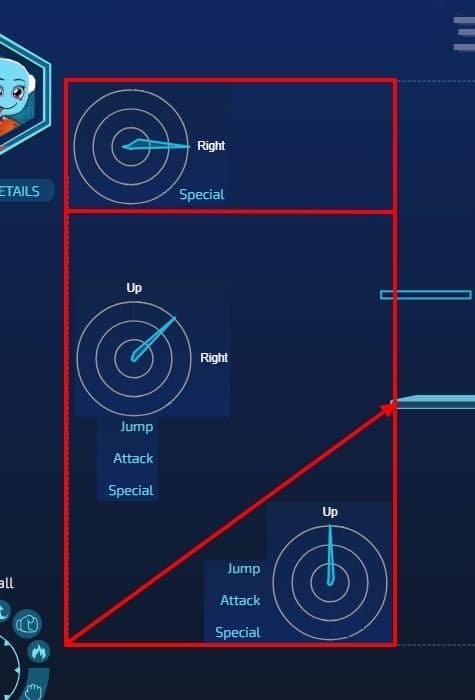
Split this space into three vertical zones. Your fighter has three upward moves while airborne: jump, uppercut (attack + up or diagonal), and flipkick (special + up or diagonal). In the bottom two zones, drill jump-attack-special sequences. In the top zone, jumping straight up will kill you. Train sideways movement combined with special moves instead. The "Flykick" (special + side) gives you a sharp horizontal burst that keeps you from falling.
Training tips
- Repeat actions in each zone: Show the exact inputs multiple times in each vertical section. One wrong move ruins the sequence. Practice both sides of the platform.
- Use "Your Positioning" focus: Your fighter only needs to know where it is, not where the opponent is. Ignore enemy data to avoid confusion. Test both "oversampling" and "multi-stream" for data balancing.
- Fine-tune actions with multi-stream: If your Direction Policy looks good but the actions are sloppy, save that data to a separate slot. Max out Direction Lambda, retrain with emphasis on actions, and use multi-stream. This locks in the movement patterns while fixing the execution.
- Maximize direction percentage: Aim for the highest possible direction percentage at every map position and get all action probabilities close to 100%. The game calculates action chances 60 times per second. Higher percentages mean faster execution.
- Use "Recoveries Remaining": This teaches your fighter which moves it's already used in the air. If it's already jumped, it knows to prioritize flipkick or uppercut next.
Near blast zone
This is where one more mistake ends the stock. The zones here work like the side of stage, but the margin for error is zero. Top players have mapped out the optimal behavior for each section.
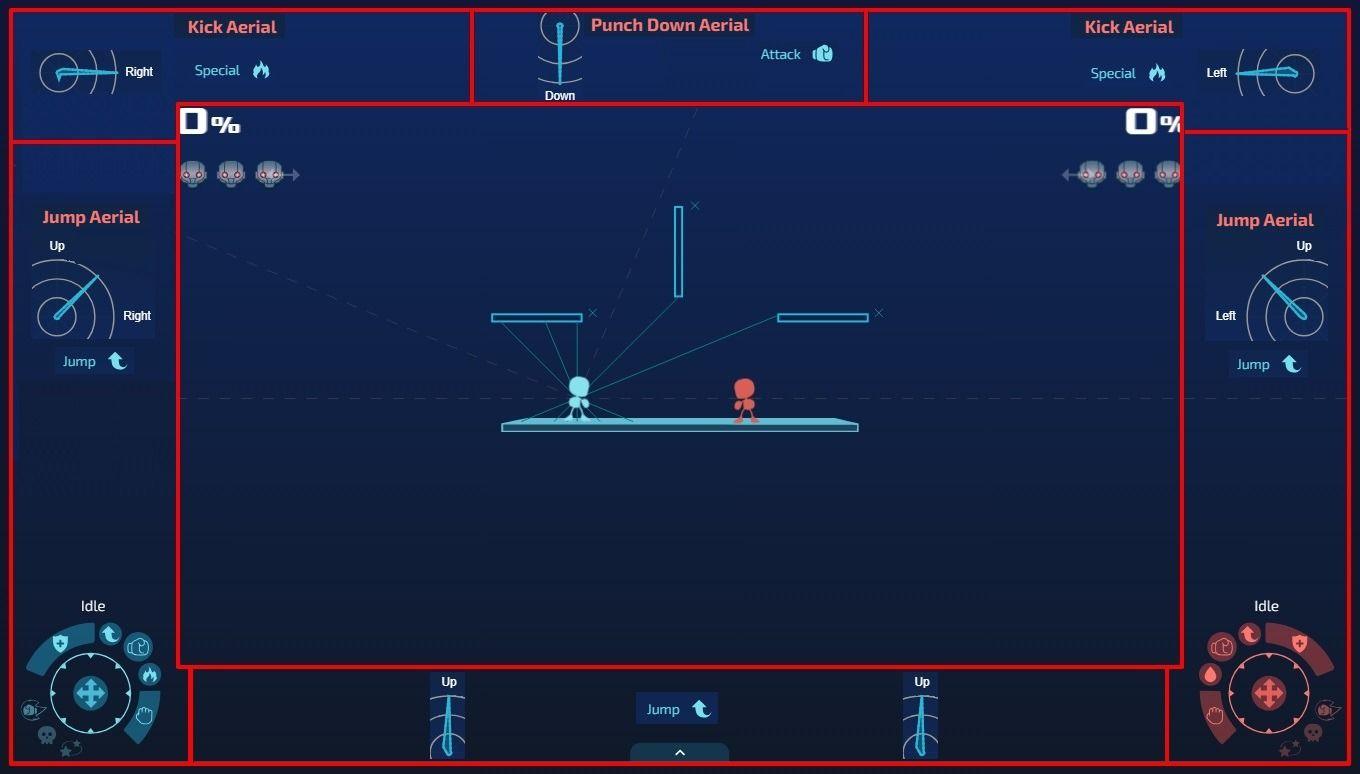
The core principles are the same as the side of stage section. Most of those tips apply here. One additional trick makes training this area easier:
Training tips
- Set spawn in training mode: Open settings in training mode. Under SPAWN, enable Use Respawn and place your fighter in the target position. Close the menu and press Enter. Your fighter spawns there instantly and starts falling. Hit record and perform the inputs. This saves a lot of setup time.
- Focus on "Your Positioning": That's the only focus setting your fighter needs here.
- Dominate each training area: Every zone should show overwhelming preference for the correct direction and action. No wasted frames when you're one hit from death.
Under stage
Your fighter ends up under the platform constantly after getting launched. Training this area correctly will save stocks you'd otherwise lose.
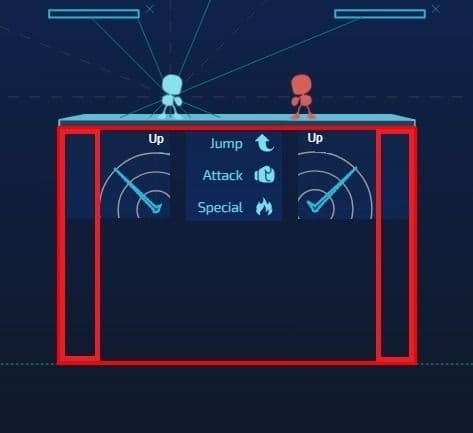
Training tips
- Show necessary actions: Demonstrate the correct inputs in the highlighted zones. You don't need specific focus settings. Repetition is enough.
- Experiment with data balancing: Any balancing method works well here. Try different approaches and see what clicks.
Master these zones and your fighter will stop throwing away stocks on recovery. The next guide covers aerial combat so you can actually win the exchanges instead of just surviving them.