
Mines don't care about your gear score. Step on one wrong, step off too early, and you're eating an explosion while some other Raider scoops the 300 points you were eyeing. The Locked Gate mine disarming trial, introduced as part of the Shrouded Skies update and currently featured in Week 23's weekly trials, is one of the more unique objectives in ARC Raiders. It rewards map awareness and movement efficiency far more than combat skill. Get the route right and you're looking at 20,000+ points in a single 40-minute run.
What are buried mines and how do they work?
Buried Mines are pressure-sensitive explosives partially embedded in the ground near points of interest on the Blue Gate map. They exist as a permanent fixture across ARC Raiders maps, but they become the weekly trial objective specifically during the Locked Gate event on Blue Gate.
Each mine has two reliable tells. The first is visual: an active mine emits a red light circle on the ground around it. The second is audio: a steady beeping sound that gets louder as you close in. That audio cue matters more than you'd think, because mines hidden in tall grass or behind terrain objects are often invisible until you're right on top of them. Slow down and listen when you enter a mine zone.

Red light marks active mines
How to disarm a mine
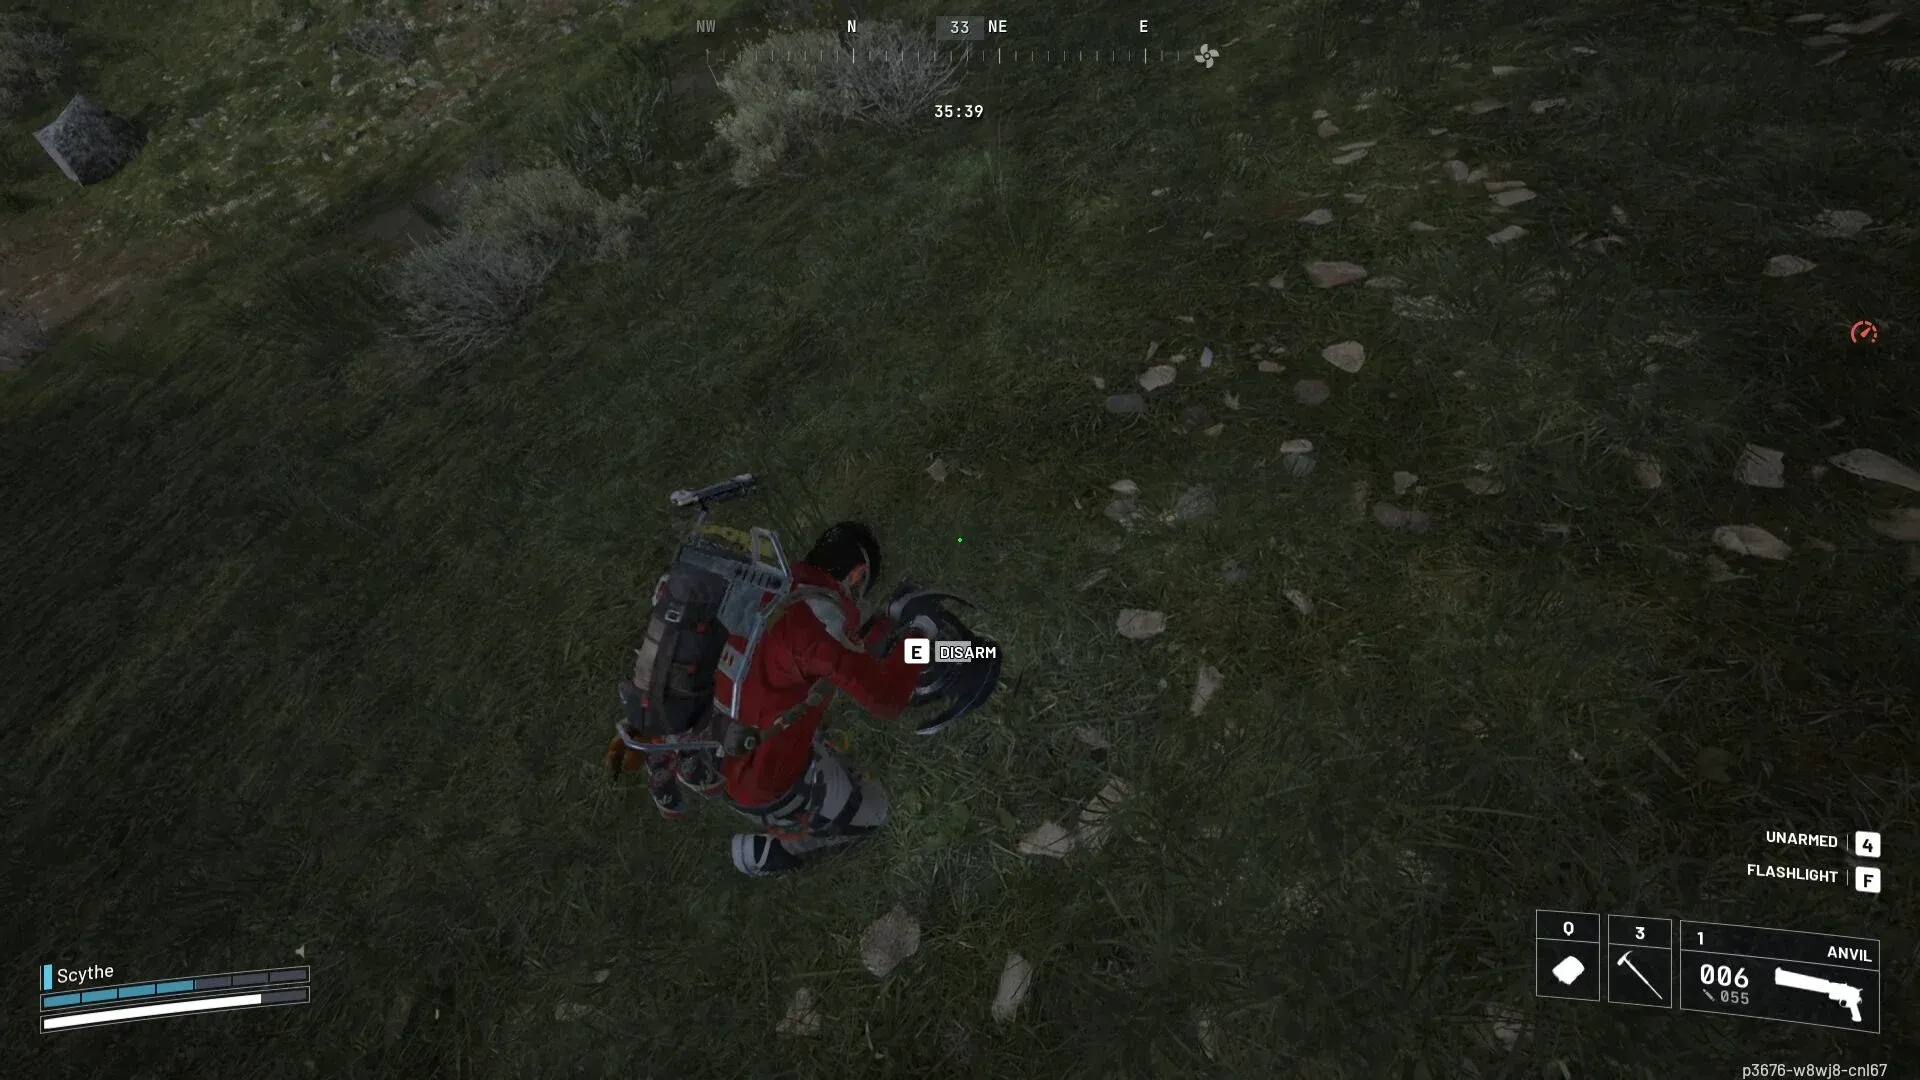
- Approach the mine carefully, listening for the beeping sound
- Walk directly onto the mine to trigger the disarm prompt
- Hold the interact button when the "Disarm" prompt appears
- Stay completely still until the animation finishes
- Move to the next mine immediately after
warning
If you step off the mine before the disarm completes, it detonates. This deals significant damage and can kill you outright. Do not move, do not panic, finish the disarm.
Shooting a mine also triggers detonation, and nearby explosions from grenades or other mines can chain-detonate. When you're in a dense mine zone, keep your trigger discipline tight.
According to Destructoid's coverage of the trial, crouching with Ctrl while moving through a mine area lets you get close without triggering mines accidentally, giving you a moment to assess the layout before committing to a disarm.
If you approach a mine and the disarm prompt never appears, another player already cleared it. Move on.
Where are the mines on Blue Gate?
All mines during the Locked Gate event spawn near the four security key locations on Blue Gate. These are the same POIs where you'd normally hunt keycards for the main Locked Gate objective:
- Pilgrim's Peak (northeastern section, highest ARC density including Rocketeers)
- Reinforced Reception (between Raider's Refuge and Pilgrim's Peak)
- Ancient Fort (bottom middle of the map)
- Raider's Refuge (northwestern section, fewest mines on average)
What's the best loadout for the mine disarming trial?
This trial is about speed, not firepower. Your goal is to cover ground between four POIs in 40 minutes while competing with other Raiders for the same mines. Build your loadout around mobility and survivability, not combat.
The Photoelectric Cloak earns its slot specifically at Pilgrim's Peak, which according to MetaForge's guide has the highest concentration of flying ARC units. Pulling a pack of Rocketeers while you're standing still on a mine is a bad time.
Can you run this trial on a free loadout?
Yes. Running a free loadout is a legitimate option, especially if you just want the 3-star reward. The main cost is fewer Adrenaline Shots, which slows your rotation between POIs. For a risk-free 3-star run, it works fine. For pushing 20,000+ points, a proper loadout with plenty of Adrenaline Shots makes a meaningful difference.
info
Use aggression-based matchmaking to land in friendlier lobbies. Less PvP pressure means you can focus entirely on mine clearing speed rather than watching your back.
How to maximize your score: routes and strategies
Each mine awards 300 points. The 3-star reward threshold sits at 4,000 points, which requires 14 mines. Hitting 20,000+ points means clearing approximately 67-70 mines across a full run.
Solo route strategy
Spawn location determines your starting point. Head immediately to whichever of the three high-density locations (Ancient Fort, Pilgrim's Peak, or Reinforced Reception) is closest to where you drop in. Clear it completely before moving on.
- Start at your nearest high-density POI and clear every mine using audio cues to find hidden ones
- Rotate to Pilgrim's Peak next (or whichever major location you haven't hit)
- Move to Ancient Fort, burning Adrenaline Shots to outpace other Raiders
- Finish at Raider's Refuge, which consistently has fewer mines than the other three locations
- Extract once you've swept all four zones
According to MetaForge's guide, a solo run in a competitive lobby typically yields between 5,000 and 15,000 points. An unusually empty lobby can push that higher.
Team strategy: split and conquer
Team play changes the math entirely. ARC Raiders uses shared scoring for weekly trials, meaning every point any team member earns gets added to every team member's total. Splitting up to cover multiple POIs simultaneously is dramatically more efficient than moving as a group.
For a 3-player team, the optimal split according to both MetaForge and Arc Raiders Hub:
- Player 1: Pilgrim's Peak
- Player 2: Ancient Fort
- Player 3: Reinforced Reception
- Whoever finishes first rotates to Raider's Refuge
This approach can push your team above 20,000 points with clean execution. Communicate regularly so players who finish early know where to rotate, and coordinate extraction so nobody dies before scoring.
warning
If a teammate dies before extracting, they get zero points for that run. Don't sacrifice players chasing a few extra mines when the timer is running low.
Fast 3-star run (minimum time investment)
If you just want the 3-star rewards without a full run:
- Drop in on a free loadout
- Keep resetting until you spawn near Ancient Fort, Pilgrim's Peak, or Reinforced Reception
- Clear mines at that location until you hit 14 disarms (4,200 points, just above the 4,000 threshold)
- Extract immediately
Time management and the 40-minute window
The Locked Gate event runs for 40 minutes per instance. You have time to cover all four zones if you move efficiently, but other Raiders are competing for the same mines, so the first 15 minutes matter most.
- First 15 minutes: Hit your highest-density cluster immediately. This is when the most mines are available before other players clear them.
- Minutes 15-30: Rotate through remaining clusters, using audio cues to find mines others may have missed.
- Final 10 minutes: Start moving toward extraction. The community discussion on the Steam Locked Gate discussions thread reinforces the point: obsessively checking the map hoping for more mines in the final minutes is wasted time. Extract and bank your score.
The trial only activates during the Locked Gate event rotation, so check an event timer before queuing to confirm the window is active on Blue Gate.
For more strategies across ARC Raiders' weekly trials and other events, browse the full guides section for additional coverage.