
Scattered across the world of Pywel, Crimson Desert's 37 Ancient Ruins puzzles are some of the most rewarding exploration content in the game. Each one guards an Abyss Cresset, which hands you both a fast travel point and an Abyss Artifact you can spend on new skills and stat upgrades. A few of these puzzles are dead simple. Others will have you walking in circles until you realize the clue is painted on a wall three regions away. This guide covers every location and solution, organized by region so you can clean them up efficiently.
What are Ancient Ruins and why should you complete them?
Every Ancient Ruins site shows up on your map as Mysterious Energy, a fog-of-war icon with a question mark, once you get close enough. You can also spot them at a distance by using Blinding Flash to reveal glints of light on the horizon.
Completing all 37 unlocks the Puzzle Solver trophy and achievement. More practically, the Abyss Artifacts you earn are the primary currency for your skill tree, so skipping these puzzles means leaving character progression on the table. You can track your progress through the Journal: Challenges tab at any time.
There are also four Maze challenges mixed into the total count. These work differently from standard puzzles, requiring you to find Engraved Stones and place them in receptacles rather than solving a single environmental mechanism.
Puzzle types: what mechanics will you encounter?
Before diving region by region, it helps to know what you're walking into. Crimson Desert uses several recurring puzzle formats across all 37 ruins.
Hernand region solutions
Central Hernand
Meandering Hills Ruins (Ancient Ruins #11) is unmissable since it's part of Act 2: Unexpected Gift - Reunion. Use Nature's Grasp to lift the stone wall, then hit the three stone plates with Force Palm in this order: middle, left, right.
Duskwood Waterside Ruins (#12) sits directly west of Kilnden Workshop. Pick up the white stone near the Abyss Cresset and place it in the empty row slot to complete a line of five matching stones. Think of it as a simplified go board.
Duskwood Hill Ruins (#4) is a pillar height puzzle with four sockets controlling different combinations of the five pillars. Your target is matching the height of the first pillar on the left. The efficient sequence:
- Socket 2 to raise pillars two and five (not quite to target height)
- Socket 3 to raise pillars two, three, and four (pillar two goes above target; three and four fall slightly short)
- Socket 4 to raise pillars three, four, and five (three and four reach target; five goes over)
- Socket 2 again to lower pillars two and five back to target height
Dragon's Stone Chamber Ruins (#32) is a mural puzzle inside a cavern east of the Greymane Camp. The painting inside hints at external clue locations. Facing the dragon statue, the three dial solutions are: left dial with the sun at the top, middle dial with the C-shape pointing left and slightly upward, right dial with the outer swirl on the bottom left.
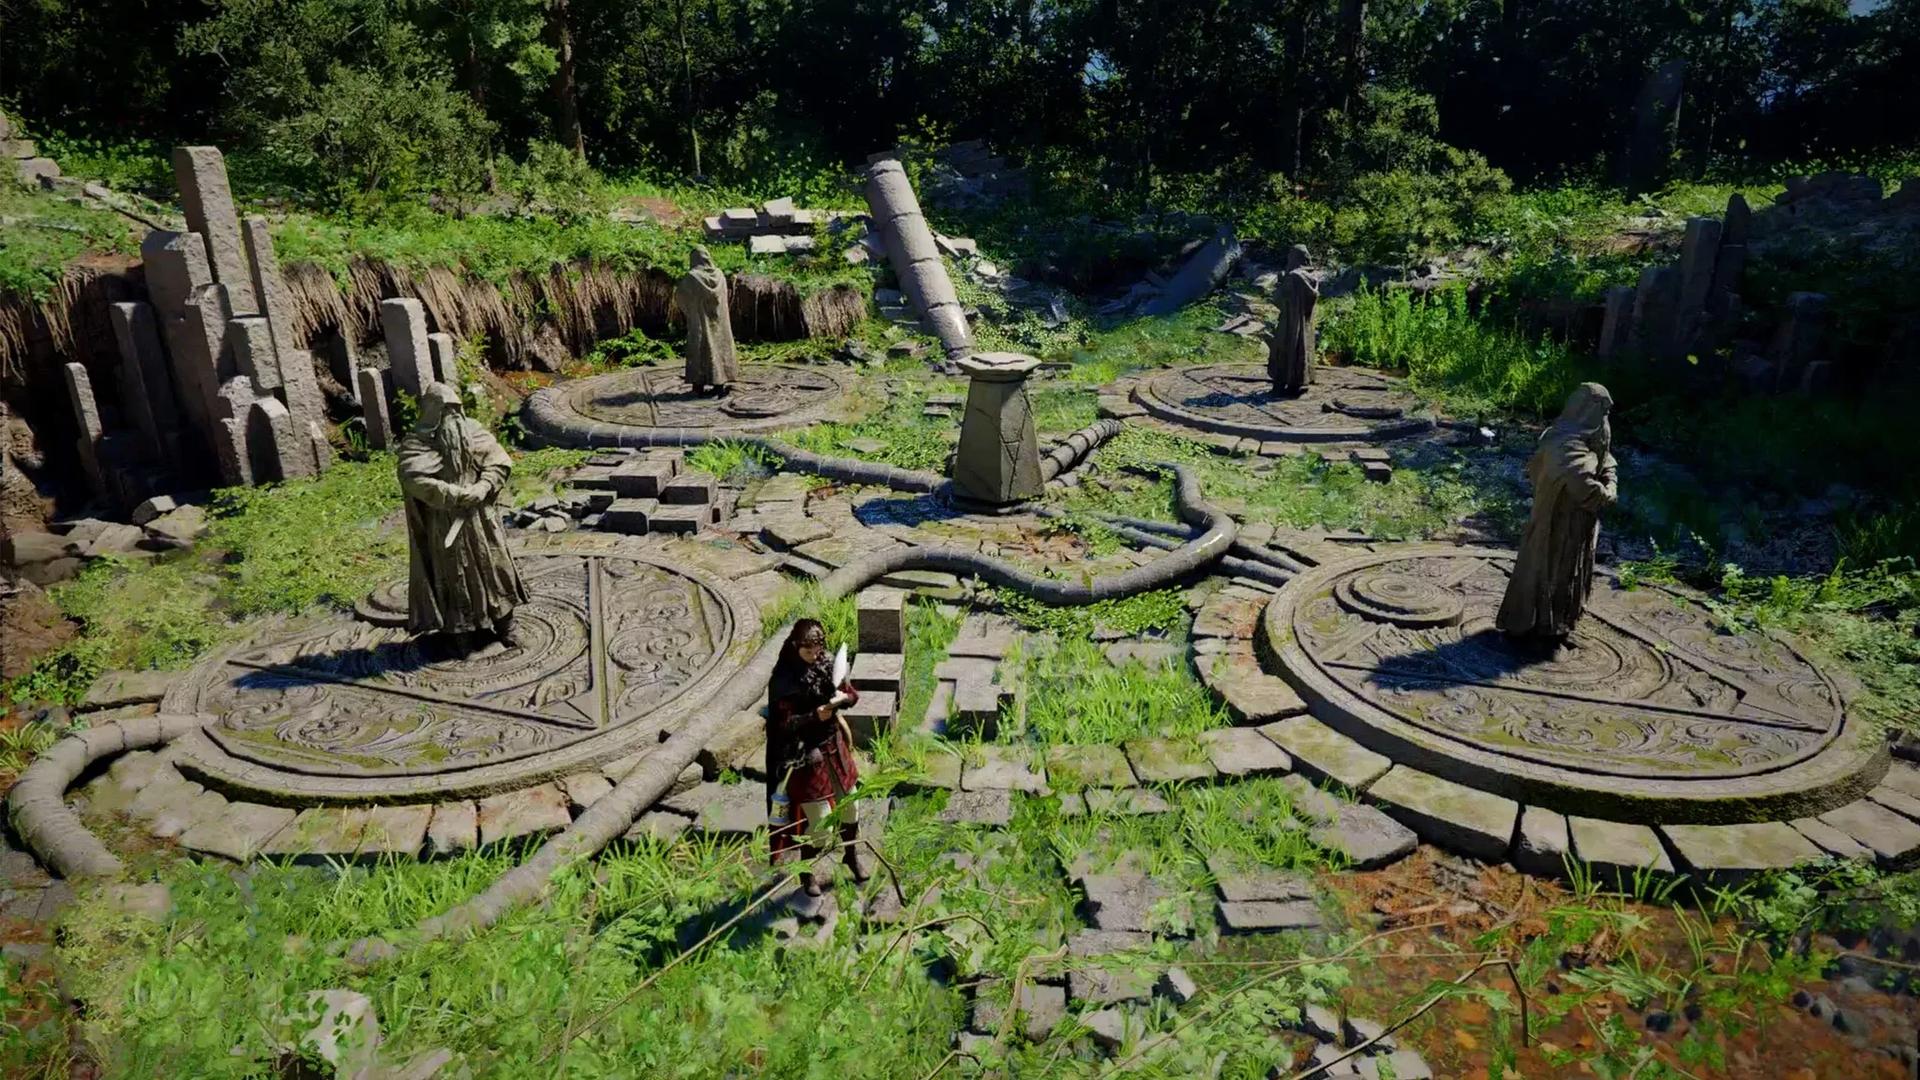
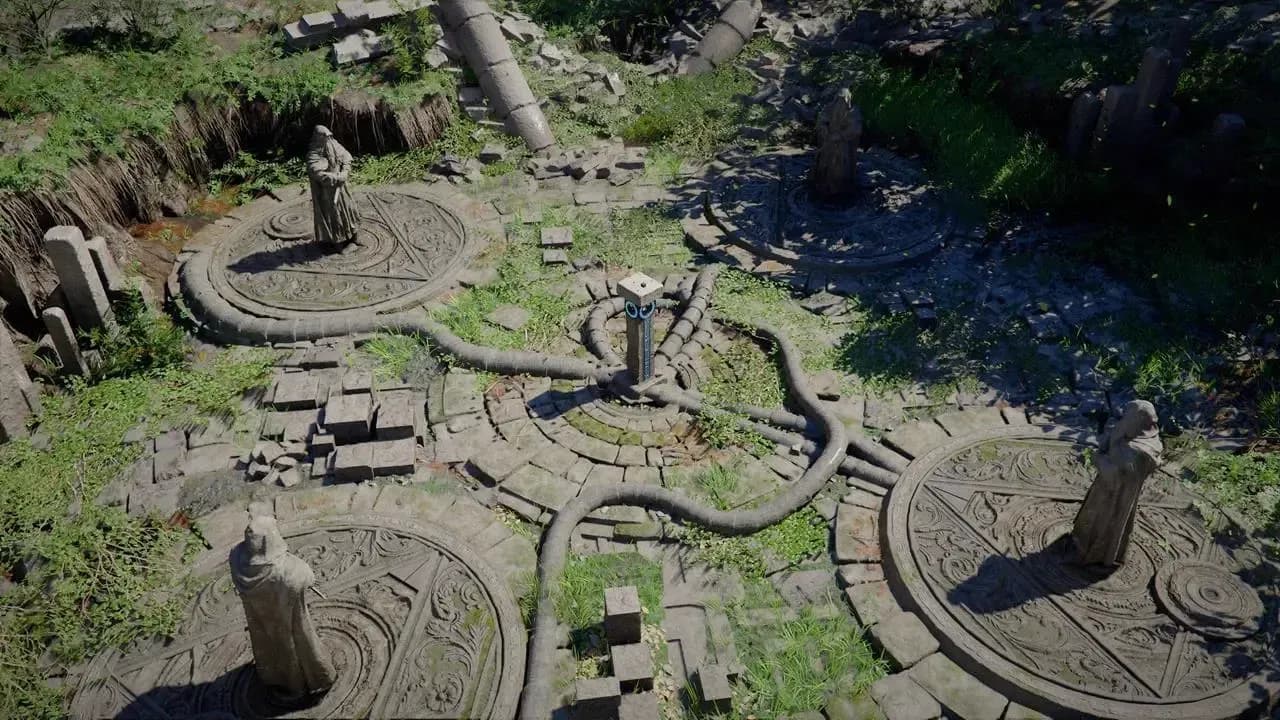
Halssius Conflux Ruins (#13) is the first Angel Statue puzzle most players encounter. Clear any loose pillars off the central area first, then use Stab on the mechanism:
- Round 1: Rotate to the plate (or oval mirror) symbol
- Round 2: Rotate to scales, harp/lyre, and vase
- Round 3: Rotate to mirror/plate, scales, harp/lyre, vase, and two horse symbols
Hunter's Cabin Ruins (#5) uses Visione to locate a Memory scene, then requires lighting all five lanterns in the area. Use Blinding Flash on any unlit ones.
Haunted Hill Ruins (#27) is a Water Drain puzzle. You need Nature's Snare unlocked (Spirit/green branch, lower-left of the Skills menu). Cast it on the first mechanism to partially drain the pool, then cast it on the second mechanism that becomes accessible once the water level drops.
Angel Statue dial rotation puzzle
Southern Hernand
Precipice of Echoes Ruins is a Stepping Stone Symbol puzzle south of Fort Perwin. Step on the starting plate, then walk to its matching symbol without crossing other active symbols or revisiting grey stones. Round one has one pair, round two has three pairs, round three has five. Bring out your lantern while walking to prevent accidental sprinting onto wrong tiles.
Sunrise Plains Ruins is a Statue Rotation puzzle south of Glenbright Manor. Rotate each statue toward the center pedestal using the dial on its back. Note that interacting with some statues will move others simultaneously. Listen for the audible stone "thunk" to confirm correct alignment.
Steel Mountains Ruins (#2) requires finding a Mallet on site and striking the bells in the sequence shown on the nearby board. Hit bells one through six in ascending order, then reverse back from four to one.
Azure Moon Labyrinth Ruins is a mural puzzle in a hidden chamber beneath the Witchwoods, near where you meet Elowen the Witch. The solution requires reading a mural inside the labyrinth that references five trees in Pororin.
Northern Hernand
Deepfog Basin Everfrost Ruins and Deepfog Basin Dragon Head Ruins sit close together on the mountain pass northwest and west of Calphade respectively. The Everfrost puzzle is another pillar height challenge identical in structure to Duskwood Hill. The Dragon Head Ruins is a Moving Block sliding puzzle where you use Stab to drag tiles into position to form a complete image.
Arboria Forest Ruins (#23) is a Water Fountain puzzle west of the Hills of No Return. Use Stab on each fountain pillar's socket and rotate until both waterspouts on each pillar point inward, filling the basin.
Drakesfall Gorge Ruins (#14) is Red Light, Green Light. Step on the stone plate at the far edge to raise the soldier statues' swords, then advance toward the king statue at the opposite end. Stop completely whenever the king statue turns and its eyes light up. If its eyes turn red, you restart.
Ancient Rift Maze is one of the four Maze challenges, located at the northern edge of Hernand. Three sets of runestones bar small nooks, each needing Blinding Flash - Concentrated Light to raise or lower pillars to equal height:
- Runestone #1: Hit the fourth (rightmost) rune once
- Runestone #2: Hit the first (leftmost) rune once
- Runestone #3: Hit the sixth rune twice, then the first rune twice
Each nook contains a block with a symbol. Use Force Palm to reveal an Engraved Stone. Collect all three, then place them in the sockets at the main fog-of-war marker to spawn the Abyss Cresset.
Pailune region solutions
Hidden Chamber of Wisdom (#1) sits on the snow-capped mountains in the center of Pailune. The entrance stone depicts wind blowing, and the mural inside shows elemental symbols matching the game's unlockable abilities. Push these four blocks using Force Current:
- Wind: top-middle
- Lightning: top-right
- Ice: mid-left
- Fire: lower-left
Completing this rewards the Memories of the Northern Winds, which reveals more hidden locations across Pailune.
Silverwolf Mountain Ruins (#2) and Five-Finger Mountain Icy Ruins (#3) both involve frozen pools. Destroy the ice with Turning Slash first, then drain the water using Nature's Snare on the exposed mechanisms before interacting with the puzzle beneath.
Five-Finger Mountain Valley Ruins (#4) uses revolving door statues. Push the stone carts to the edge to reveal each statue, then shoot the right-hand side repeatedly to rotate it until the correct face appears with glowing eyes. Repeat for all three.
Black Wall Ruins (#5) is the shortest puzzle in the game. Use Nature's Grasp to lift the stone wall, walk through to see the Abyss Cresset, then return outside. Done.
Demeniss region solutions
The Screaming Vault is a mural puzzle west of Rustleleaf Farm. Drop into the hole to find the vault. The scarecrows on the mural show the correct disc orientations:
- Left room: Vertical bar of the swirl at the 11 o'clock position, hook facing 9 o'clock
- Middle room: Two circles at the top of the triangles
- Right room: Archer's bow facing 3 o'clock
Golden Plains Ruins (#22) has four statues that need to face the center. Burn the thorny brambles blocking the fourth statue with Blinding Flash - Concentrated Light first. Facing north, number the statues 1 through 4 from top-left to bottom-right. Spin statue 2 to face the middle, spin statue 1 so that statue 3 faces the middle, then spin statue 4 so both 2 and 4 face the middle.
Bamboo Forest Seonangdang Ruins (#19) near the Serpent Marsh waterfalls is a cairn-stacking puzzle. Pick up the three smaller stones on either side of the central pile and place them on the middle cairn in order from largest to smallest, corresponding to red, blue, then yellow ribbons.
Kingshield Mountains Ruins near Tariv works identically but uses clay pots instead of stones. Stack four pots largest-to-smallest, keeping each new addition centered to maintain balance.
Wiggling Hill Ruins combines a Water Drain with a lantern-lighting task. Drain the pool using Nature's Snare, then light all five lanterns in the area.
Fuming Lands Ruins (#24) is a Water Fountain puzzle, but the mechanisms are covered in vines. Burn them with Blinding Flash - Concentrated Light or fire arrows, then use Stab to rotate each mechanism until its waterspout fills the fountain.
Trembling Woods Ruins uses three dials controlling rings on a clock-like wall mechanism:
- Right dial: Inner ring with sun and moon. Sun to 2 o'clock, moon just past 6 o'clock, eclipse just past 9 o'clock
- Middle dial: Rotate the large circular opening to surround the sun symbol
- Left dial: Handle is broken, use Stab. Rotate outer dial's two small circles to surround the moon and eclipse symbols
Smoking Lands Desert Mouth Maze is the most complex Maze challenge. A central diagram represents 11 doors marked with sun and moon symbols. One is already correct. Use Force Current to flip each remaining door to its correct symbol. The final door is in a small vine-covered nook in the bottom-northwest section.
Delesyia region solutions
Beardtree Hills Rock Ruins (#13) is a Stepping Stone Symbol puzzle west of Redfox Trading Post. The third round requires stepping on every available floor plate, so plan your path before moving. A single wrong step resets the entire round.
Beardtree Hills Sunflower Ruins (#25) is a straightforward Water Drain. Use Nature's Snare on both spinning mechanisms to lower the water level.
Memory-Laden Ruins is a mural puzzle with clues located in the desert region to the north, not in Delesyia itself. Find the glyphs etched on large trees at Red River, near the Shadow Cliff Watch Camp and Bursada Ruins. The solution: push both blocks with up/down arrows and both blocks with fish-boat symbols. Ignore the diagonal arrow blocks.
Timberdale Cliff Ruins (#5) requires burning thorny vines first, then using Force Current to push wall blocks. Pushing any block also raises or lowers adjacent blocks, so work through the three wall sections with trial and error. Use Blinding Flash to preview the correct connected path.
Timberdale Gorge Ruins combines water drainage with the block-pushing mechanic. Destroy the cracked wall with Turning Slash to spill the water, then push the wall blocks to conduct energy once the area is clear.
Blue Thicket Ruins (#9) is one of the simpler Delesyia puzzles. Use Nature's Grasp to lift the movable walls on both sides of the central circular device. Each lifted wall locks a large object outward, redirecting energy to the center.
Mount Benus Ruins is another Red Light, Green Light challenge, but harder than Drakesfall Gorge. Kill the Abyss-tainted creatures first since they can interrupt Kliff. Burn vines and clear cobwebs before starting. The ground is muddy and Kliff can slip when stopping abruptly, which counts as movement. If you want to sprint, pull out your lantern to come to a complete stop before the statue turns.
Grey Forest Ruins east of Mount Benus is another Angel Statue puzzle. Read the beam, rotate the dial with Stab to match each round's symbols.
Crimson Desert region solutions
Burhum Maze near the Spire of the Sun is a bandit-occupied settlement. Find three Engraved Stones hidden in rooms with stone plates (hit them with Force Palm), then bring all three to the receptacles in the tallest tower.
Dawnreach Maze northeast of Tashkalp works similarly, but some rooms are only accessible after using Force Palm to push leaning towers upright. Collect the Engraved Stones and place them in the receptacles.
Red River Ruins in the southeastern corner of the Crimson Desert region uses a single lever to reveal three rotating totems behind closing walls. The walls close faster than in the Pailune version. Use Focused Shot to slow time and mark multiple totem targets simultaneously. Check for red eyes on each totem to confirm the correct carving faces you.
Red River totem focused shot timing
What rewards do Ancient Ruins give you?
Every completed puzzle activates an Abyss Cresset, which gives you two things immediately: a permanent fast travel point and an Abyss Artifact. Some ruins also drop unique items or memory collectibles that reveal additional hidden locations on the map. The Dragon's Stone Chamber, for example, gives the Memories of Abundance, while the Hidden Chamber of Wisdom in Pailune drops Memories of the Northern Winds.
Abyss Artifacts feed directly into the skill tree, letting you unlock new combat abilities or boost core stats like health, stamina, and spirit. Prioritizing Ancient Ruins early accelerates your build significantly compared to players who ignore them until late in the campaign.
For more Crimson Desert content covering bosses, builds, and exploration challenges, browse the latest guides at GAMES.GG.