
Chapter 4 of Crimson Desert opens on a hangover and ends with a trip through an Abyss rift. Between those two points, Kliff repairs a broken workshop, bails out a reckless companion, infiltrates a secretive academic institution, and fights a scholar-turned-monster in the sky. It's one of the game's most varied chapters, and a few of its puzzles will stop you cold if you don't know what you're doing.
What quests are in Chapter 4?
Chapter 4 contains three main quest lines, each unlocking sequentially:
The chapter flows directly from Chapter 3: Howling Hill, and leads into Chapter 5: Guest Unbidden once you return to camp at the end.
Kilnden Workshop generator puzzle
How to complete the Mysterious Iron Pot quest
The morning after the Greymanes' camp celebration, an explosion near the Kilnden Workshop pulls Kliff away from his recovery. Head to the workshop marker and speak with the man in the golden helmet, Grimnir, to kick off the repair sequence.
Fix the Ancient Generator
The generator puzzle uses a yellow lever and a wooden lever to align four symbols. The goal is to get all four symbols matching, at which point they turn blue and power activates. Work through it in two steps:
- Push the yellow lever right, then push the wooden lever right to align the first two symbols.
- Move the yellow lever to the middle, then push the wooden lever left until the third symbol locks into place with the fourth.
All four aligned symbols turning blue confirms success.
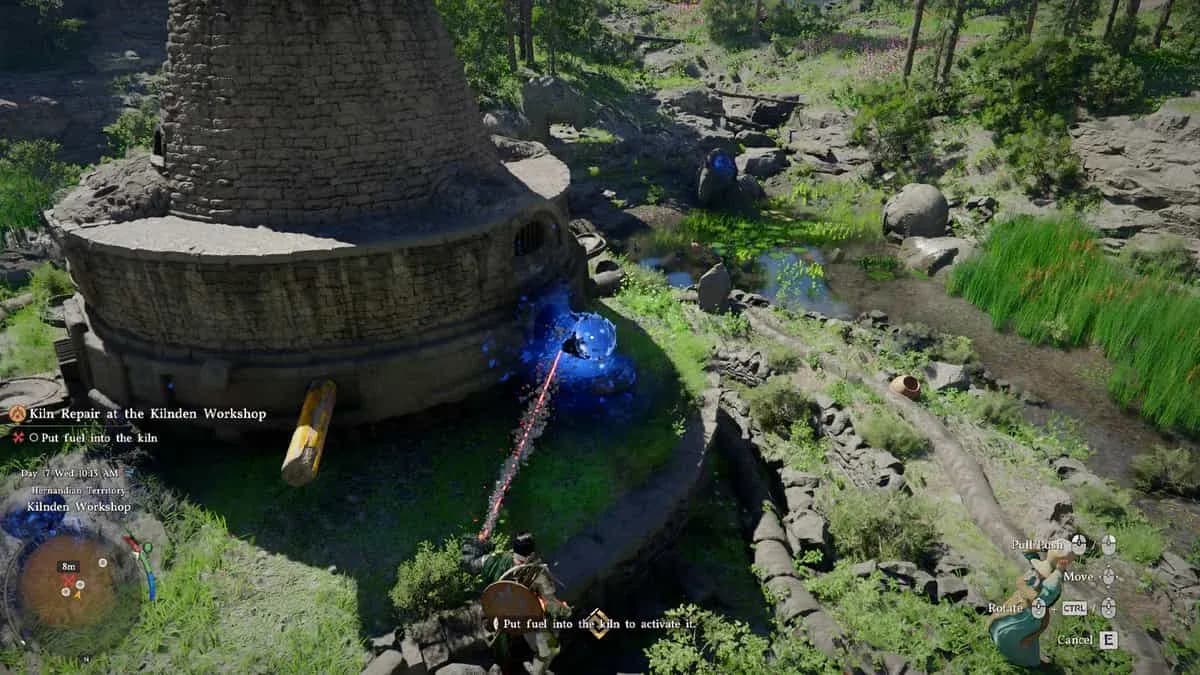
Fix the three kilns
Three kilns around the workshop need attention, and you can tackle them in any order.
Disconnected Kiln: The power cable on the side isn't attached. Interact with it to reconnect, then use the wooden lever to rotate the structure and activate it.
Dismantled Kiln: This one requires Axiom Force to reassemble. Pick up the broken circular piece to the right first, then grab the chimney piece from behind the kiln. Stack them onto the kiln base in that order. Once placed, climb to the top, jump, and use Force Palm to lock the pieces together. Push the wooden lever to maximum to activate.
Fuel Kiln: The furthest kiln needs 5 electrified fuel balls loaded into its opening using Axiom Force. Their locations:
- 2 are sitting directly next to the kiln
- 1 is at the small cave entrance nearby
- 1 is just behind the kiln
- 1 sits in the eye socket of the bird statue
After loading all five, rotate the wooden lever to activate. Once all three kilns are running, report back to Grimnir.
Obtain the Mysterious Iron Pot
Grimnir rewards Kliff by crafting a special item. After waiting for him to finish, return and rotate the stone pillar as directed. A pot launches out from the entrance in a cloud of smoke. Speak with the worker Togrum to learn what it does: the Kuku Pot can store objects of any size, which Togrum proves by having you stuff a boulder inside.
How to complete the Daily Life quest
Back at Howling Hill, Andrew flags you down about Yann, who has apparently gone missing. Before the conversation ends, Duane arrives with worse news: Yann is locked in a cage at the fighting pits after causing financial trouble for the organizers.
Save Yann at the arena
Ride with Duane to the arena. The pit operators won't take money as compensation. What they want is a crowd-pleasing performance from Kliff in their fighting pit.
Before speaking to the host, open your quick menu and equip your fists. Using any weapon, bow, or other equipment during the fights results in immediate disqualification. You need to win 3 consecutive unarmed bouts. There's a small entry fee per attempt.
After winning all three fights, speak to the guards at Yann's cage. They release him, and you ride back to Howling Hill together.
Win the Archery Contest
Back at camp, Yann mentions Naira and an archery contest. Find Naira at the bonfire with Duane. She's been mocking Duane's poor performance, and he wants Kliff to enter and win on his behalf.
Ride to the contest location and speak to the host. The rules: first player to hit 10 targets wins. Keep your bow aimed around the center target area so you can shift to any direction quickly. Secure 10 hits to complete the quest and spare Duane's dignity.
How to complete Forbidden Knowledge
This is the chapter's longest and most story-heavy quest. It starts with a letter and ends in the Abyss.
Get Alustin's Letter and reach Scholastone
Head south toward Hernand as directed. A stranger bumps into Kliff on the street and passes him a letter from Alustin. Read it in your inventory. The letter references the Scholastone Institute and notes you'll need proper attire to get inside.
Visit the Hernand Fence and tell the owner Darroch you're collecting the alchemist's belongings. He hands over the Scholastone Uniform.
The objective marker sits in the far southwest of the map, so prepare for a long ride. At the destination, climb the mountain to find a cave entrance blocked by diamond-encrusted rock. Here, Kliff learns Focused Force Palm, a new ability that lets him charge Force Palm through walls to destroy obstructions. Use it to clear the cave entrance and gain access to Scholastone.
Equip the Scholastone Uniform before speaking to the large guard near the rock formation at the top of the hill. He'll point you toward the institute. Follow the path to find the Dean, dressed in blue and white. He leads you to a scholar named Octavius, who is studying the Abyss.
Help Octavius with the experiment
On the day of the experiment, head underground and interact with the hatch panel. Press the 5 buttons in this exact order:
- Top left corner
- Bottom right corner
- Bottom left corner
- Top right corner
- Middle
This powers the device above and opens the hatch. Return to the round plaza above and locate 4 cube batteries. Use Axiom Force to carry each battery to one of the four pillars, then deactivate Axiom and use Force Palm to push it into the slot. Repeat for all four.
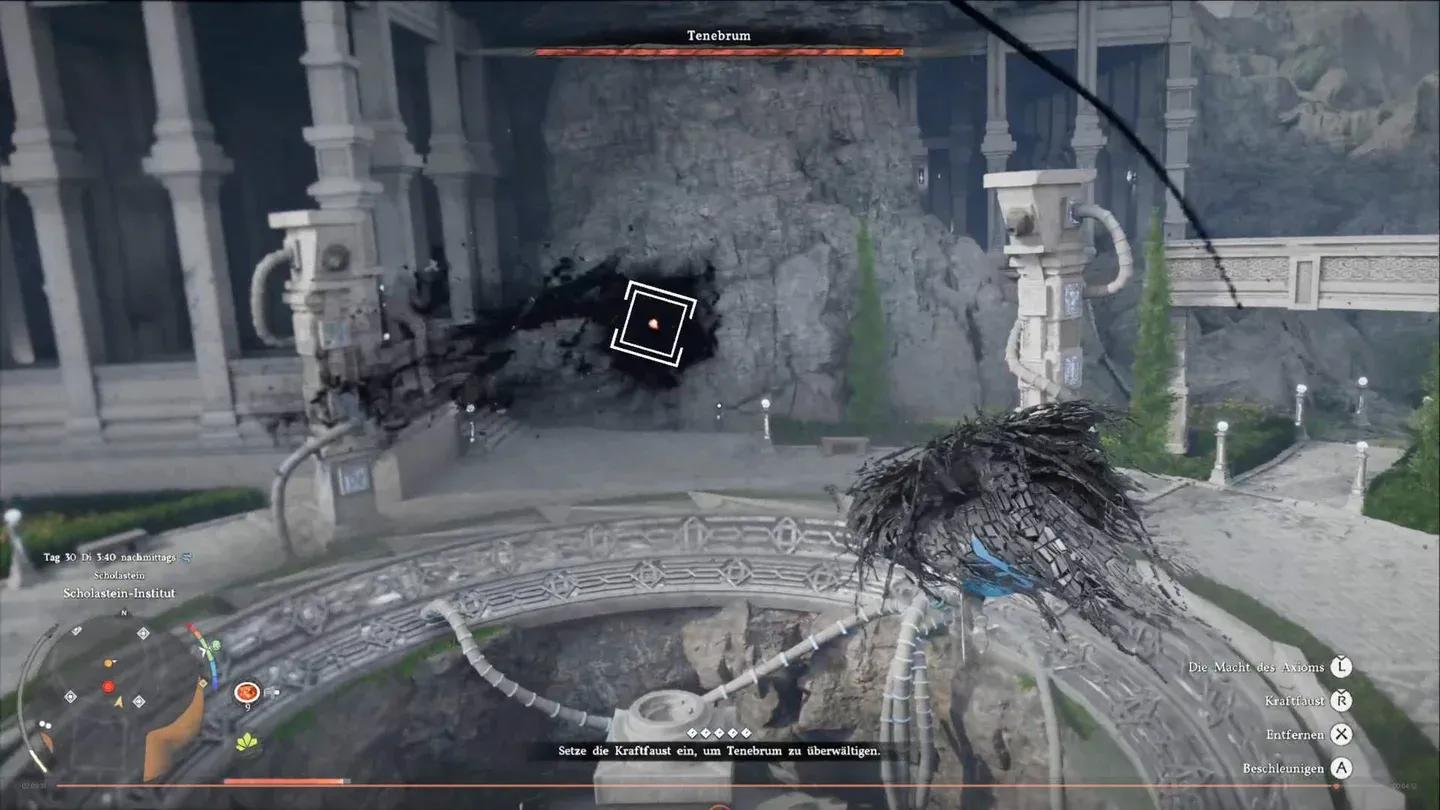
Once the device activates, Octavius begins his Abyss portal attempt. The experiment destabilizes quickly. Use Axiom Force to remove the unstable core. Octavius ignores the warning, pushes Kliff aside, and gets absorbed by the Abyss, transforming into Tenebrum.
How to defeat Tenebrum
Tenebrum is a ranged aerial enemy that you cannot reach with standard ground attacks. The only effective method is entering flight mode and striking with Force Palm.
The fight is more awkward than difficult. Maintaining flight while aiming Force Palm accurately takes adjustment, since you're constantly drifting. When your spirit depletes, land on the ground and use the restore skill before going airborne again.
There's no shortcut here. Patience and repeated Force Palm strikes in flight mode are the entire strategy.
After Tenebrum falls, a portal to the Abyss opens at the tower up the hill.
Tenebrum aerial boss fight
How to solve the Spire of the Stars puzzle
Use the cube the Dean provided to open the Spire's door. Inside, the elevator won't move until you solve the room's puzzle.
Step 1: Hit the 3 yellow panels on the room's sides with Force Palm to activate them. Each one reveals a small item called an Engraved Stone.
Step 2: Collect all 3 Engraved Stones and place each into one of the wall sockets.
Step 3: Arrange the 4 symbols in the correct order. The solution is displayed on both walls of the room. Reading left to right from the top, the correct slot order is: top, second, fourth, third.
With the symbols correctly placed, the elevator activates. Ride it to the top to reach the Abyss rift.
Investigate the Abyss
Step through the rift and you'll find Octavius in a frantic state, urging Kliff to stop whoever is tearing the rift open from the other side. Use Triple Force Palm combined with gliding to cross to the far side.
A mysterious figure confronts Kliff there and uses Force to throw him back into the real world. Back at the institute, the Dean listens to Kliff's account, but nobody can identify the stranger.
Return to Howling Hill and rest at your tent to complete Chapter 4. Chapter 5: Guest Unbidden begins immediately after.
For more Crimson Desert, browse more Crimson Desert guides on GAMES.GG for builds, boss strategies, and progression tips to carry you through the chapters ahead.