

Cull's Shadow is the Exotic Fusion Rifle at the end of Oblation: Bloodline, the first of three Exotic missions added in the Monument of Triumph update for Destiny 2. Getting to it takes a multi-step Moon questline, two platforming gauntlets, a pair of Soulfire encounters, and a two-phase boss fight. The mission leans heavily on puzzle logic rather than raw firepower, so knowing what to do before you load in makes the whole run significantly cleaner.
How do you unlock the Oblation: Bloodline mission?
Before the mission appears on the Moon Destination screen, you need to work through a hidden quest chain that starts on the Moon and touches four patrol zones.
Shoot vents while they're open
Step 1: Run Scarlet Keep with a Weapon of Sorrow
Launch the Scarlet Keep strike while a Weapon of Sorrow is equipped. Play through the strike normally and defeat the final boss. Once the boss is down, search the arena for a hidden rune puzzle. Interacting with it and solving it correctly triggers the next stage of the questline.
Step 2: Track Soulfire frequencies across the Moon
After Scarlet Keep, head into Moon patrol. You need to visit four regions in any order: Archer's Line, Anchor of Light, Hellmouth, and Sorrow's Harbor. In each zone, find a glowing dead Cabal connected to the Soulfire network. Investigating the body points you toward a nearby Hive structure with its own localized rune puzzle. Solve all four, and the Oblation mission unlocks.
Once all four zones are cleared, travel to Sorrow's Harbor, find the large red building, locate the tunnel beneath it, and interact with the mission marker to launch Oblation: Bloodline.
How to complete the Oblation: Bloodline mission
More than half of this mission is platforming and environmental puzzle-solving. The encounters aren't especially punishing if you understand the Soulfire mechanic, which the mission teaches you gradually before the boss applies it at full complexity.
Sabotaging the Syndicate drilling operation
The mission opens with a conversation with Aunor. Your first objective is disabling a massive energy drill.
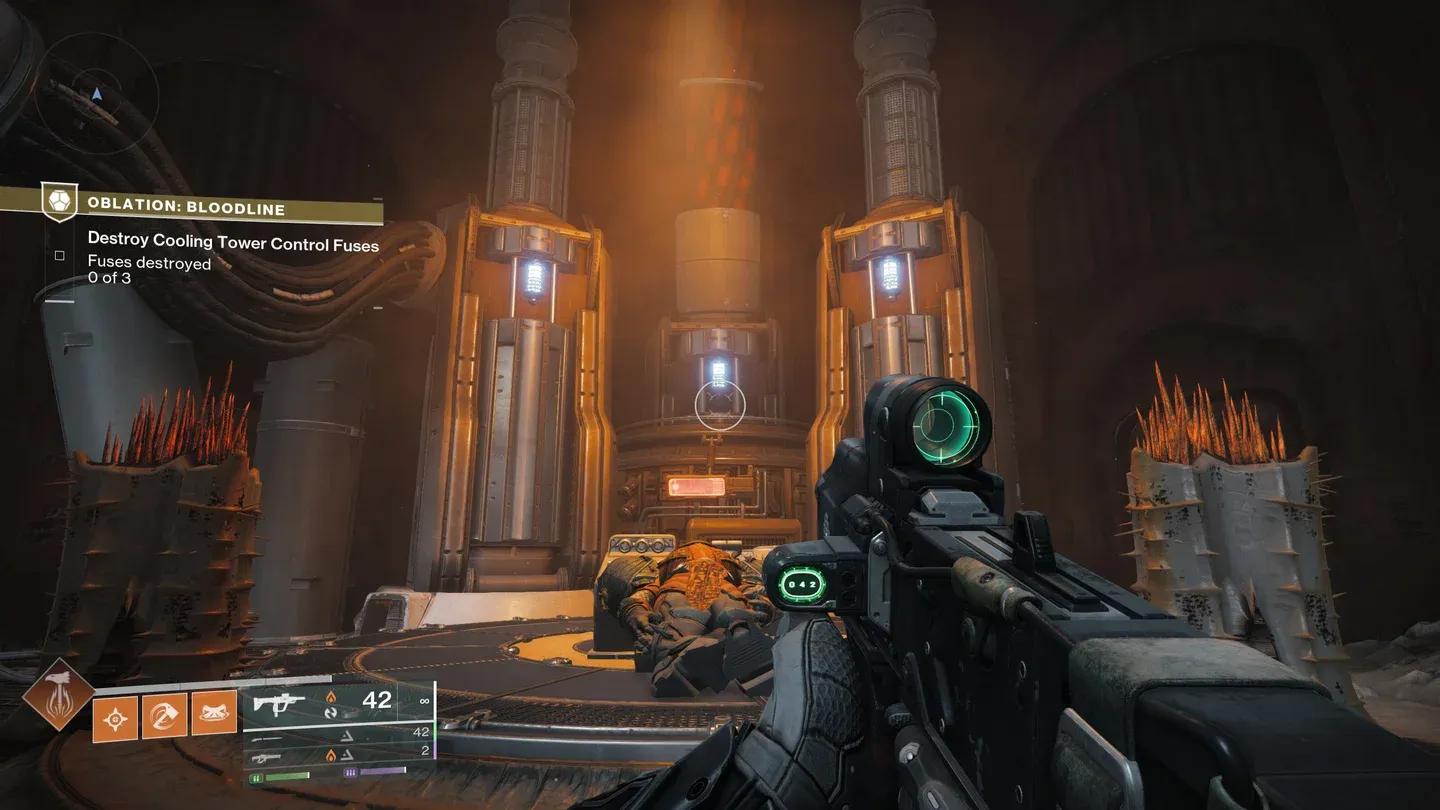
Drop off the ledge to your left before you reach the large red tower and land on the platform far below. Turn around to face the Psion snipers harassing you, push up the stairs, and kill the shielded Centurion at the command console. Flip the switch to override the Safety Controls, then destroy the three fuses behind the switch to activate the Cooling Pillars below.
Cooling Pillars are identifiable by the red-hot vents on their sides. Shoot the vents while they're open to destroy them. Break all four vents on the first pillar to bring it down, then use the man cannon that activates nearby to reach the next area.
The second area follows the same pattern with more fuses spread across the platform:
- First fuse: above and left of the switch
- Second fuse: directly across from the switch
- Third fuse: across the platform and left of the switch
Once those are broken, destroy the vents on the remaining two Cooling Towers. Head back toward the entrance, enter the command center in the rock face (the energy shield is now down), clear the enemies, flip the final switch to overload the laser drill, and ride the man cannon into the hole the drill opened.
Destiny 2 Guide: How to Get Cull's Shadow
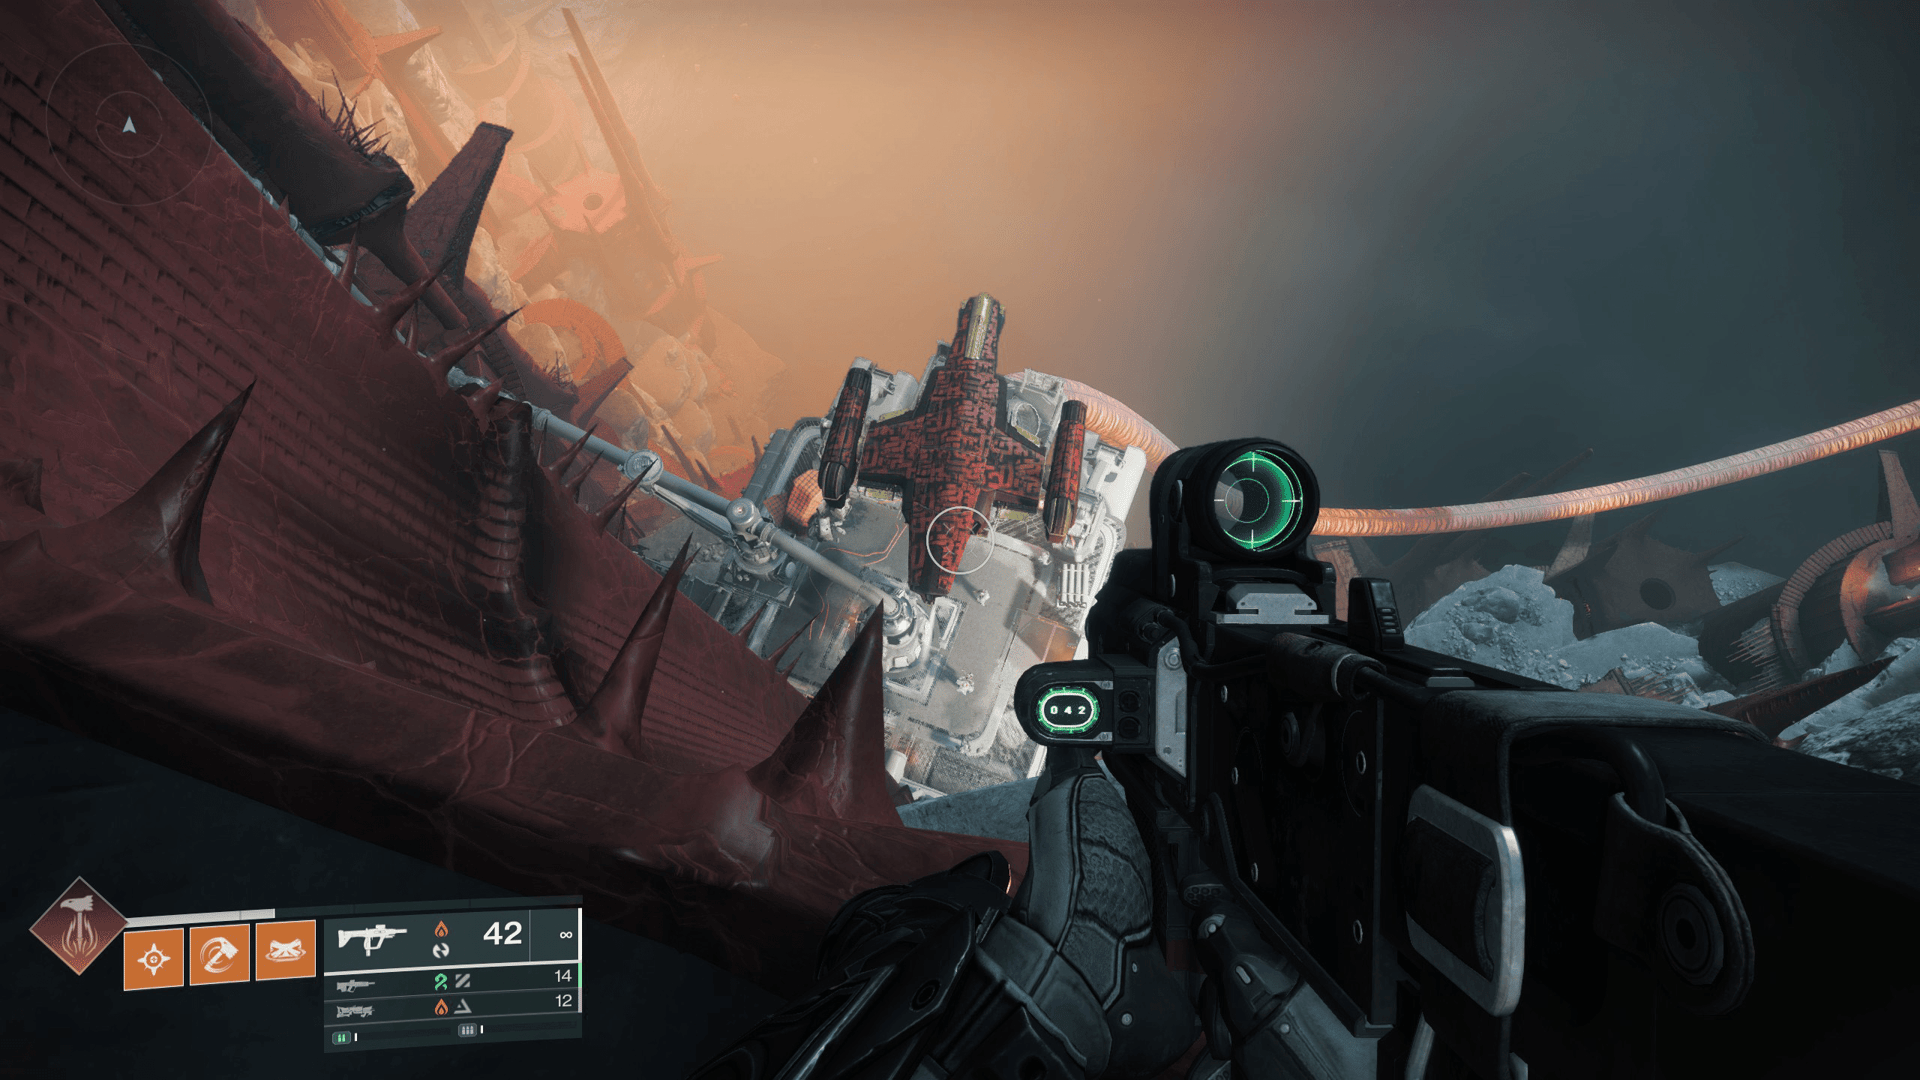
Reaching the final encounters
This section is a lengthy vertical climb through two distinct platforming areas. The Acolytes sniping at you aren't just annoyances; they're waypoints. Whatever platform they're standing on is one you can reach.
From the cave opened by the drill, jump up into the light green cave to your left, then cross to where the first Acolytes were positioned. Keep ascending, using Acolyte perches as your path guide.
Near the top of the first room, hop across to the platform covered in stalactites, then take a right through the tunnels. Follow them to a dead end, jump up to the ledge above, and continue into the Soulfire Crux, where the second platforming section begins.
Here, jump across the chasm to your right, land on a hanging sarcophagus, then use the rock ledges and additional sarcophagi to climb higher. At the top, find the large hallway with iron-barred windows, climb onto its roof, and drop to the platform on the other side.
Turn left, look at the final staircase leading toward Bael's shadow, and find the hole in the stairs. Drop through it, follow the caverns to a pit, drop again, and you'll emerge in a large room with scarlet towers. Use the left-side platforms to reach a pair of Wizards, then follow the Acolytes to the first encounter.
How to extinguish the Soulfire Barrier
A massive column of Soulfire blocks the path forward. Clearing it requires three Soulfire Charges dunked into braziers.
Charge 1: Kill the Pyre Matron Wizard, then punch the Soulfire Vessel Thrall to collect the Soulfire Charge buff. Carry it to one of the unlit braziers facing the barrier and dunk it.
Charge 2: Follow the enemies that spawn through the doorway they were guarding. Clear the room, including all three Pyre Matrons inside. This drops the central shield around the second Soulfire Vessel. Punch it, return to the middle, and dunk the charge in any remaining brazier.
Charge 3: Follow the Acolytes to the back-left of the area. Clear enemies, climb the rocky ledges to the top of the red iron tower, push past the Ogre, clear the room of Pyre Matrons and Knights, punch the final Vessel, and dunk the charge in the last brazier.
Lighting all three braziers clears the barrier and opens the path to the boss.
How to beat Valus Tau'Rig, The Insatiable
The boss fight has two phases, and both reuse the Soulfire mechanic from the previous encounter.
Phase one
Valus Tau'Rig's first health bar is small for a boss his size. A few combos with the Praxic Blade or a handful of rockets will strip it quickly. Don't overthink this part.
Phase two
Once his first bar is gone, three powerful Wizards called Pyre Cantors empower Tau'Rig and then vanish. Survive until they reappear; you can watch them fly toward wherever they'll guard the Soulfire Vessel.
Kill the Pyre Cantors, take the Soulfire Charge to the brazier the boss is currently draining energy from, and dunk it. This stuns Tau'Rig and removes his immunity shield. Now DPS him hard. Gjallarhorn, rockets, Linear Fusions, and Praxic Blade builds all perform well here.
At 50% health, he goes immune again and the cycle repeats, this time with additional Ogres in the arena. The mechanic is identical: find the Cantors, claim the Vessel charge, dunk at the correct brazier, and finish him off.
Once Tau'Rig is dead, collect Cull's Shadow from the reward chest.
What is Cull's Shadow and how does it work?
Cull's Shadow is an Exotic Fusion Rifle built around Soulfire and Soul Forge mechanics. Its design rewards aggressive mid-range play: chain kills to build Soulfire energy, use that energy to power up melee interactions, and trigger explosive detonations. Players who like weaving weapon damage with ability combos will get the most out of it.
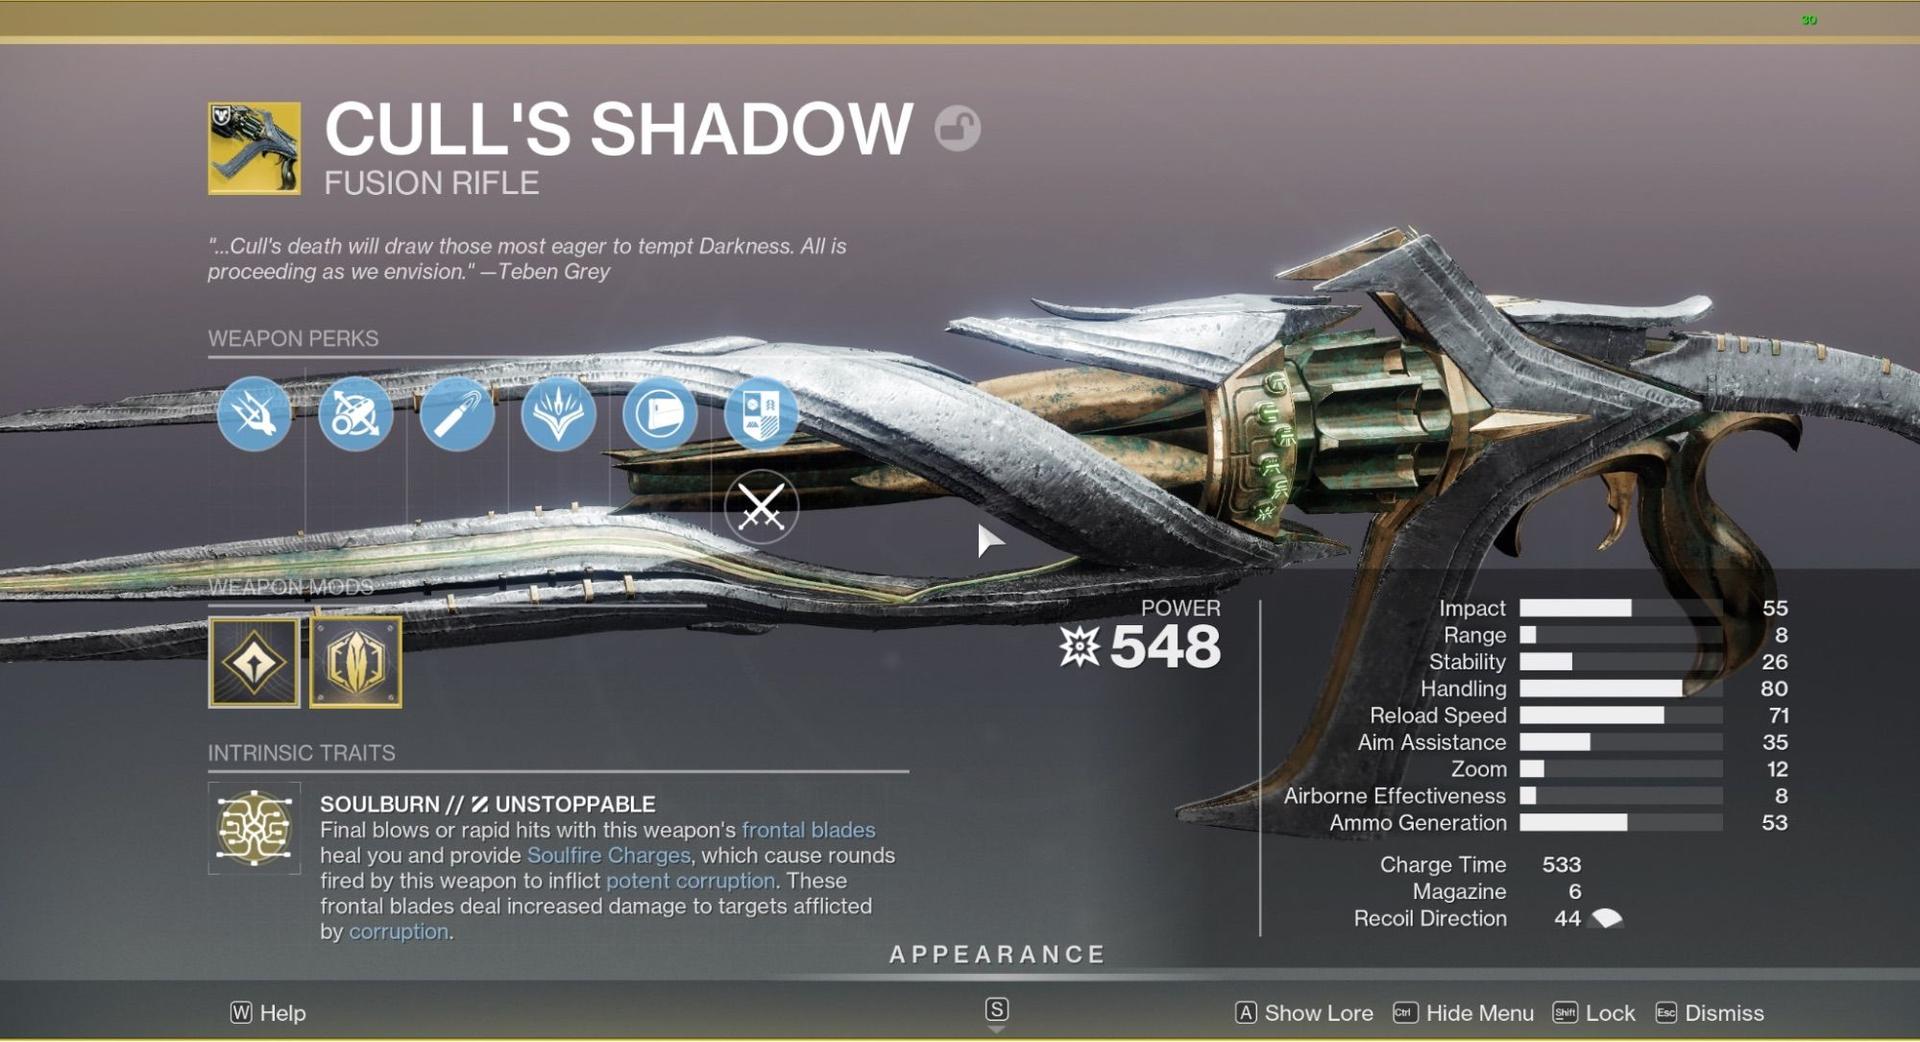
How do you get the Soulfire Succor catalyst?
Don't leave the activity after the boss dies. The catalyst is hidden in the post-boss area and requires a few extra steps.
Equip Cull's Shadow, then head back into the first encounter area and clear every enemy, including the major ones. Climb to where you collected the third Soulfire Charge buff during the first encounter. A message will appear on screen: "The Weapon of Sorrow craves profane wisdom..."
Jump across the sarcophagi to the right of where the final group of enemies was. Keep right until you reach a floating Hive grimoire. Interact with it to "Indulge Cull's Shadow," which reveals Hive runes on the walls of the boss room.
Return to the boss room and shoot the runes in the order displayed on the door, top to bottom. This breaks the seal and lets you launch Oblation: Soulfed directly from within the mission. Completing this step also unlocks the Soulfire Succor catalyst for Cull's Shadow.
What comes after Oblation: Bloodline?
Oblation: Bloodline is the first of three Exotic missions in the Oblation series. Completing the Hive rune sequence above unlocks Oblation: Soulfed, which you can launch either from within Bloodline or from the Moon Destination screen. Each subsequent mission adds new secrets and additional catalyst upgrades tied to Cull's Shadow's progression.
Oblation is designed to be replayed. Deeper runs unlock more of the weapon's potential, so clearing Bloodline is the starting point, not the finish line.
For more weapons worth farming, the Eyasluna god rolls guide covers another strong option from the Moon's Grasp of Avarice. And if you're still working through the Monument of Triumph power curve, the Edge of Fate power leveling guide has the fastest route to 450. Browse the full Destiny 2 guides collection for everything else the update added.