
The fastest way to lose in Echo Generation 2 is to treat it like a standard RPG
Echo Generation 2 is Cococucumber's sci-fi deckbuilding RPG where every fight is a puzzle built around 12-card decks, status effects, and party compositions drawn from six playable heroes. With over 150 cards to collect and no difficulty slider anywhere in the game, your only levers are deck quality, skill tree investment, and how well you understand the synergy between your three chosen characters. Get those right and fights that looked impossible start falling apart in two or three turns.
Jack's status card tooltip
How does combat actually work in Echo Generation 2?
Every hero runs a 12-card deck. On your turn you play cards up to your current action limit, which starts at one and scales toward four as you level up. More actions per turn means faster deck cycling and more combo opportunities, but it also means enemy turns arrive sooner if you can't close fights quickly.
Many strong cards carry per-battle use limits shown as green charge bars at the top of the card. A card with two charges can only fire twice before it's spent for that fight. Charges fully reset at the start of every new encounter, so don't hoard them out of habit. Spending a limited-use nuke at the right moment is correct play, not a mistake.
Defense works through active blocking. When an enemy attacks, a brief icon appears on screen. Press the interact button (A on controller, E on keyboard) to block and reduce incoming damage. Late-game enemies use piercing attacks that bypass passive shield stacks, so learning to block on cue matters more than loading up on defensive cards.
After every victory, your party heals fully. There's no attrition between fights, which means the real pressure lives inside each individual encounter rather than across a gauntlet.
What are stance breaks and why do they matter?
Every enemy displays a stance symbol. When you play a card carrying a matching symbol, you break their defense and open a window for high-damage follow-ups. Missing stance breaks is the most common reason fights drag on longer than they should.
The mental loop is straightforward: read the enemy symbol, hold matching cards until the break moment matters most, then follow immediately with status applicators or damage spenders while the enemy is exposed. On elite enemies and bosses, a well-timed break does more work than several extra attack cards.
If a fight feels like you're chipping damage without progress, check your deck for symbol-matched cards before raising raw attack numbers.

Stance break window open
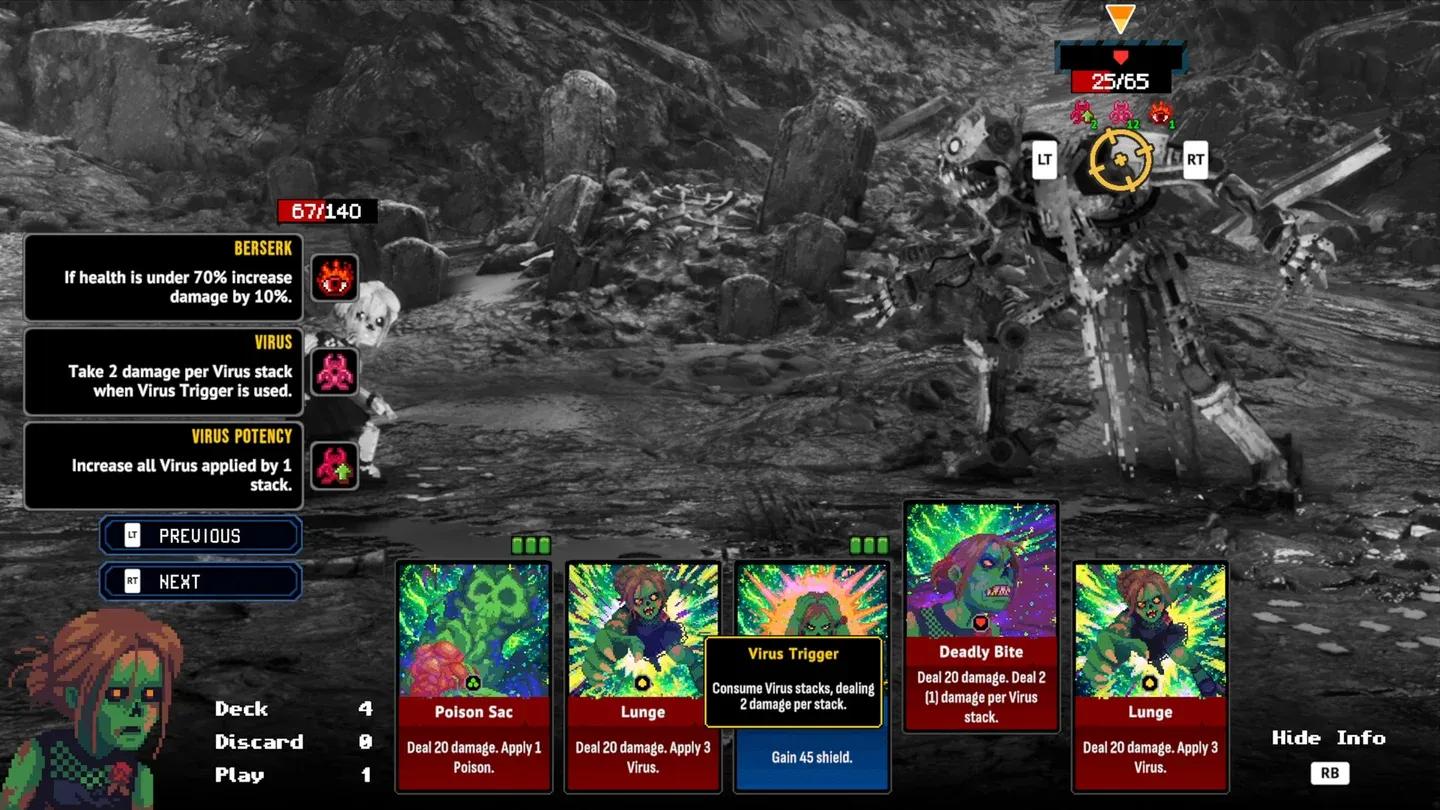
Understanding status effects: the real damage engine
Status effects drive the majority of late-game damage in Echo Generation 2. Raw attack numbers plateau; stacked debuffs don't.
Burn is the first status most players encounter. It deals damage at the end of every enemy turn. On its own that's modest pressure, but the Combustion card instantly detonates every Burn stack simultaneously while adding bonus damage on top. Two cards that each look underwhelming alone can delete a boss phase when sequenced correctly.
Mark applies a 20% damage bonus to your next attack and unlocks conditional effects on many of Jack's cards, including extra healing and additional status applications. Spark combined with Conduction weakens enemy defense while simultaneously adding shields to your allies. Poison scales with enemy max HP, which makes it absurdly effective in the final chapters where opponents sit above 1500 HP.
The table below covers the core statuses and their primary uses:
Stacking seven or more statuses on a single enemy sounds chaotic, but it's often the correct answer in late chapters. Bosses add shields and armor breakpoints that raw damage struggles to crack. Debuff-heavy trios scale better into the final gauntlet than attack-focused builds.
Who are the six heroes and how do they fit together?
Party composition matters more than individual card rarity. The six heroes each fill a distinct role, and the strongest trios pair a status applier, a status spender or converter, and either a tank or burst damage dealer.
Jack is the setup specialist. He applies statuses that allies can exploit, and his skill tree rewards investing in extra actions per turn before raw damage upgrades. He's the default learning character for stance breaks and long-game planning.
Bulder is a glass cannon whose abilities trigger additional effects when his HP drops below a threshold. His damage output climbs as he takes punishment, which means he needs either a healer or a tank keeping enemy focus away from him. Excellent in short fights after a stance break.
Noliva deals precise single-target damage through careful card sequencing and stance switching. Her companion Strix converts enemy debuffs into team-wide buffs, which means the pair work best when someone else in the party is spreading debuffs for Strix to flip. Always deploy Noliva and Strix together when both are available.
Annata Z absorbs incoming damage while spreading debuffs across the enemy line. She anchors defensive compositions and shines in fights with multiple smaller enemies.
Sister M applies two random statuses per base ability and deals multi-target damage. She's the easiest hero to build around because almost any status consumer benefits from her output. Burn packages are worth collecting early in facility chapters specifically for her.

Party selection screen
Suggested starting trios
- Jack + Sister M + Annata Z: Status spread, crowd control, and a tank to absorb pressure. Forgiving for players still learning the system.
- Noliva + Strix + Jack: Debuff conversion feeding into Noliva's burst. Strong against single bosses once stance is broken.
- Bulder + Sister M + Annata Z: High-risk burst backed by wide status application. Annata Z keeps Bulder alive long enough to trigger his low-HP bonuses.
- Sister M + Jack + Noliva: Maximum status density. Turn-heavy but capable of melting anything that doesn't kill you first.
How should you build your 12-card deck?
With 150+ cards available, the temptation is to fill your deck with the highest-damage options you own. That's the wrong approach. A well-structured 12-card deck needs role balance more than raw power.
A reliable starting framework: 4-5 damage cards, 2-3 status cards, 2 defensive or healing cards, and 1-2 utility cards covering draw acceleration, extra actions, or summons. Adjust based on the fight ahead.
Some enemies specialize in defense. Others overwhelm you with debuffs or punish slow strategies outright. A deck that dismantles one encounter can struggle badly against the next. Swapping cards between fights isn't a sign of a weak build, it's how the game expects you to play.
Remove cards from your deck that don't apply or consume statuses before a boss attempt. Dead draws during a boss phase cost more than the raw stats of any single card you might cut.
Skill trees compound deck strength. Upgrading action economy (more cards per turn) early unlocks combo potential faster than raw stat increases. Some skill tree upgrades apply status effects before combat even begins. Because the skill tree resets freely outside of combat, there's no penalty for experimenting with completely different builds between encounters.
Badges are passive items, up to three per hero per fight. They feel minor in early chapters but become load-bearing in the final gauntlet. Collect every badge during exploration rather than ignoring them as optional pickups.

Skill tree action upgrades
How do you prepare for boss fights?
Bosses test stance breaks, status uptime, and blocking discipline simultaneously. On defeat you restart from the boss encounter with your story progress intact, so every attempt is a free deck adjustment.
Before re-entering a boss fight, run through this checklist:
- All 12 deck slots filled with a role mix
- At least two status sources in the deck
- At least one defensive or shield card present
- Three badges equipped that match your trio's strategy
- At least one card that answers the boss's stance symbol shown in the opening turn
If you're dying in one or two hits, swap badges toward defense or regen rather than adding more attack cards. Piercing attacks bypass lazy shield stacks, so active blocking practice matters more than passive mitigation.
The final chapter is a series of back-to-back gauntlet fights with mandatory hero rotation. Characters you neglected during the campaign become liabilities here. Developing multiple skill trees across the full roster during earlier chapters is the only real preparation.
What most players miss during exploration
Rewards in Echo Generation 2 come from victories, exploration pickups, and side content in equal measure. Fully exploring each hub area yields cards, currency, and badges that make later fights significantly easier.
Talk to every NPC, inspect every interactable object, and finish side quests before moving chapters. Mini-games tied to achievements like Elmerlake Massacre, Happy Mayhem, Galactile Fighters, and One Last Dance are missable if you advance past the chapter hub where they appear.
The game also has 50 achievements total, designed to unlock naturally through story and exploration rather than requiring dedicated grind runs. Complete each chapter's story first, then sweep the hub for interactables and mini-game triggers before leaving.
For more strategies and builds as the community discovers new card combinations, check the Echo Generation 2 guides collection for ongoing coverage.
If you enjoy the puzzle-like structure of Echo Generation 2's combat, it sits comfortably alongside other jrpg games that reward planning over reflexes. The deckbuilding layer adds a layer of customization that most turn-based RPGs skip entirely.
Badge passive slot setup