
Escape from Tarkov locks its Icebreaker map behind one of the game's most demanding unlock chains. The Boreas questline spans multiple maps, forces branching decisions that affect both your entry and exit, and carries real financial weight — expect to spend well over 1,000,000 Roubles per Icebreaker attempt once transit fees, extraction costs, and gear all stack up. This guide covers every step from starting the questline to firing your extraction flare, so you can stop guessing and start raiding.
Boreas questline task tracker
What do you need before starting the Boreas questline?
Before touching a single quest step, get these ready:
- One Toolset for the Woods tower repair
- 400,000 Roubles for the Shoreline hovercraft transit
- 2,500 Euros for helicopter extraction on Icebreaker itself
- Access to Reserve for AMG-10 fluid farming
- Extra inventory space for quest items
- Familiarity with Shoreline and Lighthouse layouts
Two things about Icebreaker that catch players off guard: raids last only 40 minutes, and insurance does not work on this map. Any gear you lose there is gone permanently. Plan your loadouts accordingly.
Icebreaker runs as a closed PvE instance for solo players or pre-made squads only. Random PMCs will not join your raid, but the AI opposition more than compensates.
How do you start the Boreas questline?
There are two entry points, and which one applies to you depends on your Hideout progress.
Method A: Finding the Paradigm Shipping poster
Players without Intelligence Center Level 3 need to find and extract with a Paradigm Shipping poster. This is a loose quest item that spawns randomly across several locations. Extracting with it triggers the Boreas questline and sends you to Mechanic — speaking to any other trader will not advance progression.
One hard rule: the poster cannot go inside a secure container. Die before extracting and the poster is permanently lost.
Ground Zero spawn locations:
- TerraGroup Building parking structure walls
- TerraGroup main lobby staircases and rear walls near the deceased scientist
- Outer walls at the main entrance exterior
- Wall next to the broken section inside the central building near the vehicle extract
- Basement stairwell walls and connected building lobbies
Lighthouse spawn location:
- High chance around the train station area
Ground Zero is the most reliable map for farming the poster. Keep a low profile while carrying it. If the search is taking too long, the poster can also be purchased directly from the Flea Market.
Method B: The Hideout radio
Players with Intelligence Center Level 3 can skip the poster entirely. The catch: the radio interaction does not appear through the standard Hideout menu. You must physically enter the Hideout and walk up to the Intelligence Center to interact with the radio and receive the distress transmission. Players who recently prestiged or wiped will need to use Method A instead.

Hideout radio shortcut method
How do you repair the Woods cellular tower?
The first field objective is straightforward but not safe.
- Required item: one Toolset (can stay in your secure container throughout this task)
- Location: Scav bunker area near Prapor's convoy by the lake on Woods
- Action: Find the cellular tower and interact with the white control panel at its base
You do not need to survive the raid after completing the repair for it to count. The Toolset is also a known demand spike item after major updates, so secure one before prices climb on the Flea Market.
The tower area is exposed and regularly contested. Birdeye can patrol nearby, and the Woods signal tower is a known Goons spawn location. Approach from cover, interact with the panel, and reposition immediately. Do not stand around after the repair.
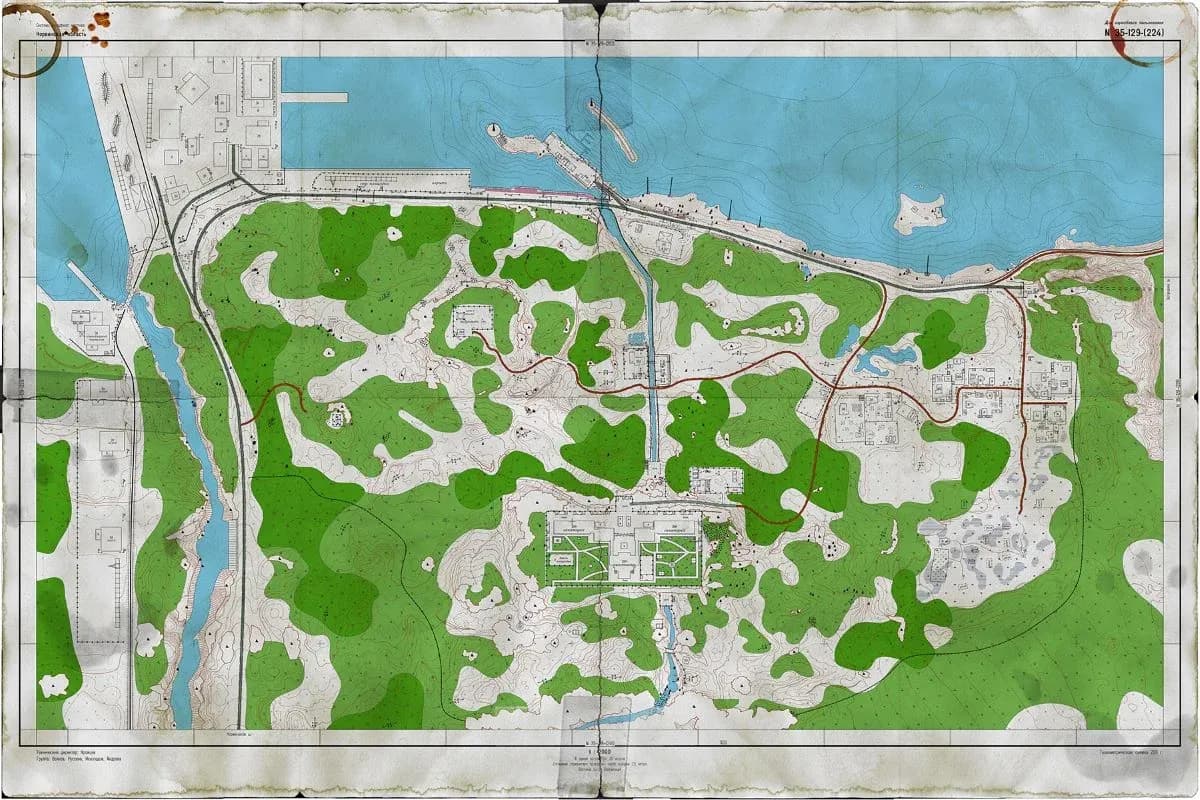
How do you get the Paradigm Shipping documents on Lighthouse?
With the tower repaired, the questline moves to Lighthouse.
- Location: Hangar or warehouse building near the train yard
- Item: A distinct red file folder sitting behind boxes on a small desk inside the warehouse
- Action: Interact with and read the document before leaving the raid
Some players report progression issues if the document is not confirmed through the in-game Handbook menu after extraction. As a precaution, open the Handbook, navigate to the documents section, and select the file to make sure it registers.
Do you need both Infill and Exfill unlocked for Icebreaker?
Yes, both branches are mandatory. Completing only Infill gets you onto the map with no way out. Entering Icebreaker without a valid extraction is effectively a permanent gear loss scenario. Complete both before you deploy for the first time.
Infill branch: unlocking Icebreaker entry
This branch runs through the BTR Driver on Woods. Locate the BTR Driver at one of its checkpoint positions (usually mid-raid) and choose one of two task paths.
Mechanic's Path (recommended)
Eliminate 10 hostile targets inside designated smuggler zones. PMCs, AI Scavs, and hostile NPCs all count toward the total. You can complete this on either Shoreline (Smuggler's Path) or Interchange (Power Plant area). Shoreline is generally faster due to higher target density.
Players who have already completed the Price of Independence quest may be able to bypass the 10-kill requirement entirely by returning to the Hideout after speaking with the BTR Driver.
Skier's Path
Requires delivering specific ammunition types to the BTR Driver. This is the slower option and not recommended unless you have a specific reason to avoid combat.
The Shoreline transit
After completing your chosen path and reporting back, head to Shoreline. The hovercraft is at the pier near the gas station and car extract. Boarding requires 400,000 Roubles in your inventory at the time of transit.
Recent updates placed Sanitar and his guards near the Shoreline pier, turning the hovercraft approach into a genuine combat encounter. Expect resistance before you even board.
Shoreline transit to Icebreaker
Exfill branch: unlocking Icebreaker extraction
Extraction is arranged through Prapor, and how much work this branch requires depends on what you did during the earlier Falling Skies task.
Military Power Filters, when required, can be found in bunkers on Woods or Reserve. They are rare, so budget extra raids if you kept the case.
Extracting from Icebreaker itself requires 2,500 Euros and a Green Flare during the raid. Fire the flare at the helipad and wait for the "Route Safe" confirmation before entering the extraction zone. Both handheld RSP-30 Green flares and 26x75mm green signal pistol rounds are valid for extraction.
Where do you find AMG-10 fluid on Reserve?
AMG-10 fluid (commonly called helicopter oil) is a canister item found as loose loot on Reserve. Spawn rates are inconsistent, so plan for multiple raids. Two reliable locations:
Central helicopter
Walk inside the helicopter cabin parked directly opposite the White Pawn building. Check the floor and on top of wooden crates inside the cabin.
Black Bishop basement
Head to the basement of the school building. Search shelves, tables, and floor areas across the basement rooms.
Once you have the fluid, the Reserve sewer manhole extract is one of the safer exits, especially if other players are hunting the same spawns.
Toolset prices spike heavily on the Flea Market after major updates due to Boreas questline demand. Secure yours early. The same logic applies to Green Flares before your first Icebreaker run.
What is the fastest route to unlock Icebreaker?
For the most efficient path through the entire questline:
- Use Intelligence Center Level 3 to skip the poster search
- Choose Mechanic's BTR path for the Infill branch
- Hand the Armored Case to Prapor during Falling Skies to keep the Exfill branch minimal
- Farm AMG-10 fluid at the Reserve helicopter first, then Black Bishop Basement if needed
- Have 400,000 Roubles and 2,500 Euros ready before deploying
Actual completion time varies with loot RNG, raid traffic, and Flea Market prices.
Icebreaker loadout and performance tips
The map's cramped hallways and tight interiors make red dot sights a better choice than magnified optics for most engagements. A few things worth knowing before your first raid:
- Smoke grenades are effective against Black Division AI enemies aboard the ship. Dense smoke disrupts their line of sight significantly.
- Gas masks are commonly used on Icebreaker. Certain areas contain radiation exposure zones, so carry healing supplies.
- Volumetric lighting set to high creates severe glare around the helipad and interior lighting. Lowering it in graphics settings noticeably improves visibility.
- Several rare electronic items found on Icebreaker are required for later progression. Avoid selling unfamiliar tech loot through the trader menu until you know what it is.
- Icebreaker transition cutscenes do not pause the raid timer. Reposition immediately once control returns.
- Later progression unlocks the option to deploy directly to Icebreaker from the Hideout menu, bypassing Shoreline entirely.
A subtle crosshair indicator expands when aiming near certain quest items. If you are struggling to find loose loot objectives, pay attention to that visual cue.
For more Tarkov content covering quests, maps, and events, the full Escape from Tarkov guides collection has everything from completing the Bulldogs Under the Rug quest to finding all duck locations for the Duck Hunt event. Tarkov is one of the most demanding extraction shooter games out there, and every quest chain you complete opens up more of what makes it worth the effort.