
Getting your controller settings right in Fortnite is one of the fastest ways to close the gap between where you are and where you want to be. The default settings prioritize accessibility, not competitive performance, which means most players are fighting with one hand tied behind their back. Whether you're on PS5, Xbox, or PC, dialing in your sensitivity, deadzone, and aim assist values gives you a measurable edge in every fight you take.
What Do Controller Settings Actually Change in Fortnite?
Every input you make travels through a chain of settings before it appears on screen. Sensitivity controls how fast your character turns per unit of stick movement. Too high and small nudges send your crosshair flying past targets. Too low and you can't track enemies moving laterally across your screen.
Response curve defines the relationship between stick position and camera speed. A Linear curve delivers a direct 1:1 ratio, which trains muscle memory faster because the output is always predictable. An Exponential curve accelerates as you push the stick further, which feels more forgiving early on but becomes harder to master at a competitive level. Linear is the preferred choice among experienced players because it removes the guesswork from small ADS adjustments.
Dead zone is the minimum stick movement required before the game registers an input. Set it too high and your reactions feel delayed. Set it too low and stick drift causes phantom movements, especially on older controllers.
Best Fortnite Controller Settings for 2026
The table below represents a proven baseline for most players across PS5, Xbox, and PC. These values work well on standard retail controllers without any hardware modifications.
Advanced Sensitivity Settings
If you want to push further, Fortnite's Advanced Sensitivity panel gives you granular control that the basic sliders can't match.
- Look Horizontal and Vertical Speed: Set both to 40%. This keeps your turning speed consistent across axes.
- ADS Look Horizontal and Vertical Speed: Set to 7%. This is relative to your base Look Sensitivity, so resist the urge to change your Look value if ADS feels off.
- ADS Turning Boost (Horizontal and Vertical): 5% each. This helps your crosshair track targets more smoothly when you're already aiming down sights.
- ADS Turning Boost Ramp Time: Keep this low, but not at zero. If it's too low, the boost activates constantly and feels twitchy.
- Scoped Speed Multiplier: 0.75–0.90x depending on how often you engage at long range.
- Look Dampening Time: Set to 0. Any dampening adds a micro-delay that works against fast reactions.
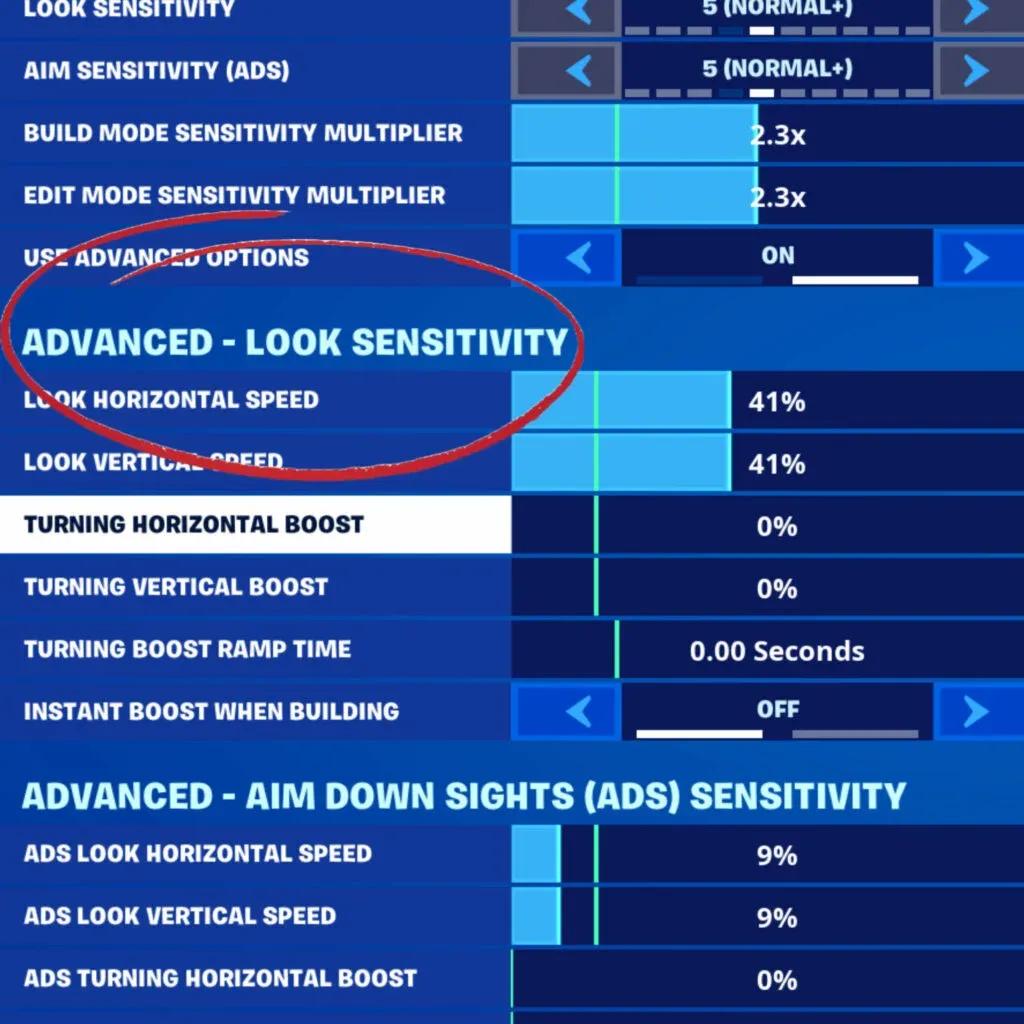
Advanced ADS settings breakdown
How to Set Your Dead Zone Correctly
Dead zone calibration is one of the most overlooked steps in controller setup, yet it directly affects how responsive your inputs feel.
Start by setting both the left and right stick dead zones to 0%. Then watch the stick diagram on the right side of the settings screen. If the indicator moves without you touching the stick, your controller has drift, and you need to raise the dead zone until that movement stops. Most controllers land between 3% and 7%. Avoid going above 10% unless drift is severe, as anything higher starts to create a noticeable input delay.
Set your trigger dead zone release to 12%. This gives you a clean, snappy release without accidental double inputs during rapid fire.
What Are the Best Game Settings to Pair With Controller?
Sensitivity alone won't carry you if your broader game settings are working against you. These configuration changes reduce input latency and speed up your decision-making:
- NVIDIA Highlights: Off. This feature records clips in the background and adds measurable input lag.
- Replays: All off. Same reason as above.
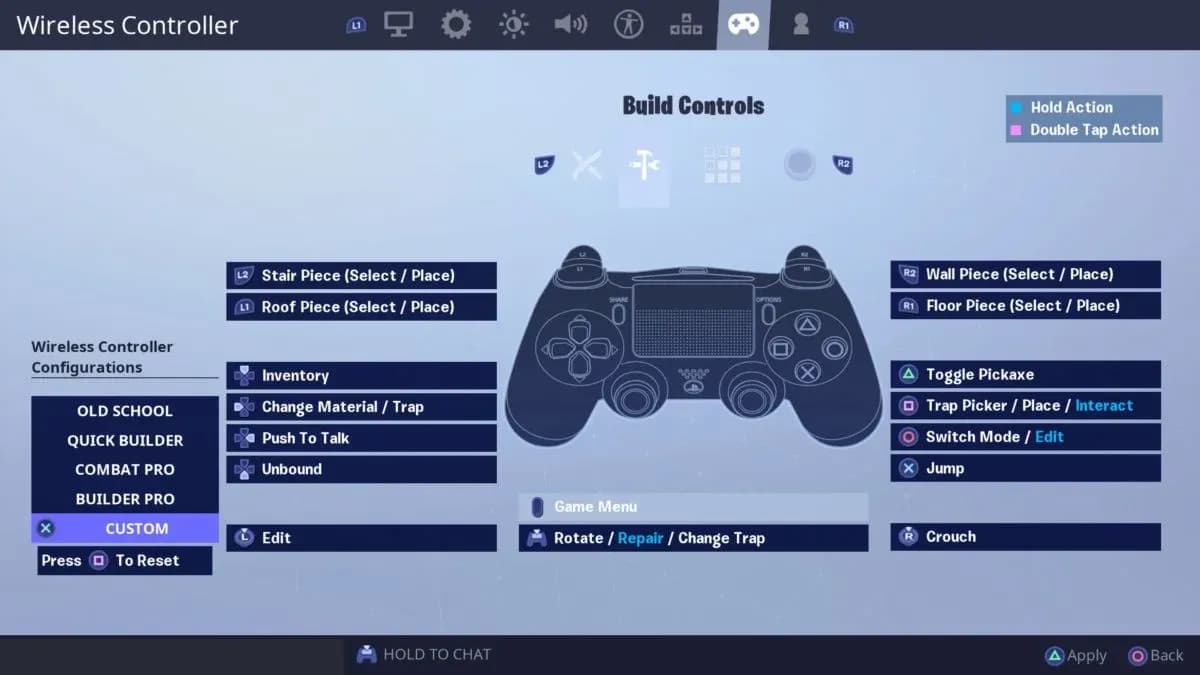
- Turbo Building: On. Holding the build button places structures continuously, which is essential in any build fight.
- Build Immediately (Builder Pro): On. This takes practice to get used to, but it significantly increases how fast you can place structures under pressure.
- Edit Hold Time: 0.100 seconds. Fast enough to avoid accidental edits, slow enough to register intentional ones.
- Slide Hold Time: 0.100 seconds. Matches the edit hold time for consistency.
- Reset Camera Axes: Both. If an enemy flanks you, resetting the camera is faster than manually turning the stick.
- Auto Open Doors: On. Removes one less action from your mental load during rotations.
- Minimum FOV: 75, Maximum FOV: 105. This range keeps the battlefield readable without distorting close-range aim.
How Should You Practice After Changing Settings?
Changing settings without structured practice is like buying new running shoes and expecting a faster time without training. The settings create the foundation, but deliberate repetition builds the skill on top of it.
Dedicate 15–20 minutes per day to Fortnite Creative aim maps before jumping into ranked matches. Focus on these drill types:
- Flick shots: Snap from a neutral position to a target and fire within 0.5 seconds. This trains your fast-twitch reaction for peeking enemies.
- Tracking drills: Follow a moving bot laterally and vertically while keeping your crosshair at head level. This is where ADS sensitivity really matters.
- Recoil control: Fire full AR and SMG bursts and practice pulling down to counter vertical spray.
- Close-range reflexes: React to bots appearing at point-blank range. These situations punish high sensitivity more than any other scenario.
Change only one setting at a time and test it across at least 10 matches before making further adjustments. Changing multiple values simultaneously makes it impossible to identify what actually helped.
Does Your Controller Hardware Matter?
Your settings can only perform as well as the hardware running them. That said, you don't need to spend a fortune to compete at a high level.
For PS5 players, the DualSense Edge stands out as the premium option. It features swappable thumbstick modules, adjustable dead zones built into the hardware, and remappable back buttons, all of which complement the in-game settings covered above. The trade-off is a battery life of around 6 hours, which is short for long sessions.
On Xbox, the NACON Revolution X Unlimited uses Hall Effect magnetic joysticks that eliminate drift entirely, with 1ms wired and 2ms wireless latency. For PC players, the PowerA OPS V3 Pro offers adjustable thumbstick heights and Hall Effect technology at a more accessible price point.
If budget is a concern, the PXN P5 costs under $30 and still includes Hall Effect joysticks, hair triggers, and four customizable back buttons. Testing shows it delivers drift-free aiming that competes with controllers costing three times as much.

DualSense Edge stick options
Common Mistakes That Stall Your Progress
Even with good settings, certain habits quietly undermine your improvement.
Running sensitivity too high is the most common issue. A horizontal sensitivity of 9 or above makes micro-adjustments nearly impossible, and any slight hand movement becomes an overcorrection. Most players who feel like they can't aim are actually fighting their own sensitivity.
Ignoring posture and grip costs more than people realize. Keep your thumbs centered on the sticks, wrists slightly elevated, and avoid gripping the controller tightly. Tension in your hands translates directly into imprecise stick movements.
Using too many sensitivity profiles prevents muscle memory from forming. Limit yourself to two or three profiles at most: one for snipers, one for mid-range, and one for close combat.
Playing on a slow display negates good settings entirely. A monitor or TV running below 60Hz with high input lag makes even perfect settings feel sluggish. Enable game mode on your display and target at least 60Hz refresh rate.
What Settings Do Pro Fortnite Controller Players Use?
Pro players consistently lean toward higher Look Sensitivity values, typically 35–40% in the Advanced Sensitivity panel, paired with ADS Sensitivity of 5–7%. Most run thumbstick extenders, which physically increase the arc of movement and allow fine-tuned adjustments at high sensitivity without sacrificing accuracy.
Aim Assist is universally set to 100% at the pro level. There's no competitive reason to reduce it. Dead zones are kept as low as possible, usually 3–5%, with players recalibrating whenever they switch controllers.
Quick-Reference Settings Checklist
Before your next session, run through this checklist to confirm your setup is competition-ready:
- Look Sensitivity set between 6 and 8
- ADS Sensitivity set between 3 and 4
- Aim Assist Strength at 100%
- Dead Zone calibrated to the lowest value without drift (typically 3–7%)
- Response Curve set to Linear
- Build/Edit Mode Multiplier at 2.1x
- Turbo Building and Build Immediately both enabled
- NVIDIA Highlights and Replays turned off
- Edit Hold Time at 0.100 seconds
- Advanced Look Speed at 40%, ADS Look Speed at 7%
Applying these settings is the starting point, not the finish line. Consistent daily practice on aim maps, combined with regular gameplay review, is what turns good settings into real results. For more guides covering weapons, builds, and ranked strategies, browse the latest gaming guides to keep building on your progress.