
Every deployment in Helldivers 2 starts the same way: you drop in, the clock starts, and Super Earth expects results. But there's a lot more going on beneath the surface than just "complete the objective and extract." Operations chain multiple missions together, optional objectives scatter across every map, and the campaign type you're fighting on changes what modifiers you'll face. Here's how all of it fits together.
How do operations and missions work in Helldivers 2?
An Operation is a sequence of missions tied to a single planet. Complete every mission in the operation and you earn bonus rewards on top of your standard payout. Fail one mission and the entire operation collapses — the remaining missions become unavailable. This makes mission order matter more than most players realize, especially at higher difficulties where a single bad drop can wipe out the whole chain.
Each mission has Primary Objectives (also called Main Objectives) that must be completed for the mission to count as a success. Your Super Destroyer stays in low orbit during the mission window, and if it leaves before the primary objective is done, the mission fails. Extraction is not required to collect your rewards — as long as the main objective is complete, you get paid.
Primary objectives reward 500 Requisition Slips and 100 XP before difficulty multipliers are applied. Optional objectives add 200 Requisition Slips and 50 XP each, with one notable exception: the "Destroy High-Value Target" optional objective skips the Requisition Slips entirely but awards 222 XP instead.
What are the different campaign types?
The planet you deploy to determines which campaign type is active, and that matters because Liberation Campaigns and Invasion Campaigns apply Operation Modifiers that can complicate your loadout planning. Defense Campaigns are the exception — they run completely clean with no modifiers.
Here's a quick breakdown of each campaign type:
High-Priority Campaigns cover some of the most mechanically distinct missions in the game, including Deploy Dark Fluid on Meridia (where the planet itself becomes the weapon) and operations tied to the Terminid Control System activation and deactivation cycle.
All primary objective types, sorted by faction
Universal objectives (any planet)
These missions appear regardless of which enemy faction controls the planet. They span the full difficulty range, with some available from Trivial and others gated behind Medium or Hard.
- Retrieve Essential Personnel — Available Trivial through Helldive
- Spread Democracy — Available Trivial through Super Helldive
- Emergency Evacuation — Available Medium through Super Helldive
- Launch ICBM — Available Medium through Super Helldive
- Retrieve Valuable Data — Available Medium through Super Helldive
- Conduct Geological Survey — Available Medium through Super Helldive
- Evacuate High-Value Assets — Available Hard through Super Helldive
- Upload Escape Pod Data and Start Fuel Pumps — Both capped at Easy difficulty
Terminid-specific objectives
Terminid planets have the largest pool of unique objectives, reflecting the faction's focus on infestation control and biological hazards. Standout entries include Purge Hatcheries (Easy through Super Helldive), Nuke Nursery and Cleanse Infested District (both starting at Challenging), and the brutal Eliminate Impaler and Eliminate Bile Titans missions that cap out at Hard difficulty as primaries.
Several Terminid missions are tied directly to the ongoing narrative, including Activate/Deactivate Terminid Control System, Collect Gloom Spore Readings, and the newer Conduct Mobile E-711 Extraction and Restore Air Quality objectives added as the Gloom storyline developed.
Automaton-specific objectives
Automaton missions lean toward sabotage and destruction of infrastructure. Sabotage Supply Bases, Destroy Transmission Network, and Sabotage Air Base all reflect the faction's reliance on coordinated logistics. The hardest Automaton-specific primaries include Destroy Command Bunkers (Hard through Super Helldive) and Halt Cyborg Production (Challenging through Super Helldive).
The Commando mission variants — Extract Intel, Acquire Evidence, and Secure Black Box — are notable because they run without full Super Destroyer support, forcing your squad to operate with severely limited stratagem availability.
Illuminate-specific objectives
The Illuminate mission pool is smaller but distinct. Evacuate Colonists and Free Colony are the entry points, available from Trivial. Take Down Overship and Repel Invasion Fleet represent the harder end of the Illuminate mission pool, with Blitz: Destroy Illuminate Warp Ships available from Medium onward. The newer Destroy Exospire mission ties directly into the Exostorm campaign events.
What are optional objectives and are they worth doing?
Optional Objectives (also called Tactical Objectives) are secondary tasks that appear on the mission map — up to 5 per mission. They're never required for mission success, but completing them pays out 200 Requisition Slips and 50 XP each, and many of them remove active hazards or unlock in-mission resources.
The most impactful optional objectives to prioritize:
- Stratagem Jammer (Automaton, Challenging+) — Disabling this is often non-negotiable. Losing stratagem access on higher difficulties is a squad wipe waiting to happen.
- Detector Tower (Automaton, Challenging+) — Removes constant enemy detection, dramatically reducing patrol density.
- Spore Spewer (Terminid, Easy+) — Clears the visibility-obscuring spore cloud from part of the map.
- Stalker Lair (Terminid, Challenging+) — Stops Stalker spawns. If your squad is getting picked off by invisible threats, this is the first thing to hunt down.
- Shrieker Nest (Terminid, Challenging+) — Eliminates aerial Shrieker attacks from that nest.
- SEAF Artillery (Super Earth, Easy+) — Activates a fire support asset you can call in during the mission.
- Gunship Facility (Automaton, Extreme+) — Stops Gunship spawns. At Extreme and above, this can be the difference between a clean run and a disaster.
Finding optional objectives isn't always straightforward. During the mission briefing, the map displays "hotzone" markers — memorizing their positions before you drop narrows down where optional objectives are likely to be. The Radar Station optional objective, once activated, reveals the full map and makes tracking everything else much easier. One useful trick: if the SEAF Artillery stratagem doesn't appear in your loadout selection screen, that map simply doesn't have a SEAF Artillery site.
For the full breakdown of every optional objective and its faction requirements, the Helldivers Fandom wiki objectives page has a detailed reference.
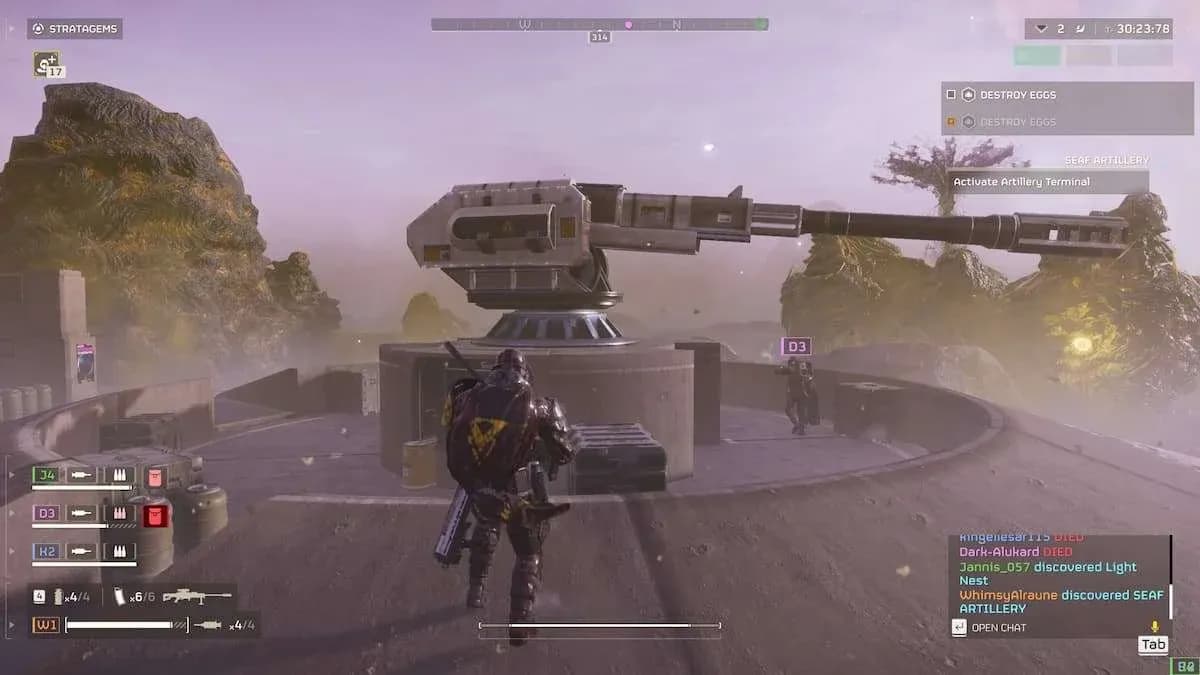
SEAF Artillery site on map
How is mission performance rated?
At the end of each mission, your squad receives a performance rating based on what percentage of objectives (primary and optional) were completed. The rating system works as follows:
Not all five stars are available at every difficulty level, so don't expect a perfect rating on Trivial missions.
Major Orders and Personal Orders
Major Orders are community-wide objectives that all Helldivers contribute to simultaneously. Typically only one is active at a time, with gaps between orders. These drive the Galactic War narrative and usually require liberating or defending specific planets.
Minor Orders (also called Strategic Opportunities) sometimes appear alongside Major Orders. Completing them rewards bonus stratagem usage rather than the standard Medals payout.
Personal Orders reset every 24 hours and are completed individually. They're optional but worth checking daily since they offer a consistent source of Medals without requiring you to grind specific mission types.
For the complete breakdown of mission types and what each one involves mechanically, the Helldivers Wiki missions page is the most up-to-date reference. You can also browse more gaming guides for loadout recommendations and stratagem tier lists to pair with this mission knowledge.