
Pure Fiction: Virtual Made Manifest is live in Honkai: Star Rail Version 4.1 from March 30 through May 11, 2026, and Stage 4 is where the real test begins. The scoring target climbs to 60,000 points for full completion, and the enemy lineup across both halves requires very specific team planning. Here is everything you need to clear it cleanly.
Buff selection for Stage 4
How does the Virtual Made Manifest buff system work?
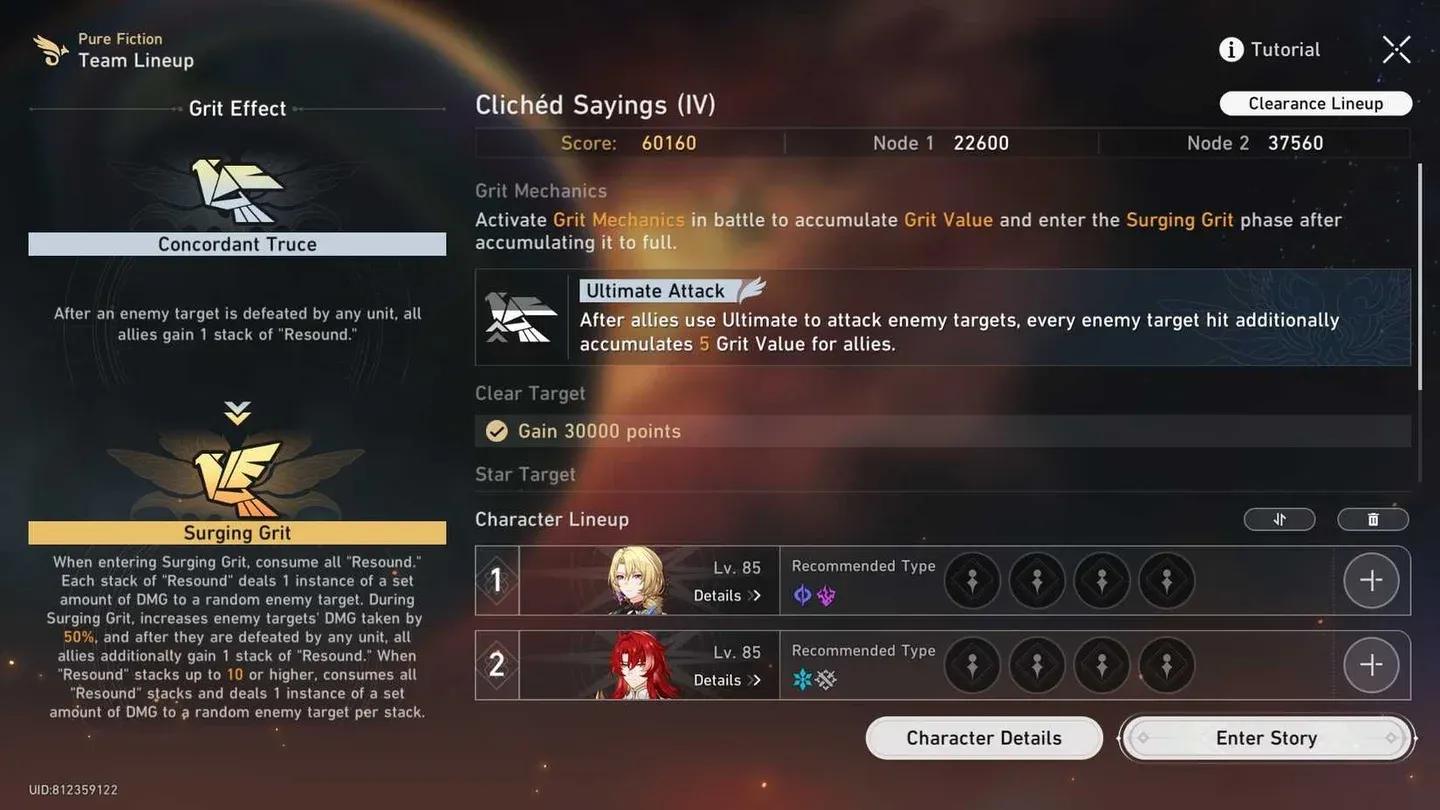
The core mechanic running through all of Stage 4 is the Grit Value system. Each time your allies use an Ultimate that hits enemy targets, every target hit generates 5 Grit Value for your team. Once Grit Value fills up, you enter Surging Grit, which is where the real damage multipliers kick in.
Before Surging Grit activates, every enemy kill grants your team 1 stack of Resound through the Concordant Truce passive. When Surging Grit begins, all stored Resound stacks are consumed and each one deals a separate instance of damage to a random enemy. During Surging Grit, enemies take 50% increased damage, kills generate even more Resound stacks, and once Resound hits 10 or higher, every stack triggers another damage hit before resetting. The snowball potential here is significant.
On top of that base system, each team in Stage 4 runs one of three individual buffs:
Stage 4 First Half: What enemies should you prioritize?
The First Half runs Physical and Fire type weaknesses, so build your team around those elements.
Wave 1: Everwinter Shadewalker, Lesser Sting, Furbo Journalist
The Everwinter Shadewalker is the most dangerous enemy in this wave because it can delay units in the action order. Take it down first. If your Physical or Fire characters can break it early, that pushes its turn back significantly and reduces how often it acts.
The Furbo Journalist drops Punchlines for Aha's Instant when defeated, so killing it quickly benefits your point accumulation across both halves. Do not let it linger.
For the Lesser Sting, focus it down if your team has strong single-target or blast damage. Its death triggers an explosion that helps clear the wave faster.
Wave 2: Ichor Memosprite Winged Serpent, Ichor Memosprite Pheasant
The Winged Serpent carries a Whirl stack counter. If those stacks are not depleted before its next turn, it fires off Hemotort Vortex, which hits hard. Keep attacking it consistently to burn through the Whirl stacks before that window closes. As a side note, while the Winged Serpent is in its coiling state, each hit triggers a counterattack on your whole team, which actually generates extra energy for sustain units if you want to take advantage of it.
Wave 3: Argenti, The Shield, Speartip
This wave needs careful sequencing. The Shield unit gives Argenti a barrier that absorbs one damage instance when it acts. If your main carry fires their Ultimate into that barrier, the burst is completely wasted. Use a support or sub-DPS Ultimate to strip the barrier first, then follow up with your primary damage dealer.
Best teams for the First Half
The top recommended compositions for the First Half are:
- Sparxie DPS: Sparxie, Yao Guang, Sparkle, Permansor Terrae (Commotion buff)
- Firefly DPS: Firefly, The Dahlia, Fugue, Lingsha (Commotion buff)
- Hysilens DoT: Hysilens, Kafka, Black Swan, Permansor Terrae (Memory buff)
- F2P option: Herta, Trailblazer (Ice), Asta, Permansor Terrae (Commotion buff)
Other solid picks for the First Half include Bronya, Himeko, Tingyun, Huohuo, Argenti, Gallagher, Yunli, and Phainon.
Stage 4 Second Half: How do you handle Stellaron Hunter Sam?
The Second Half uses Imaginary and Lightning type weaknesses. Build accordingly.
Wave 1: Automaton Beetle, Dreamjolt Troupe's Mr. Domescreen, Furbo Journalist
The Mr. Domescreen is the most important enemy to manage in this wave. In its default state, it drains your team's Energy. A single hit flips its channel and stops the drain, and it also restores Energy to one of your characters. Hit it once early and move on. Do not ignore it or you will find your Ultimates perpetually delayed.
The Automaton Beetle's shield is a lower priority in this wave. Focus the Furbo Journalist for Punchlines, then manage Mr. Domescreen, and let the Beetle come last.
Wave 2: Past Confined and Caged, Sableclaw Wolftrooper, Tide-Eroded Blade
This wave is relatively straightforward compared to the others. No special mechanical adjustments are needed beyond your normal rotation. Clean execution is enough here.
Wave 3: Stellaron Hunter Sam, Assistant Graffiti Rusher, Automaton Beetle
Sam has very high HP, so the fastest path through this wave is clearing the smaller enemies first to reduce Sam's health more efficiently through the mechanic interactions.
Watch the Automaton Beetle's position in the action order. Your support or sub-DPS should hold offensive Ultimates in reserve so your main DPS does not lose a key damage window to the Beetle's shield going up at the wrong moment.
When Sam enters Secondary Combustion, spending a total of 5 Skill Points removes its enhanced state and applies additional vulnerability. That is your primary damage window, so plan your Skill Point economy around hitting that threshold cleanly.
The Second Half is the harder side for most players this cycle. Sam's mechanic requires waiting for the right window, and the Automaton Beetle's shield is a genuine DPS check that can waste burst turns if timed poorly. If you are deciding where to invest your stronger roster, put it in the Second Half.
Best teams for the Second Half
The recommended compositions for the Second Half are:
- Ashveil DPS: Ashveil, Sunday, Tribbie, Hyacine (Streets Abuzz buff)
- Aglaea DPS: Aglaea, Sunday, Cyrene, Hyacine (Commotion buff)
- Mydei DPS: Mydei, Cyrene, Tribbie, Hyacine (Commotion buff)
- F2P option: Serval, March 7th (Imaginary), Yukong, Lynx (Commotion buff)
Other strong picks include Imbibitor Lunae, Sparkle, Acheron, Aventurine, Jade, Jiaoqiu, Rappa, and Cipher.
What are the rewards for clearing Stage 4?
Completing Stage 4 with all objectives nets the following rewards:
The full 60,000 point threshold unlocks all completion rewards. The stage runs through May 11, 2026, so there is time to refine your approach across multiple attempts.
Stage 4 full completion rewards
Quick reference: Type weaknesses by half
Matching your team's damage types to the enemy weaknesses directly affects how quickly you can break enemies and control the action order, which feeds directly into Grit Value generation and Resound stacking.
For more endgame content strategies and character build guides, browse more guides on GAMES.gg to stay ahead of each new Pure Fiction cycle.