
What Is the Mirror Dungeon in Limbus Company?
The Mirror Dungeon is Limbus Company's dedicated grinding mode, letting you farm materials without any weekly cap on runs. Each run sends your team of Sinners through a randomly generated dungeon built around E.G.O Gifts, keyword decks, and escalating floor difficulties. Unlike story content, the Mirror Dungeon refreshes every Season alongside new Canto releases, meaning the mechanics you master today will carry forward into future iterations with only minor adjustments.
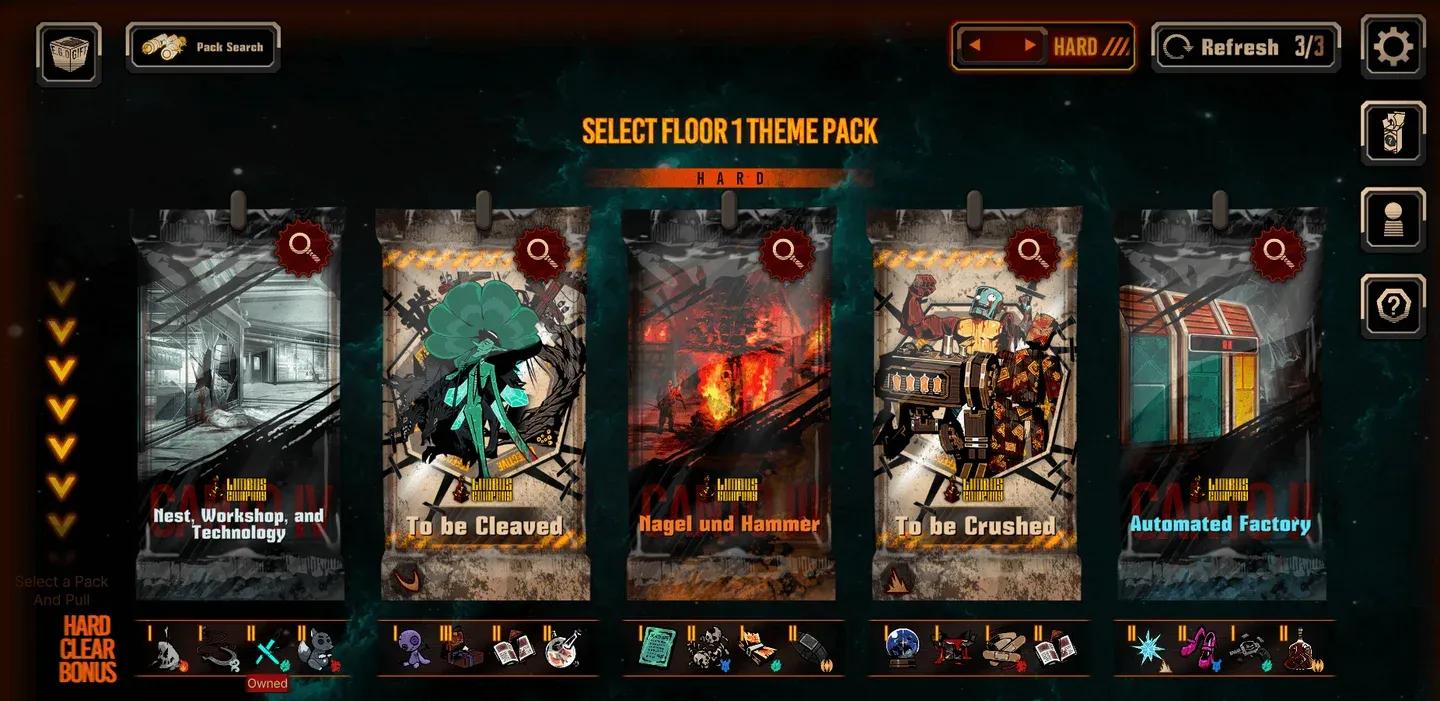
Theme pack floor selection
How Does the Reward System Work?
Entry into the Mirror Dungeon is free, but claiming rewards costs Enkephalin Modules. The base Normal Mode run requires 5 Modules per weekly bonus charge used, while Hard Mode costs 6 per charge (or 5 if no bonus charges remain).
Each week, you receive 3 weekly bonus charges. Here is how the reward tiers break down depending on how you use those charges:
Hard Mode is the clear winner for efficiency. Using all 3 charges in a single Hard Mode run nets the same 750 Lunacy while delivering significantly more Limbus Pass XP compared to three separate Normal Mode runs. Hard Mode for the current Mirror of Names and Spiders requires completing Canto VIII and clearing Normal Mode first.
Understanding the Core Mechanics
Starlight: Your Meta Currency
Starlight is a persistent currency that carries between runs and funds several quality-of-life mechanics. You earn it from multiple sources:
- 60 Starlight per run as a base amount
- 1 Starlight per Rest Bonus charge on Identities used in the run
- Starlight equal to the floor number upon each floor clearance (up to 5 per floor)
- An additional 4x the floor number for clearing floors in Hard Mode (up to 20 per floor)
- 15 Starlight per Adversity Score at run end
- 5 Starlight per Refraction Railway theme pack cleared
- 300 Starlight for extracting a newly released Identity or E.G.O within 2 weeks of release
Starlight fuels Theme Pack Observation, which lets you swap out a theme pack in any given floor slot for a different one from the available pool. The first swap costs 20 Starlight, with each subsequent swap on the same floor costing 10 more. This is invaluable for targeting specific E.G.O Gifts tied to particular theme packs.
How Does Cost Work in the Mirror Dungeon?
Cost is the in-run currency earned by winning combat encounters. It funds shop purchases between floors. The amounts you earn per encounter type are:
You also start each run with a base of 200 Cost, plus 1 Cost for every 5 Starlight you convert at run start. Certain Starter Buffs also increase your starting Cost pool.
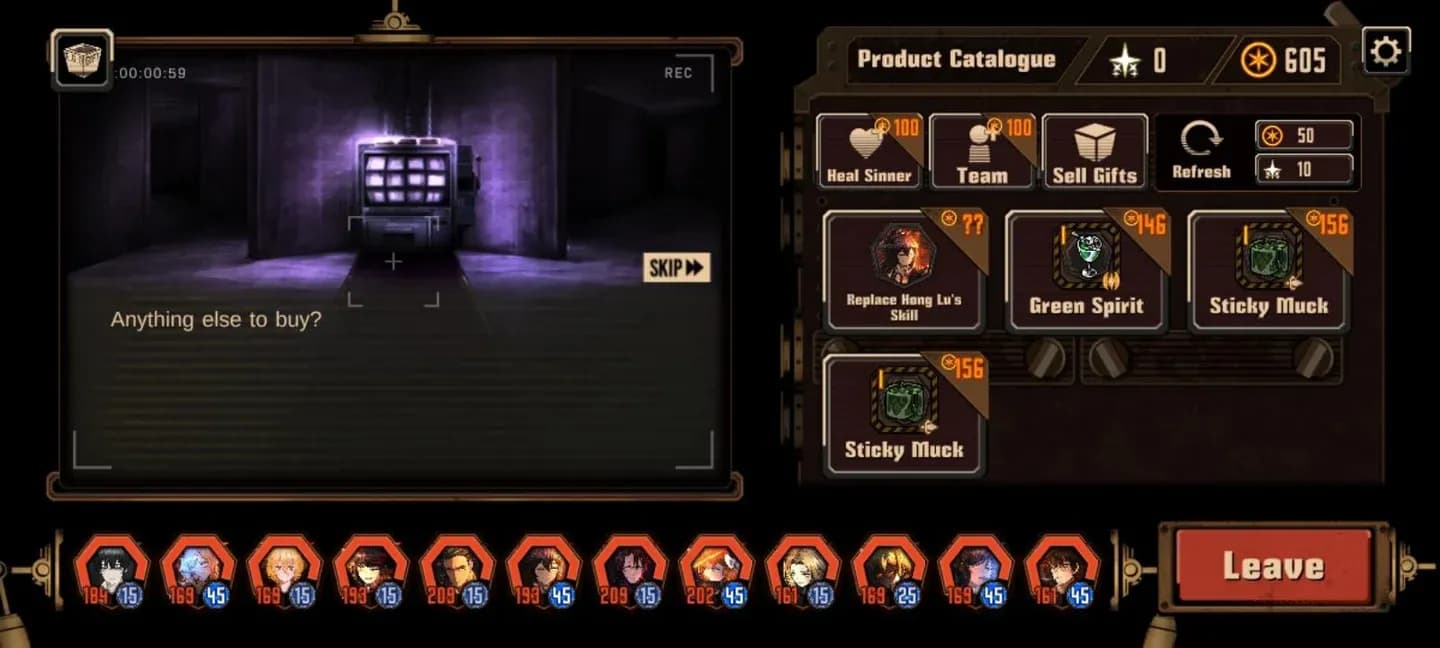
In-dungeon shop Cost menu
What Can You Buy at Shops?
Shops appear before the final boss node on every floor. Key purchases include:
- Heal Sinner (100 Cost): Heal one Sinner by 50% HP and 45 SP, revive a dead Sinner, or heal all Sinners by 15% HP and 15 SP
- Team Adjustment (100 Cost): Swap the Identity or E.G.O of up to 3 Sinners
- Skill Replacement (45/75/120 Cost): Replace Skill 1 with Skill 2, Skill 2 with Skill 3, or Skill 1 with Skill 3
- E.G.O Gifts (140-600 Cost): Purchase gifts from a rotating pool of 4
- Refresh (15 Cost, +15 each time): Refresh the gift pool and Sinner available for skill replacement
- Keyword Refresh (90 Cost): Like a standard Refresh, but biased toward a keyword you select
- Gift Fusion (Free): Combine multiple gifts to create higher-tier ones
- Sell Gifts: Recover 50% of a gift's purchase price
Super Shops replace regular shops on Hard Mode floors with a 3% base chance, increasing by 1% for every 20 Cost spent at previous shops. Super Shops display 7 E.G.O Gifts instead of 4, allow 2 skill replacements, and support fusion of up to 5 gifts.
E.G.O Gifts: The Heart of Every Run
How Do You Start a Run?
At the beginning of every run, you select 1 Tier II E.G.O Gift from one of 10 categories, each tied to a status keyword or damage type:
- Burn: Hellterfly's Dream, Fiery Down, Pain of Stifled Rage
- Bleed: Wound Clerid, Little and To-be-Naughty Plushie, Awe
- Tremor: Oscillating Bracelet, Reverberation, Sour Liquor Aroma
- Rupture: Barbed Lasso, Fluorescent Lamp, Smoking Gunpowder
- Sinking: Red Order, Melted Spring, Grandeur
- Poise: Cigarette Holder, Stone Tomb, Old Wooden Doll
- Charge: Employee Card, Portable Battery Socket, Patrolling Flashlight
- Slash: Dreaming Electric Sheep, Short Cane Sword, Resolution
- Pierce: Gathering Skulls, Plume of Proof, Torn Bandolier
- Blunt: Today's Expression, Pocket Flashcards, Temporal Bridle
After selecting your starting gift, you can use E.G.O Gift Search to purchase up to 3 additional Tier III or lower gifts directly for Starlight:
This system is particularly powerful for securing niche gifts tied to specific theme packs that might not appear naturally during your run.
Starting E.G.O Gift selection
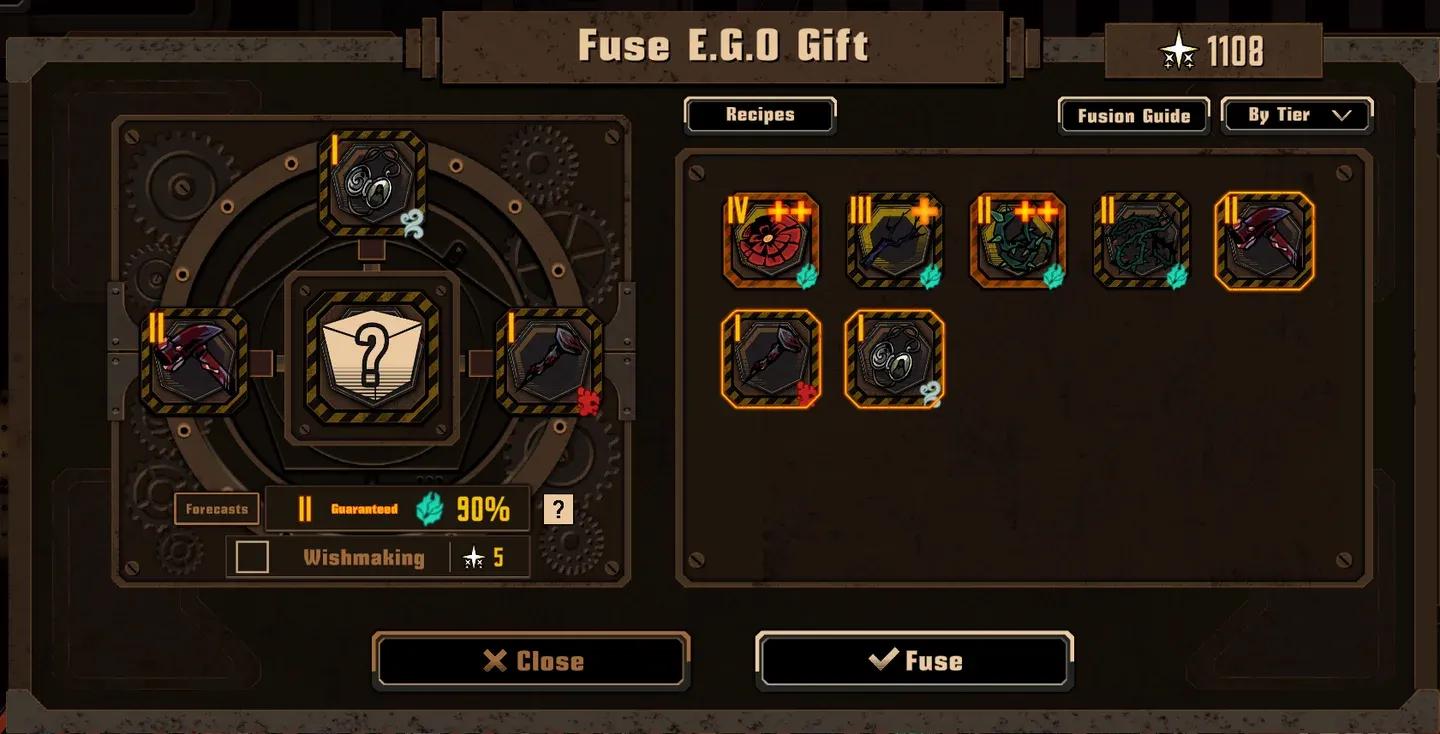
How Does Gift Fusion Work?
Fusion combines multiple gifts to produce a new one, using a points system based on tier:
The combined point total determines the output tier:
- 10 or fewer points: Tier I result
- 11-16 points: Tier II result
- 17-24 points: Tier III result
- 25+ points: Tier IV result
Super Shop fusions use slightly compressed thresholds, making it easier to produce Tier IV gifts when fusing there.
For keyword accuracy, fusing more gifts increases the chance of landing on your chosen keyword category: 2-gift fusions have a 60% chance, 3-gift fusions have a 90% chance, and 4+ gift fusions have a 99% chance. Spending 5 Starlight on Wishmaking during any fusion boosts these to 90%, 99%, and 99.99% respectively.
What Are the Seven Core Keywords?
Limbus Company centers its Mirror Dungeon deck-building around 7 representative keywords, each tied to one of the seven Sin Affinities. Understanding each keyword's strengths and weaknesses is the difference between breezing through Hard Mode and struggling on Floor 3.
Burn (Wrath)
Effect: At turn end, deal fixed damage equal to Burn Potency and reduce count by 1.
Strengths: Easy accumulation and maintenance. Count only drops by 1 per turn, making it the most consistent keyword to stack. Burn-proportional coin power effects are easy to trigger.
Weaknesses: Damage activates only once per turn end, capping at 99 fixed damage regardless of how high Potency climbs. This makes Burn less impactful in high-HP boss fights outside of Mirror Dungeon. The core gift Fiery Down received nerfs that reduced its ceiling in Hard Mode.
Bleed (Lust)
Effect: Each time the afflicted unit tosses an attack skill coin, it takes fixed damage equal to Bleed Potency. Count drops by 1 per coin toss.
Strengths: Highest damage ceiling among keywords when enemies act frequently. The exclusive synthesis gift Blood Fog grants coin power +3 and damage +100% to the fastest formation ally, making Bleed one of the strongest Mirror Dungeon decks. The La Manchaland and Black Cloud personality pools are both deep and high-performing.
Weaknesses: Count depletes rapidly since it decreases per coin toss rather than per turn. Bleed deals no damage when enemies are staggered. Outside Mirror Dungeon, Bleed relies heavily on enemy action frequency.
Tremor (Sloth)
Effect: When hit by a Tremor Burst skill, deal disruption damage equal to Tremor Potency. Count decreases at turn end.
Strengths: The best keyword for triggering staggers quickly. Tremor Burst raises an enemy's Stagger Threshold, enabling faster disruption. Amplitude Conversion variants add significant damage and debuff utility. The vibration deck currently holds top-tier status in Parallel Superposition EXTREME.
Weaknesses: Requires specific setup around amplitude conversion and entanglement to deal meaningful damage. High completion cost since key Tremor personalities and EGOs are often time-limited.
Rupture (Gluttony)
Effect: Each time the afflicted unit is hit by an attack skill, it takes fixed damage equal to Rupture Potency. Count drops by 1 per hit.
Strengths: Theoretically unlimited damage per coin, with 99 fixed damage per coin at max Potency. Ignores physical resistance entirely, making it reliable against heavily resistant enemies. The Black Water personality line provides excellent count maintenance.
Weaknesses: Count maintenance is the most demanding among all keywords, requiring active EGO Gift support. Performance in Parallel Superposition EXTREME ranks in the lower tier due to limited high-power gifts.
Sinking (Gloom)
Effect: Each time the afflicted unit is hit, it takes fixed SP damage equal to Sinking Potency. Count drops by 1 per hit. Enemies without Sanity take Gloom attribute damage instead.
Strengths: Exceptional clash win rate against enemies with plus-coin skills by depleting their SP. Deals Gloom attribute damage to enemies without Sanity, making it a damage specialist against certain resistances. Panic type manipulation provides significant turn control.
Weaknesses: Deals no damage to enemies with Sanity, relying entirely on SP depletion for value. Enemies using minus-coin skills become extremely dangerous since their low SP increases their coin accuracy. Slow clearing speed in normal encounters.
Poise (Pride)
Effect: Boosts critical hit chance by Potency x5% for the next Count hits.
Strengths: Self-buff keyword that works against any enemy. No requirement to stack debuffs on targets. The synthesis gift Lucky Bag dramatically boosts Skill 3 power, turning Poise from a minor buff into a genuine carry keyword. Period Office personalities hold Tier 0 status.
Weaknesses: Count is difficult to maintain without dedicated support. Keyword damage increase from crits alone is minimal without gift amplification.
Charge (Envy)
Effect: Consumed to strengthen specific skills. Count cap is 20 (extendable). Count drops by 1 at turn end.
Strengths: Self-buff that persists as Charge Power once accumulated, never decaying unlike other keywords. W Company personalities with Charge reach extremely high clash power and damage output after warmup. The Near-light Superbattery gift allows Charge to ignore physical and Sin resistances.
Weaknesses: Requires warmup turns before reaching full potential. Several key Charge personalities self-harm or attack allies when Charge Count runs low, demanding careful management. Resistance issues persist outside Mirror Dungeon without specific gift support.
Parallel Superposition Mode: Going Beyond Floor 5
Once you clear all 5 floors in Hard Mode with Parallel Superposition enabled, a prompt appears after the Floor 5 boss. Confirming extends your run to 10 floors, with Floors 6-10 featuring significantly harder Mounting Trials. Lunacy rewards do not increase past Floor 5, but you gain additional Starlight and Projection Rate.
After Floor 10, another prompt unlocks Parallel Superposition EXTREME, extending the run to 15 floors. Floors 11-15 feature unique Long Battle theme packs, Mounting Adversities that impose severe limitations on your Sinners, and large Starlight and Projection Rate rewards. Theme Pack Observation is disabled in EXTREME mode.
The four EXTREME Boss rewards are:
- Don Quixote: The Family's Resentment (Tier IV Bleed gift)
- Ricardo: Rules of the Middle (Tier IV Blunt gift)
- Lei Heng: For the Capo (Tier IV Tremor gift)
- Kkomi and Vergilius?: Kkomi's Mini-Gift (Tier IV universal gift)
Mirror Projection: Long-Term Rewards
Completing specific actions in Mirror Dungeons earns Achievements, which convert into Projection Rate. Every 100 Projection Rate equals 1 Reward Level, with up to 100 Reward Levels available per Season.
Regular run completions also grant Projection Rate, but a weekly cap of 1000 Projection Rate (10 Reward Levels) applies to this passive method. For faster progression, clear EXTREME floors with Adversities selected, as these provide Projection Rate far more efficiently than standard runs.
Achievements and their associated rewards reset with each Season's new Mirror Dungeon.
Mirror Projection reward levels
What Multi-Keyword Decks Should You Consider?
Once you have enough Sinners built out, multi-keyword decks unlock access to multiple synthesis gift effects simultaneously. The most viable combinations currently are:
Bleed + Poise (Calling Deck): Blood Fog and Lucky Bag both active. The fastest formation ally benefits from both gifts, creating extreme Skill 3 damage. Core personalities include Black Cloud Heathcliff and Black Cloud Ishmael alongside La Manchaland members.
Poise + Rupture (Breath Burst Deck): Released in Season 6, this deck uses Black Water personalities as the backbone. Lucky Bag and the Rupture gift Pleasure work in tandem to accelerate burst windows. Strong in EXTREME mode.
Poise + Sinking (Index Deck): Made viable by Season 7 Index personalities. Spiderweb Index Finger Yi Sang acts as a hypercarry, with the deck performing well even without full gift support.
Charge + Rupture (W Company Deck): W Company personalities supply Charge while Rupture handles resistance bypass. The Near-light Superbattery gift solves the resistance problem that plagued pure Charge decks.
Key Takeaways for New and Returning Managers
The Mirror Dungeon rewards players who invest in understanding keyword interactions over those who simply field the highest-rarity Identities. Pick a starting keyword that matches your available Sinners, use Theme Pack Observation to target relevant gift packs, and prioritize synthesis gifts over individual upgrades whenever possible. Hard Mode is always worth attempting once unlocked, as the reward efficiency gap over Normal Mode is substantial.