
Mouse: P.I. For Hire hides ten Jack Pepper figurines across its campaign, and the game does almost nothing to help you find them. Unlike comics, newspapers, or baseball cards, your menu doesn't track how many you've grabbed. The only way to check your progress is to look at the shelf in Jack's P.I. Office, wedged between the caseboard and the bedroom. Miss one, and you won't know until you're done.
Most of these figurines are buried behind puzzles, locked doors, and abilities you may not have fully explored yet. A few are blink-and-miss-it easy once you know where to look. This guide covers every single one, in mission order, so you can grab them on your first run without backtracking.
Where do you check your Jack Pepper figurine progress?
There's no collectible counter in your pause menu for these figurines. Head back to the P.I. Office and check the shelf between the caseboard and the bedroom. Each figurine you collect appears there physically. If a slot is empty, you're still missing one.
Before heading into a new mission, glance at the shelf. It's the fastest way to confirm whether you picked up the figurine from the previous level without needing to replay the whole thing.
Your figurine shelf in the office
All Jack Pepper figurine Locations
Collectible 1: P.I. Office mission
Head into John's Bar and walk through to the kitchen. At the back of the kitchen, you'll find a lock you can pick. Pick it, go down into the basement, and walk to the far end of the room. The first figurine is waiting for you there.
This one is the most straightforward of the ten. Think of it as the game's way of introducing the concept before things get complicated.
Collectible 2: Cheeseball Sub mission
This is the most mechanically demanding figurine in the game. You'll need to progress well past the boss and through multiple areas that test your propeller tail hovering ability before you reach the relevant room.
Look for a typewriter sandwiched between a ladder and a locked door. The ladder goes up to the Cheeselegger Foreman. Do not go up there, or you'll lock yourself out of the room (it's timed, not permanent, but the spikes make it stressful). Crack the timed lock, get inside, and flip the switch to activate the fans. Rise up to the rafters and find the barrel next to the wall marked "Totally Normal Wall". Throw the barrel at the graffitied foundations to blow a hole through. If you miss, your TNT works just as well. The hidden cellar behind the wall holds the figurine and some coins.
Collectible 3: Saltwater Cambozo mission
From the mission's starting point, locate the fish hanging off the pier. Turn around, jump off the edge, and hover using your propeller tail while facing the cliff. A small alcove is cut into the cliff face. The figurine is inside, alongside a black safe that contains one of the game's schematics.
Collectible 4: White Lies and Dark Secrets mission
Reach the courtyard outside the mansion. There's a locked church just to the right of the main gate. The graffiti on its front reads "For whom the bell tolls", which is the puzzle hint you need.
Three bells are scattered nearby: one at ground level near the house with the birdhouse above it, one on the tree in the courtyard, and one on the church roof itself. Shoot all three, and the doors open. The figurine is in the back room, near a closet.
Collectible 5: Damp Evidence mission
Once inside the mansion, find the room containing the foyer key and typewriter. Here's the catch: do not pick up the foyer key. Grabbing it collapses the floor and seals the room permanently.
Instead, turn around and find the bookcase with a vent above it. Climb through the vent. Ammo, the figurine, and a significant amount of cash are all waiting on the other side.
Picking up the foyer key before going through the vent locks you out of this figurine for the rest of your playthrough. Vent first, key second.
Collectible 6: It All Points To Here, Right? mission
After speaking with the elephant, backtrack and climb the ledge. You'll find a locked door leading to a clue and a vent that opens into the viewing gallery. Grab the clue, spot the janitor and a key nearby, take the key, and leave the room without going downstairs.
Use the key on the locked door in the area. Inside, a warp pipe leads to a safe, but the adjacent door opens into a dressing room. The figurine is sitting on the dressing room table.
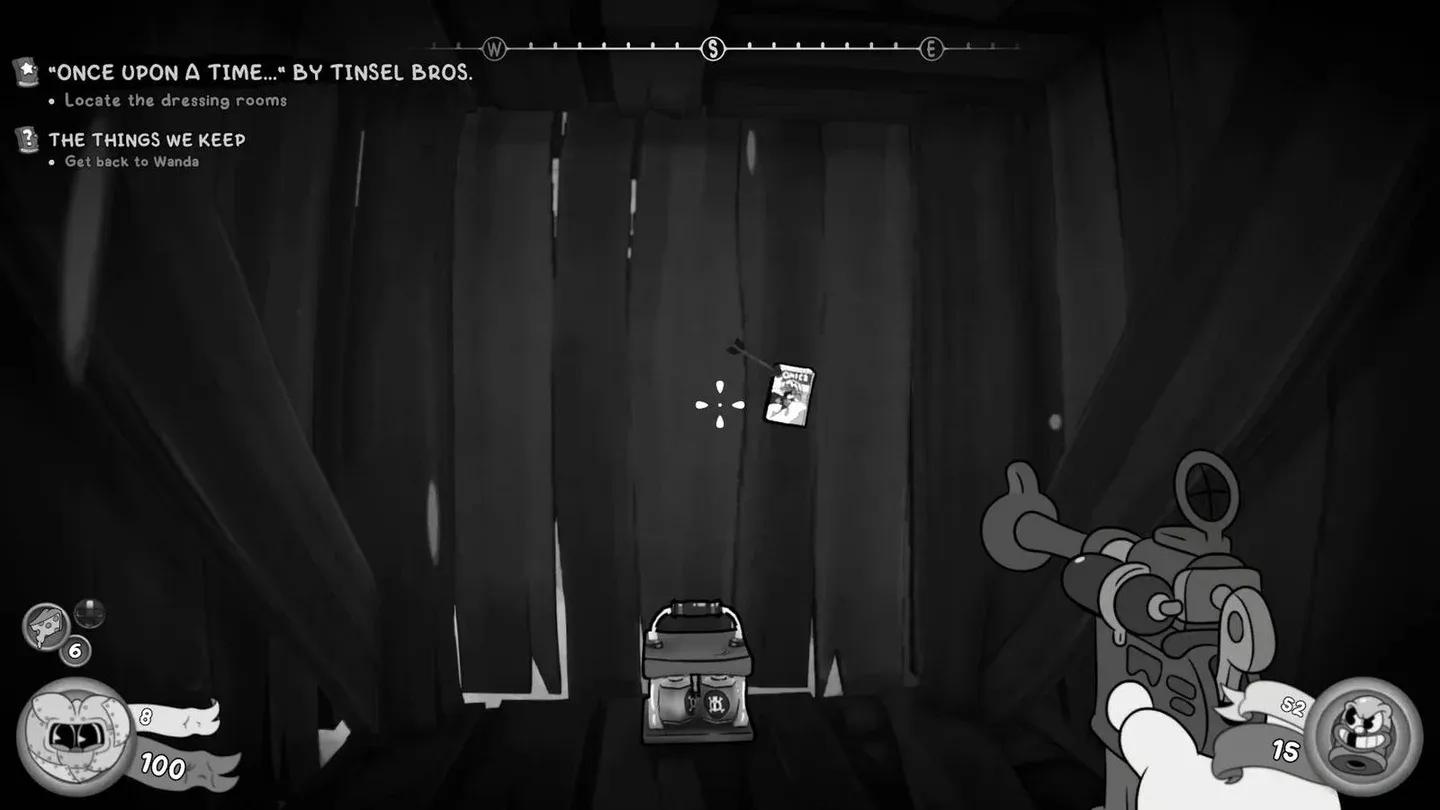
Dressing room table figurine spot
Collectible 7: ?lednaB evetS si lleH eht erehW mission
This one doesn't require any puzzle-solving. At the start of the section where you enter literal hell, you'll walk into a bar full of enemies, including your first encounter with the cartoon Cacodemons. Clear the room, then look behind the bar before heading upstairs. The figurine is sitting between two coin stacks. Easy to walk straight past if you go upstairs immediately after the fight.
Collectible 8: The House of the Empty Mouse mission
This is the most involved puzzle of the ten. Three Mon-keigh statues (mouse-like primate figures) are hidden around Bandel's mansion:
Bring all three to the pedestals on the middle floor of the library in the northern part of the estate. The placement order follows the Japanese maxim of the three wise monkeys: see no evil, hear no evil, speak no evil, placed left to right on the plinths. Get the order right and the bookshelf to your right opens, revealing a staircase down to a small laboratory. The figurine is on the console at the back.
If you're unsure which statue represents which monkey, think visually. The posture of each Mon-keigh should give you a clear enough hint once you're holding them.
Collectible 9: Glugging From The Deep mission
In the main dock area, you need to activate two switches to progress. After hitting the first switch, walk along the ledge toward the ocean to its far end. A small ledge sits below. Drop down to it and a computer entity called the Veloper will begin speaking to you. After a conversation with another developer (delivered in Polish), a warp pipe, some money, and the figurine all appear in the room.
Veloper conversation unlocks figurine
Collectible 10: Fair Enough mission (World's Fair 1934)
The final figurine comes after the point of no return, in the World's Fair 1934 level. During the first section, fight through the BMP goons near the topiaries of two elephants and a giraffe. Once they're down, go through the gates and turn left up the stairs.
There's a newspaper on a bench. Look at the bush to the right and you'll notice a skeleton partially visible inside it. That skeleton is the hint: you can walk straight through this bush. Inside, you'll find a large supply of ammo, cash, and the tenth and final figurine.
What unlocks when you collect all 10 figurines?
Based on available information from sources, collecting all ten figurines completes your shelf display in the P.I. Office. The game tracks this visually rather than through a menu counter, making the fully stocked shelf a satisfying physical reward. Whether additional unlocks are tied to a complete collection, check the Achievement and Trophies guide for any related completion milestones.
For more guides covering Mouse: P.I. For Hire and other games worth your time, browse more guides at GAMES.GG.