
Mouse P.I. For Hire hides 89 schematics across its levels and side jobs, and they are the only way to upgrade your weapons at B.A.N.G stations. You cannot buy them in the shop, and levels are not replayable, so missing too many on a first run will lock you out of upgrades permanently. The good news: you only need 63 of the 89 to fully upgrade every weapon and unlock the We'll B.A.N.G., Ok? trophy or achievement, giving you a buffer of 26 you can safely skip.
Schematics cannot be purchased from the in-game shop and levels cannot be replayed. Plan your route carefully on your first playthrough to avoid missing more than 26.
How do schematics work in Mouse P.I. For Hire?
Each weapon requires 9 schematics to reach maximum upgrade level at a B.A.N.G station. With 7 fully upgradeable weapons implied by the 63-schematic requirement, collecting every single one is not mandatory, but staying aware of your count per level keeps you on track. Most schematics are tucked inside safes, on tables, pinned to walls, or hidden behind destructible objects. A handful are awarded for completing side jobs rather than found in the environment.
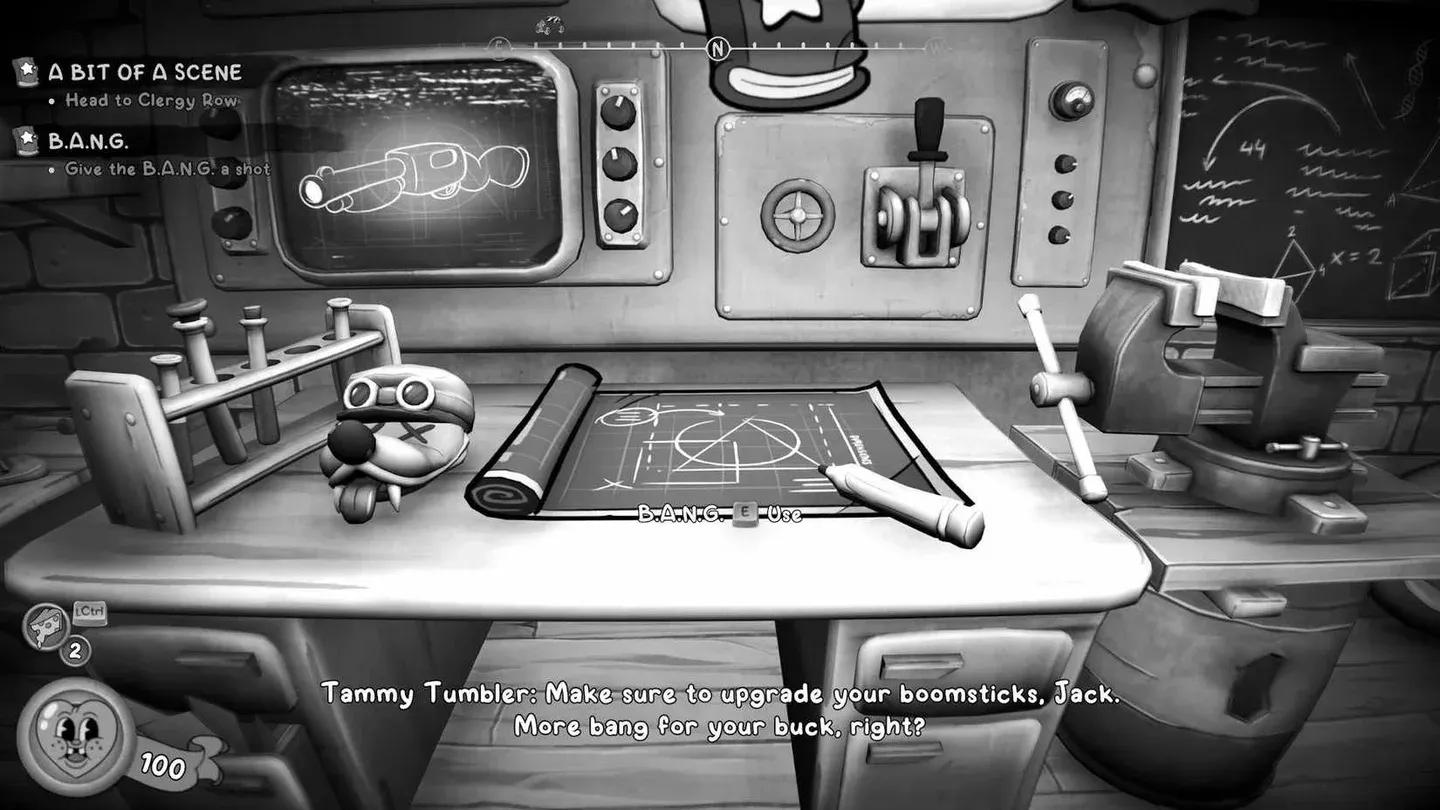
B.A.N.G station upgrade screen
What is the fastest way to find all schematics?
The missions below are listed in the order they appear in the game, based on data from PowerPyx and ShowGamer. Each entry describes exactly where to go so you can grab every schematic without backtracking.
Big Mouse, Little Hope (prologue and return)
The game opens here and revisits this location later. Across both visits there are 4 schematics total.
- After descending the large staircase, enter the next room and open the safe inside.
- Near the room with the locked mechanical door, check the small room beside the lever. Kick the glass to get inside.
- After watching Soyer descend the elevator, take the stairs down and find the ladder. Climb it for the schematic.
- On your return visit, the schematic is in the same safe as the very first one you found in the prologue.
The Vanishing Act
Four schematics spread across an apartment building and a subway section.
- In the apartment building, shoot the box blocking the bathroom door to get the Loft Key, then use it on the locked door nearby. The schematic sits on the table inside.
- After reaching the next typewriter in the subway, check a table close by.
- After defeating enemies who arrive by train, board the train and exit through the top left doorway onto the tracks. A safe there holds the schematic.
- In the same area, enter the bathroom below the stairs to find another on the table.
Gumshoe in the Opera
Three schematics, all tied to vertical exploration.
- Right at the start, jump on top of the vent.
- After learning the double jump, drop to the platforms in the water and open the safe.
- Follow the path over the water to the next platform and look on the barrel to your left.
Bandel's Laboratory
Four schematics, including one that requires chaining movement after the elevator.
- After climbing the ladder to one of the typewriters, look left to spot the schematic under a pallet.
- After the first boss fight, enter the room beside the stairs. It is on one of the tables.
- After activating the elevator via the fallen pathways, turn around and double jump onto a broken platform.
- From that same spot, ride the elevator up, go down the stairs on the right, then go under the stairs and tailpick the safe.
A Bit of a Scene
Four schematics, with two requiring the jail section.
- After climbing the ladder into the building, turn left immediately. The schematic is on the floor.
- Shoot the target to lower the pipes, cross over, and check the dresser.
- Take the left vent into the police station. In the jail area, open the gate on the right and tailpick the safe.
- Still in the jail cells area, find a side room with the prison key. One of the cells has the schematic under the bunk.
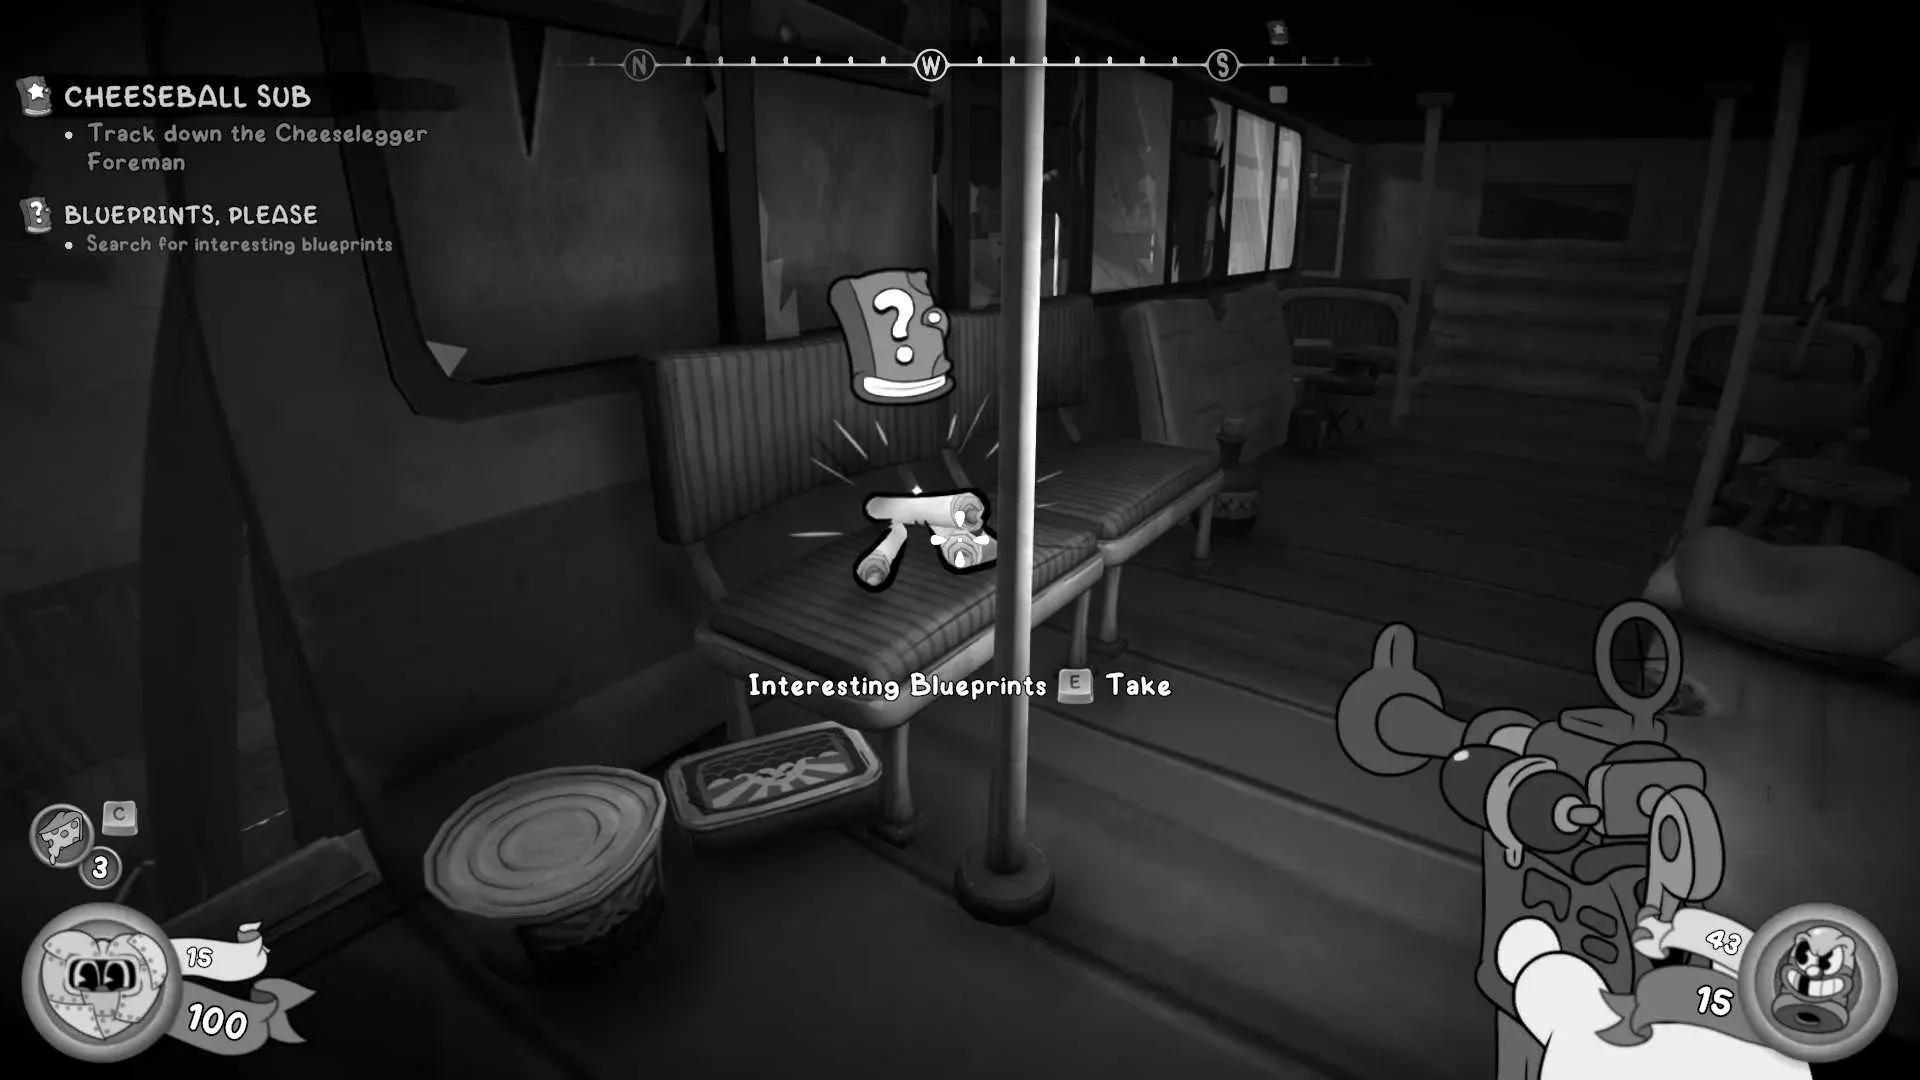
Cheeseball Sub
Four schematics, including one that requires jumping into water with heavy damage risk.
- After getting the Ticket Booth Key near the first train, unlock the door, follow the stairs, and go into the left room. The schematic is on the top bunk.
- From the room with the suspended train car, break the top-left window, shoot the explosive barrel to blow the wall, follow the path through the train to the platform, turn left, and jump into the tipped-over train.
- After gliding over the second body of water, the schematic is in the lower section at the far end. Water deals heavy damage here. Use a double jump into the updraft to escape.
- After the vent, tailpick the door ahead, jump into the water, and follow the tunnel at the bottom to a hidden safe.
The water in Cheeseball Sub deals significant damage. Grab the schematic quickly and use the updraft double jump to get back out without dying.
"Once Upon a Time..." by Tinsel Bros
Four schematics across a film set environment.
- After crossing the hole in the ground, go up the stairs on the left. The schematic is on a table.
- At the second set, drop down below to find one on the tables.
- After swinging across the top of the drawing room, check the tables on the other side.
- Get the key from Betty's dressing room, go outside, unlock the door on the right, tailpick the door on the left, then tailpick the safe at the bottom.
A Bit of Curd and Pepper
One schematic, easy to grab at the mission start.
- At the very start of the mission, check the top left of the room for a safe containing the schematic.
Saltwater Cambozo
Three schematics, all requiring some platforming or environmental awareness.
- After the opening stairs, jump up the wooden beams on the right side of the buildings until you reach an open window. The schematic is inside.
- After talking to Cameron Bozo and dropping into the yard, go to the top right and kick boxes to reveal a hidden path. Climb the ladder and look left.
- After breaking the power boxes to open the gate, jump over the truck and break boxes to uncover a vent. The schematic is inside.
White Lies and Dark Secrets
Four schematics across a countryside and mansion setting.
- After picking up the Kiss Kiss weapon, enter the house on the right. Skip the hole and go into the room on the right instead. The schematic is on the wall.
- On the ground near the first wedding ring.
- After exiting the barn, jump the gap and follow the fence on the right. The schematic is behind some crates.
- Inside the mansion, go upstairs and tailpick the door. The safe in that room holds the schematic.
Damp Evidence
Four schematics across a mine and swamp area.
- Near the wooden shacks by the mine entrance, jump onto the roof of the shack in front, then over to the broken bridge. The schematic is on the ground.
- After leaving the mine, go downhill and enter the opened building. The schematic is on the wall behind the shelf.
- In the swamp, jump onto a tree platform and swing across. The schematic is pinned to the tree.
- At the Cheeselegger's hideout, go down the middle and turn right when the building ends. A safe holds the schematic.
Shrewd Shrews
Four schematics, including one tied to a puzzle room with levers.
- After dropping down the waterfall, turn around and walk back through it. Follow the stairs and jump the gap. The schematic is on a table.
- In the lever room that activates updrafts, jump through the broken fence into the pistons and gears section. The schematic is by the small wooden boat.
- While chasing the magnet, look left after climbing one of the ladders.
- After the fighting ring, go upstairs, turn around, and follow the wall to a safe tucked in the corner.
It All Points Here, Right?
Four schematics in what appears to be a performance or entertainment venue.
- After blowing the wall and dropping down, jump onto crates in the far left corner and reach the small platform above.
- After the vent leads to balcony seats, pick up the Dressing Room key from the windowsill. Return to the bar, unlock the dressing room, take the warp pipe, and open the nearby safe.
- After using 4 Secret Tickets to unlock a door, go forward and find the schematic pinned to crates in the top right.
- After opening the giant mouth and going inside, check the tables.
Swamp Oddity
Three schematics, including one behind a piano puzzle.
- After lowering the bridge, jump onto the cages on the left and over to the small wooden room. The schematic is on the ground.
- After speaking with the Old Shrew, go to the music room and interact with the piano. Press the keys A, C, E, G in that order. Exit the room and a dresser will open, revealing a safe with the schematic inside.
- After exiting through the vent outside, go behind the building. The schematic is pinned to the wall.
The piano puzzle in Swamp Oddity requires pressing A, C, E, G in sequence. According to PowerPyx, the game confirms you did it correctly with a Dark Souls 1 reference from Jack.
To Catch a Mockingmouse
Four schematics, including one during the escape sequence.
- Behind the stage of the band playing in the Banquet Hall, on a table.
- In Kitchen 2, grab the Storage Key by the door and take the Warp Portal in the storage room. The schematic is on the table.
- Still in Kitchen 2, use the storage room Warp Pipe to reach Cabin IX, unlock it with the Cabin IX key, go through the vent, drop down the hole, pick up the Captain's Key, and tailpick the safe in the captain's room.
- During the boat escape sequence, the schematic is visible inside one of the cages.
"The Bookkeeper" by Tinsel Bros
Three schematics in a cave and cliff environment.
- After dropping through the building floor several times, break the crates on the right and enter the cave. A safe holds the schematic.
- After picking up the Bookkeeper's Letter, look left to spot a distant safe. Climb the wooden platforms and shoot the targets to lower the hook, then swing across to it.
- From that same safe, return to the cliff and find a small hole in the cliff face. The schematic is pinned to the wall inside the cave.
One Flew
Four schematics across a flooded and brain-themed area.
- In the water-filled room, jump in and find a way under one of the bridges into the center area. The schematic is on crates.
- In the room with the brain, the schematic is on the board.
- After getting the Jar-Head gun, go through the door and enter the newly opened warp pipe. Go through the door on the right, climb the ladder, and find the schematic on the table by the door.
- On the top floor balcony, jump to the roof of the center area and open the safe.
?lednaB evetS lleH eht erehW
Four schematics across a rooftop, boat, and hell-themed section.
- After jumping onto the roof, the schematic is on the table.
- On the boat, go upstairs and find it on a crate.
- In the hell section, cross the platforms to the wall-running segment. Look right and jump to the small rock ledge. The schematic is in the safe.
- After turning on the gears, parkour up the platforms to the typewriter, turn left, and follow the jump pads to the locked room with the schematic.
"Fatal Repulsions" by Tinsel Bros
Three schematics across a castle and swamp.
- In the castle area, after enemies kick down the giant painting, enter the revealed room and go through the vent. The schematic is in the safe.
- After dropping from the vent into the swamp, the schematic is pinned to the wall in the top-right room.
- After defeating Reggie and taking the warp pipe, the schematic is on the desk.
Glugging from the Deep
Four schematics across a port and underwater section.
- At the very start, jump up to the warp pipe ahead. The schematic is on the table.
- At the port, parkour up the right side of the roof into the large building and enter the vent. The schematic is pinned to the wall.
- Underwater, once you reach the large area with the submarine visible on your right, climb the nearby ladder. The schematic is in the safe ahead.
- After defeating Ze Professor and re-entering the water, the schematic is near the giant dead fish.
Jack Squat
Three schematics across a flooded environment.
- Pinned to the wall of Tammy's building.
- In the cellar, pinned to the wall directly on the main path.
- After the first flood escape, follow the main path until you need to drop down again. Instead of dropping, jump across to the other platform and open the safe.
The House of the Empty Mouse
One schematic in a hidden wall section.
- After exiting the cellar back outside, go to where you broke the metal pillar earlier and break the wall. Crouch under the wooden boards to find the schematic on a crate.
Fair Enough
Four schematics in the final stretch.
- Near the boats, blow up the wall to find the hidden room. Shoot the target on top of the building to open the warp pipe leading to the schematic.
- After talking to Wanda, head toward the stairs and go up the stairs on the right. The schematic is on a display to the left.
- After fighting enemies in the statue-filled courtyard, go through the gate and jump up the boxes to reach a board you can climb into the crate.
- In the room full of crates, go to the top right corner and open the safe.
Do you need every schematic for 100% completion?
No. The We'll B.A.N.G., Ok? trophy and achievement only requires 63 of the 89 schematics, meaning you can miss up to 26 without losing the unlock. That said, fully upgrading every individual weapon does require 9 schematics each, so if you want maximum firepower across the board you will want to stay thorough in each level.
For more guides covering action-platformers and collectible hunts, browse more guides at GAMES.GG to keep your playthrough on track.