
Mouse P.I. For Hire ditches the typical lockpick minigame entirely. Instead of wiggling a pick until a meter fills, you guide Jack Pepper's literal tail through the interior of a lock, threading it past walls and pins to reach the other side. The mechanic is called tailpicking, and while early locks are forgiving enough to figure out by feel, later puzzles with timed safes and permanent failure states are a different story. Miss the wrong move on a black safe and whatever was inside is gone for good.
How does tailpicking actually work?
When you interact with a locked door or safe, the game loads a top-down view of the lock's interior. A path starts on one side and your job is to extend it to the opposite end. On PC, you steer using WASD. On a controller, the left stick handles movement. The path moves in whatever direction you input, threading through the narrow gaps inside the lock.
Scattered along the route are small circular nodes. These nodes represent the lock's pins (also called tumblers). You cannot skip any of them. To clear a tumbler, move the tip of your path directly into it, which pushes the pin back to its original position and opens the route ahead. Miss one or veer into a wall and the attempt resets completely.
Think of it as two simultaneous tasks: navigating tight gaps without touching walls, while keeping track of where the next tumbler sits so you don't overshoot it. Early locks have a handful of pins and a single clean path. That simplicity does not last.
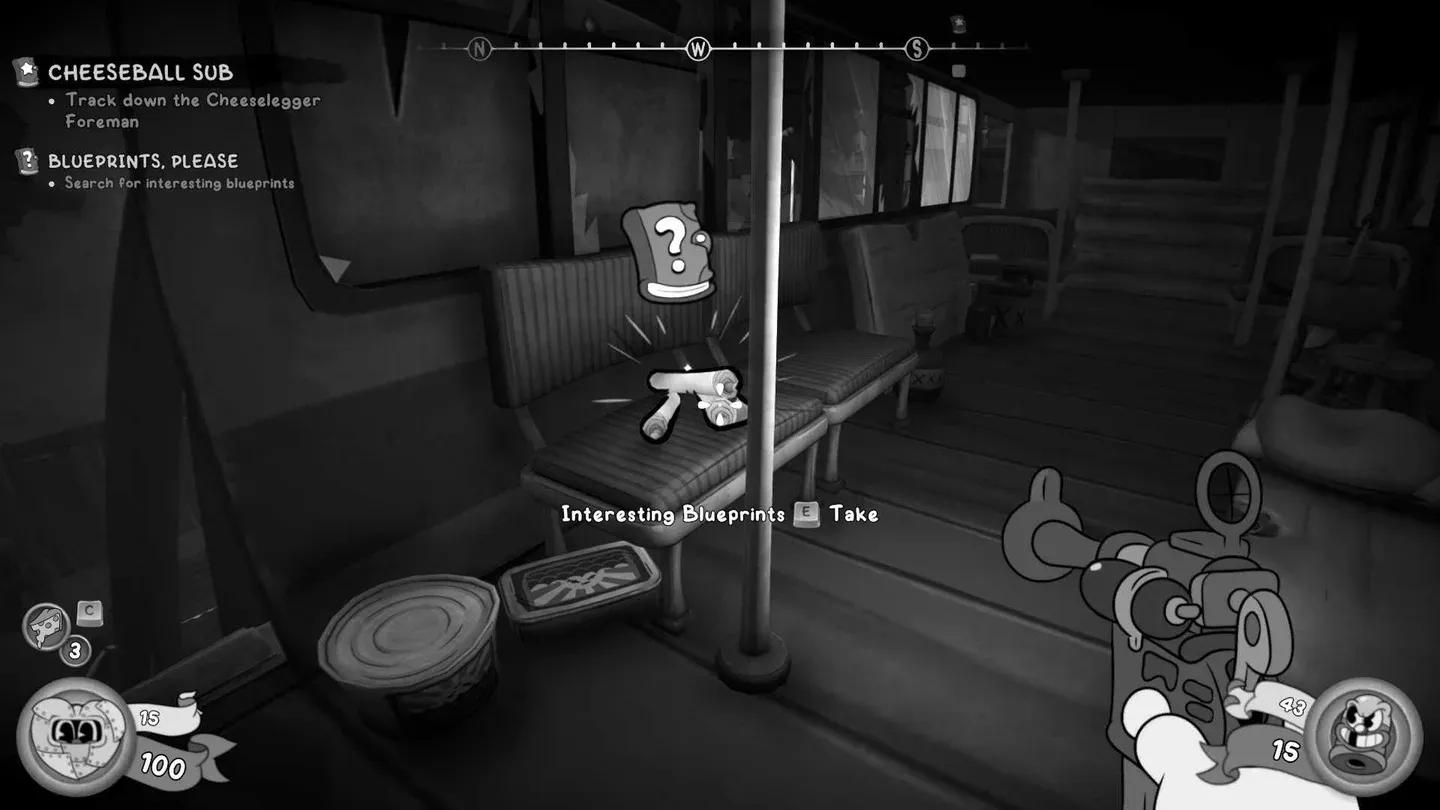
Tailpick lock interior view
What happens when you hit a thorn or a wall?
As you progress through the campaign, locks start introducing thorns (spikes) scattered throughout the path. Touching a wall forces a full restart of the attempt. Touching a thorn does the same, with zero partial progress preserved. The distinction matters because thorns are often placed right next to tumblers, meaning a slightly greedy input to hit a pin can send you straight into a spike.
The saving grace here is the undo button, located in the bottom-right corner of the lock interface. Pressing it steps your path back one move at a time, and you can press it as many times as needed. There is no penalty for using it. On puzzles with branching paths, the undo button is less a convenience and more a core part of the solution: take a branch, see where it leads, undo back to the fork if it hits a dead end, try the other direction.
Later locks layer on move limits alongside the thorns and branches. The available moves on restricted puzzles are typically calibrated to match the optimal solution path with little room for error. If you find yourself running low on moves, you almost certainly took a wrong branch early. Undo back to that fork rather than pushing forward and hoping the remaining path is short enough.
Timed locks and the permanent jam problem
Certain locks, particularly the black safes, impose a time limit, a move limit, or both. The timer appears in the upper-left corner of the lock interface. If time runs out or you exhaust your moves before finishing, the lock jams permanently. A jammed lock stays jammed. There is no in-game fix, no second attempt, and no way to recover the contents through normal play.
The only recovery option is reloading a manual save from before you interacted with the lock. Mouse P.I. For Hire uses a typewriter-based save system, with typewriters placed throughout each level. The game gives you 50 save slots, so there is no reason to be stingy. Save at a typewriter before every lock you encounter, especially any black safe.
Where does tailpicking show up in the game?
Tailpicking appears throughout the campaign whenever you hit a locked door or safe. The Bandel's Laboratory mission is a notable example, featuring multiple metal doors and at least one safe that all require successful tailpicks to proceed. The rewards behind those locks include weapon upgrade schematics, making them worth the extra care.
The game contains 24 main missions and 14 side jobs, many of which hide rewards behind locked doors and safes. Given that you cannot go back to replay levels, treating every lock as a one-shot opportunity is the right mindset from the start. Safes primarily contain money, but the weapon upgrade schematics that occasionally appear make the minigame far more consequential than it first appears.
Quick reference: tailpicking situations and solutions
Tips for getting through the hardest tailpicks
After working through the more complex puzzles, a few habits make a real difference. First, treat the undo button as part of your toolkit from the start, not a fallback. On branching puzzles, you are expected to explore and backtrack. Second, slow down near tumblers in tight corridors. The most common reset cause is clipping a wall while trying to hit a pin, not missing the pin outright.
For timed locks specifically, resist the urge to explore branches when the clock is running. Commit to the path that reaches the most remaining tumblers in the fewest moves. If that path turns out to be wrong, you will need to reload anyway, so there is no point burning time on optimistic detours.
The tailpicking system feels awkward for the first few attempts, but the rhythm of steering, hitting tumblers, and undoing bad moves becomes natural quickly. The real skill is not puzzle-solving ability; it is remembering to save before every single lock so a mistake never costs you something permanent.
For more gaming guides and tips, browse more guides on GAMES.GG to find coverage across the games you're playing right now.