

Pragmata gives you 15 weapons across four categories, and the game does not hold your hand about which ones are worth printing. Some are tucked into sector sub-areas you can walk past without noticing. Three require Stamp Board progression. One you cannot touch until you roll credits. Knowing where everything is, and more importantly which weapons to prioritize at the Unit Printer, makes the difference between coasting through Sectors 4 and 5 and getting demolished by them.
How does Pragmata's weapon system work?
Before getting into the list, the durability system deserves a clear explanation because it changes how you think about every non-Primary weapon.
Primary Units (the Grip Gun and Pulse Carbine) are permanent. They auto-recharge ammo and cannot be destroyed under any circumstances. Every other weapon in the game operates on breakable durability: once an Attack, Tactical, or Defense Unit runs out of ammo mid-mission, it is gone permanently. You have to return to the Shelter and print a fresh copy at the Unit Printer before you can use it again.
This means every shot from a non-Primary weapon carries weight. Blowing through your Charge Piercer ammo on standard enemies before a boss fight is a real mistake.
The process for permanently unlocking any weapon:
- Find the weapon as a field pickup in its designated sector sub-area.
- Fire it once to register the schematic automatically.
- Return to the Shelter between missions.
- Print it at the Unit Printer using available resources.
- Assign it at the Tram Terminal Loadout screen before entering the next sector.
The slot expansion at Sector 3's Firmware Updater terminal lets Hugh carry two Attack Units and two Tactical Units simultaneously. Before that point, you are limited to one of each. This upgrade fundamentally changes how you approach combat and makes dual-weapon rotations possible.
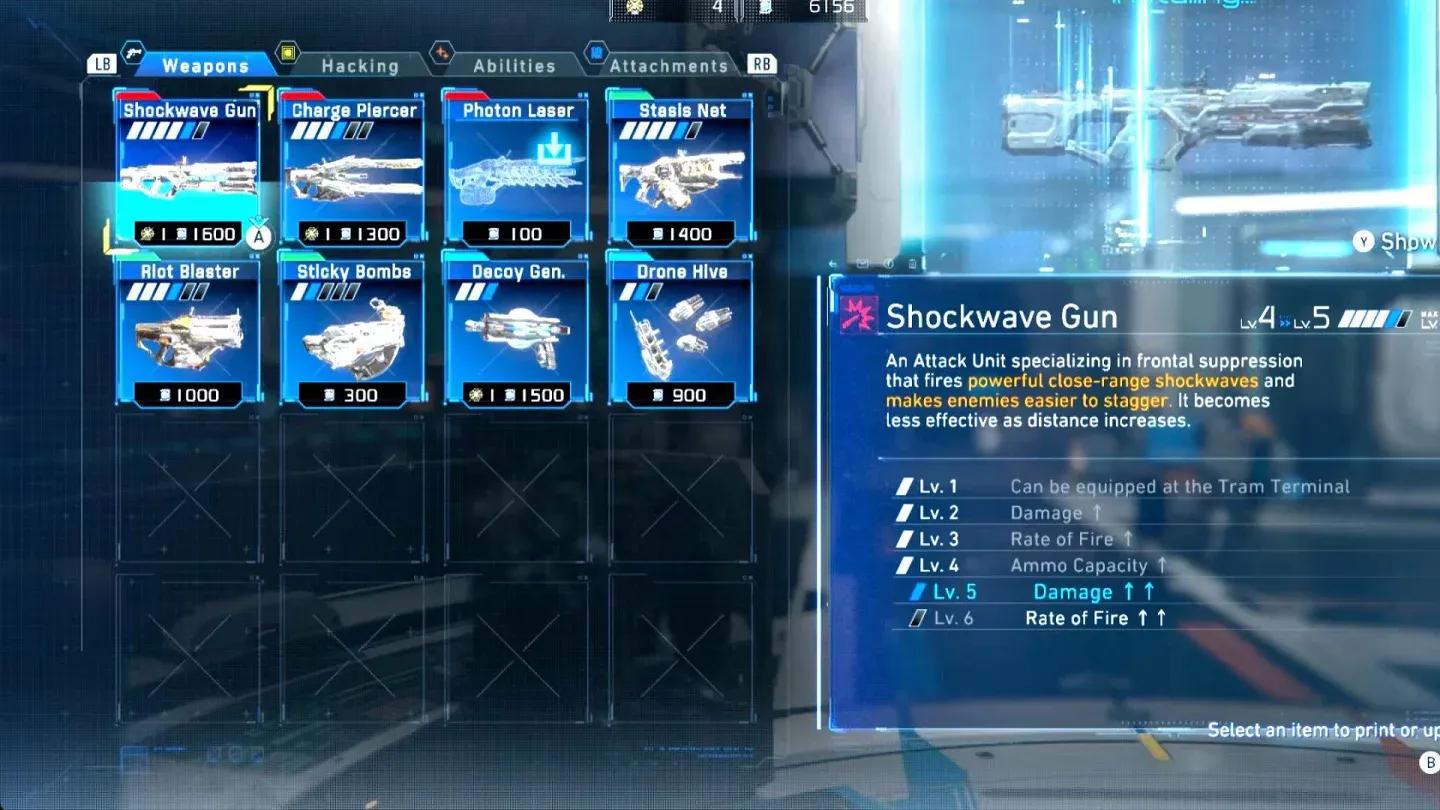
Unit Printer at the Shelter
All 15 Weapons
Primary Units
These two weapons form the backbone of every run. They never break, always have ammo available, and can be swapped only at the Shelter Loadout screen before entering a sector.
Grip Gun
Your starting sidearm and the one weapon you always have regardless of what else is in your loadout. It fires individual mid-range shots, holds 6 rounds that recharge automatically, and cannot be permanently destroyed. The catch is rapid fire triggers overheat, forcing a brief cooldown. Controlled burst fire is the right approach, especially during boss fights.
Upgrades through the Firmware Updater apply to both Primary Units once the Pulse Carbine is unlocked. Damage increases from 35 at level 1 to 44 at level 2, recoil improves from 0.26 to 0.15 between levels 3 and 4, and a seventh ammo slot opens at level 5. Damage reaches 53 at later upgrade milestones, turning the Grip Gun into a genuinely effective fallback weapon for extended fights.
Pair the Grip Gun with the Expose hacking node to extend Open State windows and land more shots before enemies close.
Pulse Carbine
Found at the Terra Dome Entrance in Sector 3, the Pulse Carbine is an assault rifle-class Primary Unit with fully automatic fire and a heat buildup system rather than a traditional reload. It generates substantially more heat in enemies than the Grip Gun, making it the dominant choice for heat-focused builds.
The main drawback is a strong left-pulling recoil. Use controlled bursts when you need to monitor the hacking grid simultaneously. At level 8, the Heat Gauge Buildup increases from 1.44 to 1.80, which meaningfully strengthens synergy with heat-damage modifier builds. The difference is noticeable against armored enemies that resist standard damage types.

Pulse Carbine heat buildup system
Attack Units
Attack Units hit hard and deplete fast. The game rewards knowing when to deploy them rather than using them as primary damage sources.
Shockwave Gun
The first Attack Unit you encounter, sitting in Sector 1's Power Distribution Center alongside the Stasis Net. It fires a radial energy burst at close range, effectively functioning as a sci-fi shotgun. High single-hit damage, strong stagger power, and best used immediately after a successful hack at point-blank range.
The Shockwave Gun handles common bots faster than anything else in the early game. It remains a strong second Attack Unit slot option even after the Charge Piercer becomes available, particularly for close-quarters sectors where positioning allows you to get in range consistently.
Charge Piercer
Found in the Side Alley of Sector 2: Mass Production Array. This weapon fires chargeable piercing rounds that increase in damage the longer the trigger is held, and the shots pass through multiple enemies in a line for AoE value. Slow charge time early on, but the level 3 and level 6 upgrades (which unlock Double Charge and Triple Charge respectively) transform it into the highest alpha-strike weapon available before post-game content.
Boss fights are where the Charge Piercer earns its place. Combine it with the Freeze Hack node to extend the Open window, then release a fully charged Triple Charge shot. The damage ceiling is absurd when you land clean hits on exposed weak points.
Photon Laser
Located in the Soil Research sub-area of Sector 3: Terra Dome. It delivers a sustained continuous-fire beam that increases in damage the longer it stays on target. Mobility is reduced while firing, so repositioning during extended beam use is genuinely difficult. Best used against bosses with exposed weak points that require sustained fire.
The Photon Laser excels in the final boss encounter on Lunatic difficulty, where maintaining beam uptime on specific weak points becomes the primary damage window. It also works well as part of a Jackhammer and Photon Laser rotation in post-game content where you need both burst and sustained damage options.
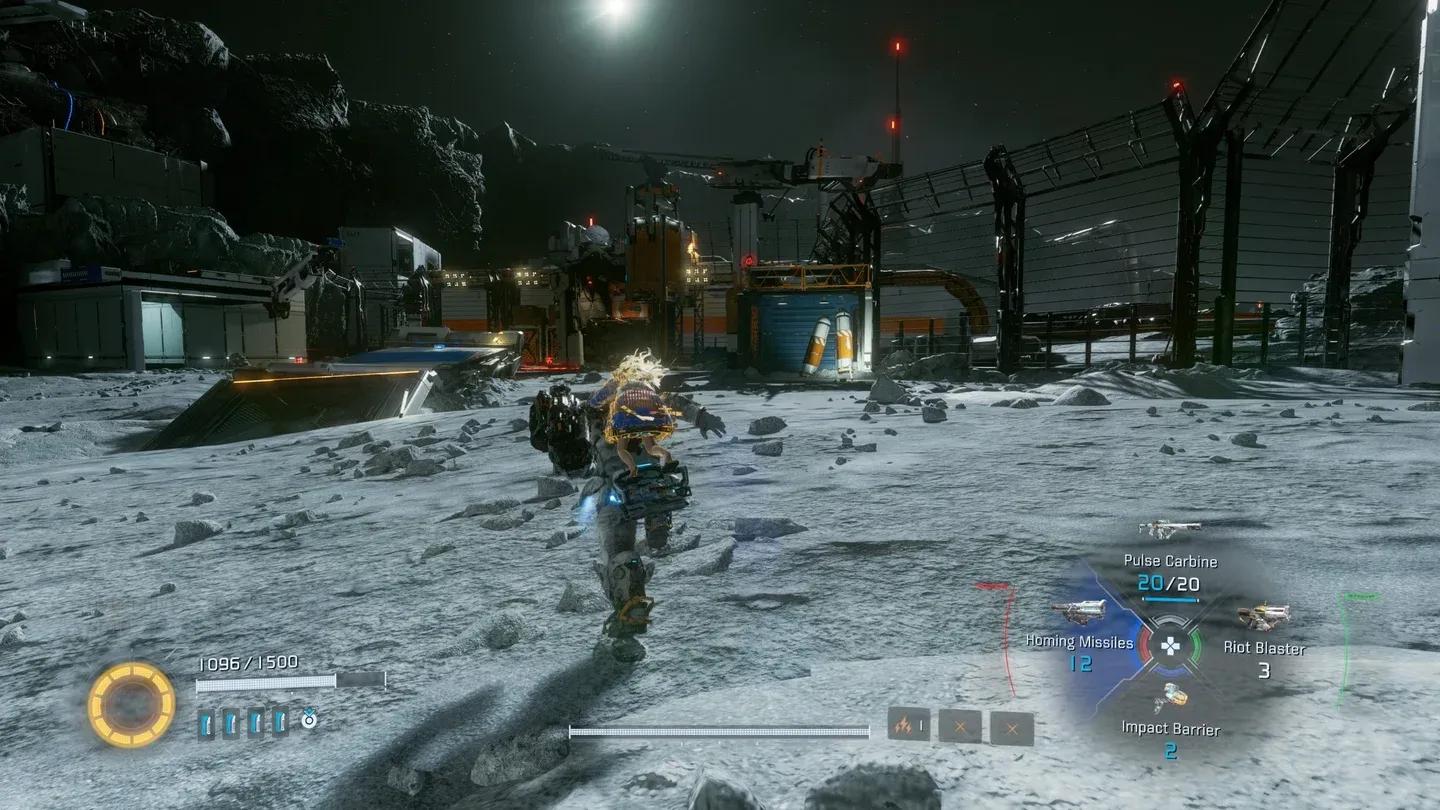
Homing Missiles
Found at the Mine Entrance in Sector 4: Lunum Mines. Charge the trigger to lock onto multiple enemies simultaneously, then release to fire. The level 4 and level 7 upgrades increase the number of simultaneous lock-on targets, making this the best crowd-clearing Attack Unit for wave encounters. Ammo-inefficient in isolated single-enemy fights, so save it for Red Zone waves.
Jackhammer
Unlocked only after completing the main story and entering New Game Plus or Unknown Signal Mode. The Jackhammer is the strongest weapon in the game: a heavy melee Attack Unit that deals massive damage even when enemies are not in an Open State. The mechanic requires holding the right trigger until the first hit connects, then continuing to hold for a pile bunker follow-up. Watch for the weapon flash, which signals the timing window for the extra hit. The follow-up carries pierce properties.
Low ammo count means it is not designed for sustained use across full sectors, but for boss rematches and Unknown Signal Mode challenges, nothing else comes close. The damage output is obscene when you land both hits cleanly.
Jackhammer post-game exclusive
Tactical Units
Tactical Units interact directly with the hacking system in ways no other category does. The right Tactical pairings can outperform equivalent Attack investment in complex multi-enemy scenarios.
Stasis Net
Found alongside the Shockwave Gun at Sector 1's Power Distribution Center. It fires a spherical electromagnetic net that immobilizes all enemies caught in the blast radius. The level 4 upgrade widens the net radius for more reliable coverage.
Stasis Net is particularly effective against the SectorGuard boss, where immobilizing the enemy creates a safe window to target the fuel tank's weak point during the hack window. Pair it with Offense Mode hacking for continuous damage during immobilization.
Riot Blaster
Located in the Shopping District of Sector 2: Mass Production Array. It fires arcing concussive rounds that damage, knock back, and briefly down enemies in a wide area. The downed state opens hacking windows and follow-up attack opportunities. The level 2 and level 5 Down Time upgrades directly extend how long enemies stay grounded.
Running Stasis Net and Riot Blaster together gives you strong crowd control coverage across different enemy types. Stasis Net handles clustered groups, Riot Blaster handles scattered threats that need to be grounded quickly.
Sticky Bombs
Found in the Eco Modeling Lab in Sector 3: Terra Dome. These attach to enemies and shrink the hacking grid matrix, reducing the number of nodes Hugh needs to navigate to complete hacks faster. Effects stack when multiple bombs are attached to the same target, and they also deal damage on explosion. The level 7 upgrade increases Hacking Matrix Shrink Time.
Sticky Bombs have no standalone combat value, but they become increasingly important in late-game sectors where grid complexity spikes. Attaching two or three bombs to a high-priority target before initiating a hack can cut completion time in half.
Code Generator
Unlocked by earning a Triple Bingo on the Specialist (third) Cabin Stamp Board. It spawns additional Open nodes in the hacking grid, disables error nodes for a duration, and increases hack damage. The Code Generator addresses the two biggest late-game hacking obstacles simultaneously: grid density and error node placement. Pair it directly with Offense Mode for maximum hack damage per Open window.
Hacking Mines
Unlocked by earning a Triple Bingo on the Director's (fourth) Cabin Stamp Board. Deploys mines that automatically hack any enemy that triggers them, bypassing the manual grid entirely. Highly situational, but strong in Unknown Signal Mode's Hidden Chamber challenges where enemy density makes manual hacking across multiple targets impractical. Deploy in chokepoints to maximize trigger frequency.
Defense Units
All three Defense Units share compact 3-level upgrade trees, making them the fastest and cheapest category to fully invest in. Each one operates on a different logic: the Decoy Generator distracts, the Impact Barrier blocks, and the Drone Hive attacks.
Decoy Generator
Found at the Lim Recycling Facility in Sector 2: Mass Production Array. Projects a holographic copy of Hugh that draws nearby enemies, pulling aggro and creating free repositioning and hacking windows. The upgrade path is just two levels of Increased Duration after the initial equip unlock, making it one of the cheapest units to fully upgrade.
Impact Barrier
Located at the Crane Operation Yard in Sector 4: Lunum Mines. Deploys a physical shield that blocks incoming projectiles and some enemy movement for a set duration. Unlike the Decoy Generator, this provides direct cover rather than a distraction. The level 3 upgrade adds both Increased Duration and Shield Strength. Use it to hold position while completing hacks or charging the Charge Piercer behind it.
Drone Hive
Unlocked by earning a Triple Bingo on the Associate (second) Cabin Stamp Board. Deploys autonomous drones that independently seek out and attack nearby enemies, actively contributing damage rather than simply drawing fire. The key difference from the Decoy Generator is that the Drone Hive deals real DPS. You can switch between other weapons while the drones are active, letting them handle cleanup while you focus on priority targets.
For Lunatic difficulty and Unknown Signal Mode runs, consider replacing the Decoy Generator with the Drone Hive in the second half of the game. The damage contribution becomes more valuable than pure distraction when enemies hit harder and have more health.
What loadout should you run after Sector 3?
Once the dual-slot expansion is active from Sector 3 onward, you can carry two Attack Units and two Tactical Units simultaneously. Cycling between them uses the D-pad: tap Left twice to switch Attack weapons, tap Right twice to switch Tactical weapons.
The recommended general-play loadout:
- Attack: Shockwave Gun + Charge Piercer
- Tactical: Sticky Bombs + Stasis Net
- Defense: Decoy Generator
For Lunatic difficulty and Unknown Signal Mode, swap the Decoy Generator for the Drone Hive, and shift the Attack pairing to Jackhammer and Photon Laser once both are printed. This gives you melee burst damage and sustained beam coverage for the toughest encounters in the game.
For more Pragmata coverage and guides on other games, browse more guides at GAMES.GG.