
Pragmata's upgrade system splits across two terminals at the Shelter, and if you walk in without a plan, you'll spread resources thin and feel the consequences by the third or fourth Sector. Enemies hit harder, attack patterns get more complex, and suddenly you're wishing you'd spent those Lunafilament stacks on something more useful than a half-upgraded weapon you never use. This guide cuts through the noise and tells you exactly where to put your resources first.
How does the upgrade system work in Pragmata?
There are two separate upgrade paths, and understanding the difference between them saves a lot of confusion early on.
The Firmware Updater tab in the Shelter takes Upgrade Components, which you collect throughout levels. This is where you raise Maximum Health, Primary Unit (your main weapon's damage), and Hacking efficiency for both Hugh and Diana. These are your bread-and-butter stat increases. Target at least level 7 in Health, level 4 in Primary Unit, and level 3-4 in Hacking by the end of the second level.
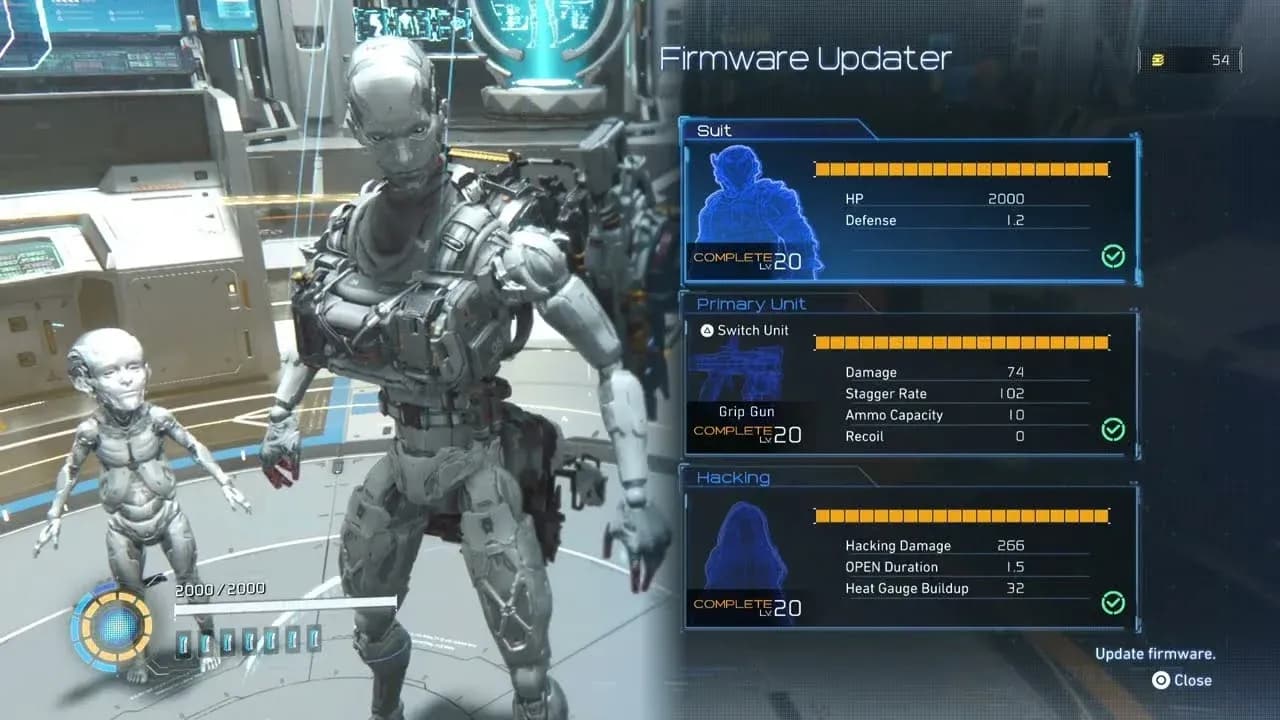
Firmware Updater stat screen
The Unit Printer is the other terminal, and it runs on Lunafilament and the rarer Pure Lunum. This is where you unlock specific abilities, weapon upgrades, hacking nodes, and attachment perks. You earn both currencies by exploring levels, opening chests, and completing Training Simulations. Pure Lunum is notably scarcer, so spend it deliberately.
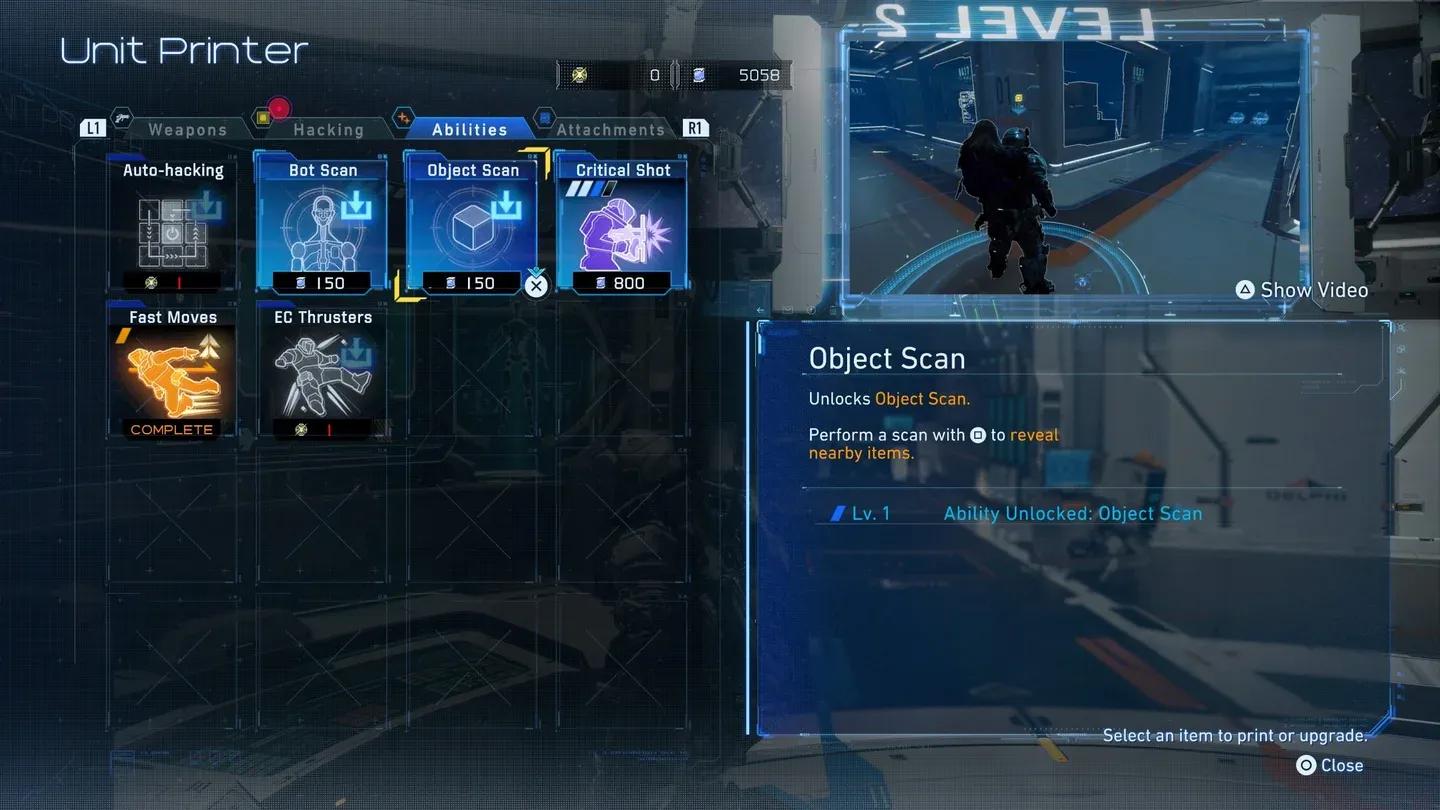
Unit Printer upgrade terminal
What are the best Unit Printer upgrades to get first?
Here's the full breakdown of which Unit Printer upgrades are worth your early Lunafilament.
Which upgrades should you prioritize in what order?
After testing the combat across multiple Sectors, the clearest priority order shakes out like this:
Survivability first. Pump Health in the Firmware Updater to at least level 7 before you do much else. Enemies in later Sectors hit hard and attack in groups, and a thin health bar makes every fight a gamble. Pair this with Thrusters (target level 3 minimum) and Repair-Up from the Unit Printer so your dodges last longer and your healing items go further.
Deletion Protocol system second. The Hacking Gauge and Deletion Protocol upgrades together form your panic button. Deletion Protocol exposes all enemies and stuns them, which is genuinely lifesaving when you're surrounded. The Hacking Gauge upgrade shortens the time to fill it, and the Deletion Protocol upgrade makes the ability hit harder and last longer. Get both.
Fast Moves as soon as possible. This single-level ability creates a bullet-time window on a perfect dodge. The game's dodge timing is forgiving enough that even players who aren't dodge specialists can trigger it reliably. The payoff is massive: free damage on exposed weak points with no risk of getting hit back.
Mod Slots for long-term power. Each additional Mod Slot multiplies the value of every Mod you find. At max level you can run 6 Mods simultaneously, which compounds bonuses across health, hacking, and damage. It's not flashy, but it's one of the highest-impact upgrades in the game.

Mod Slot and Thrusters upgrades
Should you balance stats or specialize in Pragmata?
This is where different approaches show up, and it's worth considering both.
One approach recommends balancing Firmware Updater stats equally if you want a well-rounded experience. Another leans toward prioritizing Health heavily first (level 7), then Primary Unit (level 4), with Hacking as a secondary concern (level 3-4) unless you prefer hacking over shooting.
The honest answer: your playstyle decides it. If you find the hacking minigame engaging and want to lean into Deletion Protocol and node combos, invest in Hacking early. If you prefer shooting robots directly, stack Primary Unit damage and let Auto-Hacking (available in the Unit Printer, 4 levels) handle the minigame in tense moments. Auto-Hacking skips the manual minigame but doesn't interact with special Hacking Nodes, so manual hacking still matters for node-based abilities.
For more Pragmata tips and guides across all genres, browse more guides at GAMES.GG.