
The Bastion is the only Legendary defensive class in Survive Zombie Arena, and it plays completely differently from every other option in the roster. Where most classes focus on personal firepower, the Bastion is about controlling space, keeping teammates alive, and letting automated equipment do the heavy lifting while the rest of your crew pushes forward. If you want to see high round numbers, this is the class that makes it possible.
What makes the Bastion class stand out?
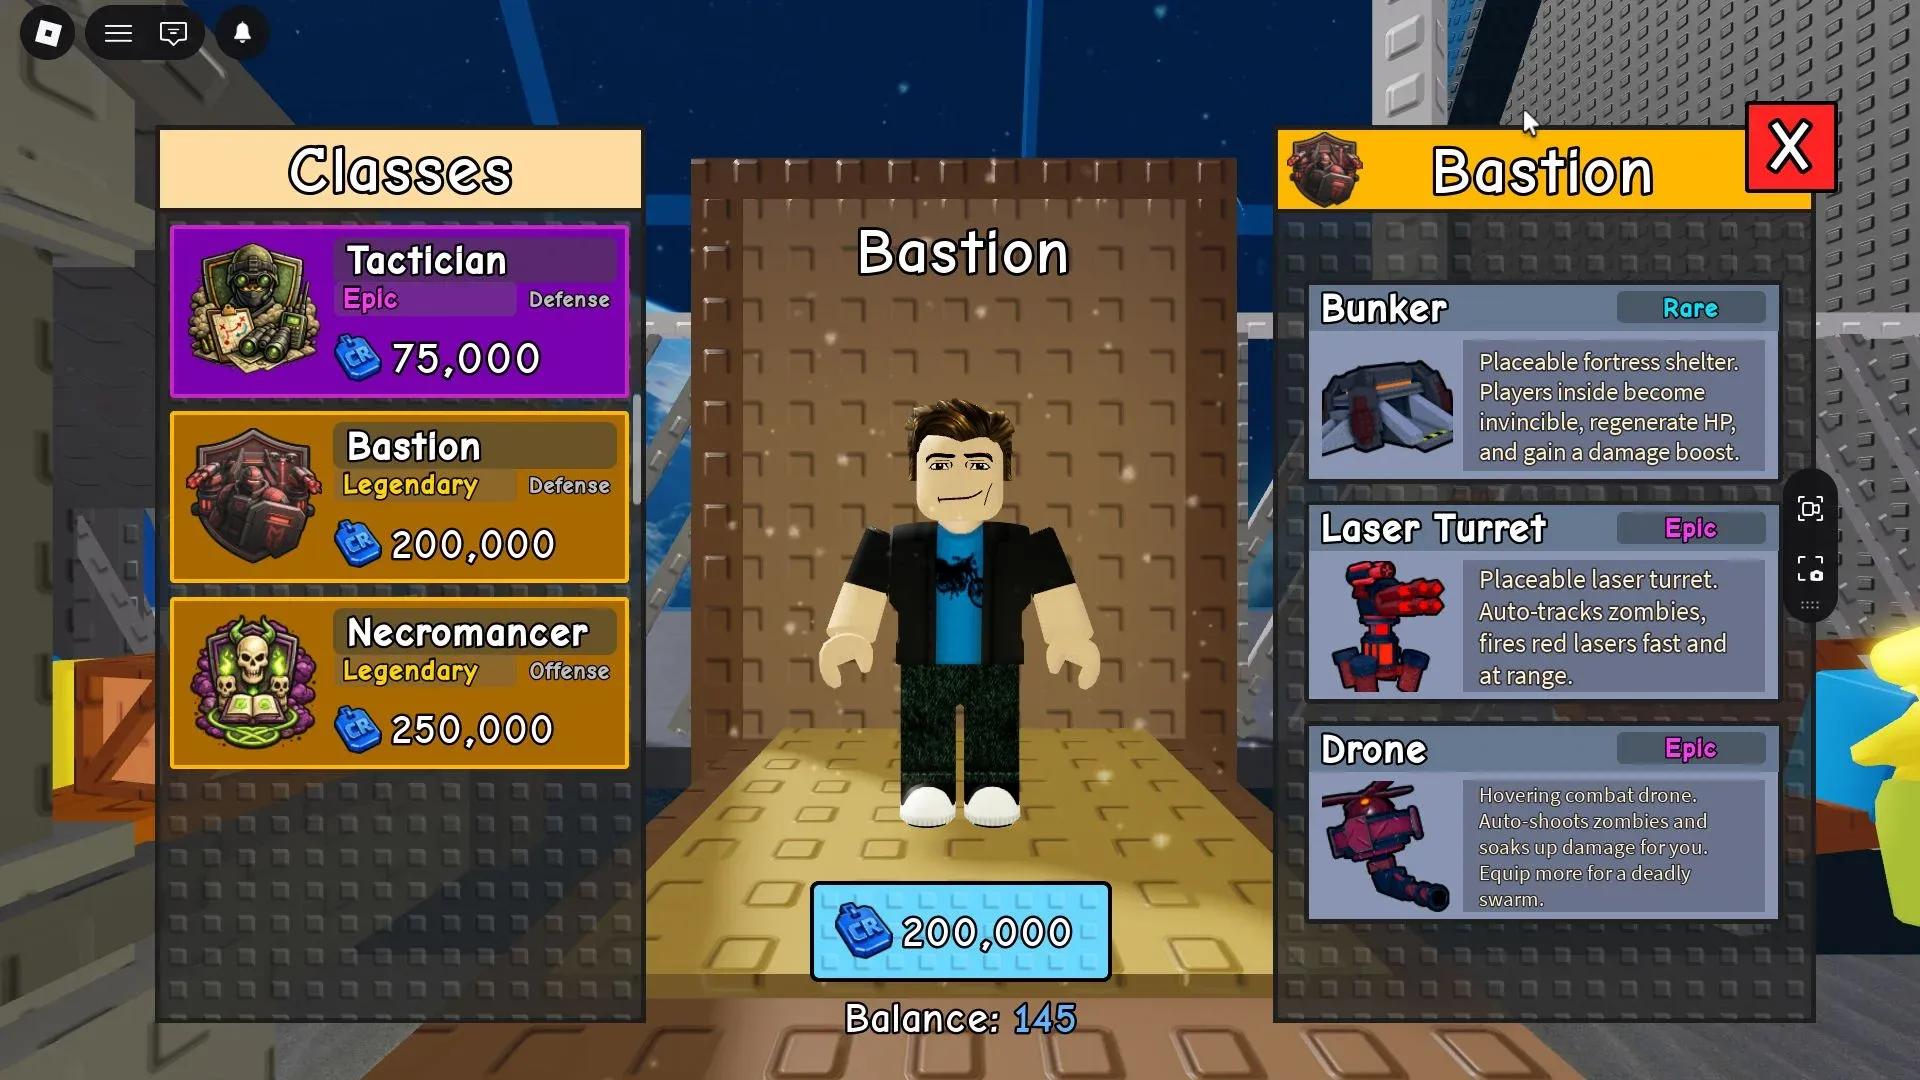
The Bastion sits in the Defensive category and is classified as Legendary rarity, making it one of the most premium class options in Roblox. The core fantasy here is straightforward: you deploy gear, your team benefits, and zombies get shredded by automated systems while your allies focus on surviving.
The class comes with three pieces of equipment, each filling a distinct role in your defensive setup:
The spread of rarities here is interesting. The Bunker is Rare while both the Laser Turret and Drone are Epic. That gap in rarity does not reflect the Bunker's importance, though. In practice, the Bunker is the single most impactful piece of equipment in the entire kit.
How does the Bunker work in Survive Zombie Arena?
Deploy the Bunker on the ground and any player who steps inside receives three simultaneous effects: full invincibility, health regeneration, and a damage boost. That combination is not subtle. A teammate who is close to dying can duck into the Bunker, recover, and come out hitting harder than before.
Placement is everything. Drop the Bunker somewhere central enough that multiple teammates can reach it quickly during a heavy wave, but not so exposed that players have to cross a zombie mob just to get inside. Corners near choke points tend to work well since zombies funnel in from predictable directions and your team can retreat to the Bunker without crossing the main threat line.
How should you use the Laser Turret and Drone?
Both the Laser Turret and the Drone are automated offensive tools, which means the Bastion can contribute meaningful damage output without personally firing a single shot. The Laser Turret locks onto zombies and deals heavy damage, making it best placed at choke points where zombie pathing is predictable. The Drone provides aerial fire support, which is harder to position around but useful for covering wider areas.
Think of the two together as a layered defense. The Laser Turret handles concentrated ground threats at a specific point while the Drone covers the broader area. Placing both before a wave begins means you have automated damage running from the moment zombies spawn.
Is the Bastion worth the cost in Survive Zombie Arena?
The goal in Survive Zombie Arena is to earn enough credits to buy better weapons or unlock new classes. The Bastion sits at the top of the defensive class tier as the only Legendary option in that category, so the cost reflects that status. Based on the source material, the verdict is clear: yes, the Bastion is worth it, specifically for teams that want to push into higher rounds.
Solo players can still get value from the automated turret and drone coverage, but the class truly earns its Legendary designation in co-op. The Bunker alone can save a teammate who would otherwise be eliminated, effectively keeping your team's total firepower intact for the next wave. That kind of contribution does not show up in a kill counter but it absolutely shows up in how far your run goes.
Bastion vs. other defensive options: how does it compare?
Survive Zombie Arena has other classes worth knowing about. The Engineer class (also covered in the deltiasgaming.com guide series) and the Medic class both serve supportive roles, but neither matches the Bastion's combination of offensive automation and direct survivability tools. The Medic focuses on healing teammates directly, while the Engineer presumably works with deployable structures. The Bastion merges both concepts: it heals through the Bunker while simultaneously putting out damage through its turret and drone.
For players who enjoy a similar support-oriented style in other Roblox titles, the Roblox Bake or Die beginner's guide covers another game where strategic positioning and resource management determine how long you last.
Quick tips for playing Bastion effectively
- Deploy the Bunker before waves start, not during them. Reaction-time placement rarely lands in a useful spot.
- Position the Laser Turret at the narrowest point in the zombie path so it hits as many targets as possible per shot.
- Use the Drone to cover flanks that your turret cannot face.
- Communicate with teammates about the Bunker's location so they know where to retreat when health drops low.
- The Bastion's value compounds in multiplayer. A solo run still benefits from the automated damage, but the Bunker's full potential only shows in co-op.
For more Roblox class and strategy content, the Roblox guides collection at GAMES.GG covers everything from tower defense to survival games across the platform. If you play other Roblox survival titles, the Steal A Brainrot beginner's guide is worth checking out for tips on protecting your position and reading server dynamics, skills that transfer directly to high-round Bastion play.