

Rome fell to a zombie plague. Now it's your job to rebuild it from the ground up in Romestead, a 2D survival town-builder from Beartwigs and Three Friends currently in Steam Early Access. The game supports 1 to 8 players, and it throws you into a world of overlapping systems with minimal hand-holding. Pick the wrong starting location, recruit the wrong citizens, or ignore your food chain for too long, and the early hours will punish you hard.
What makes Romestead different from other survival games?
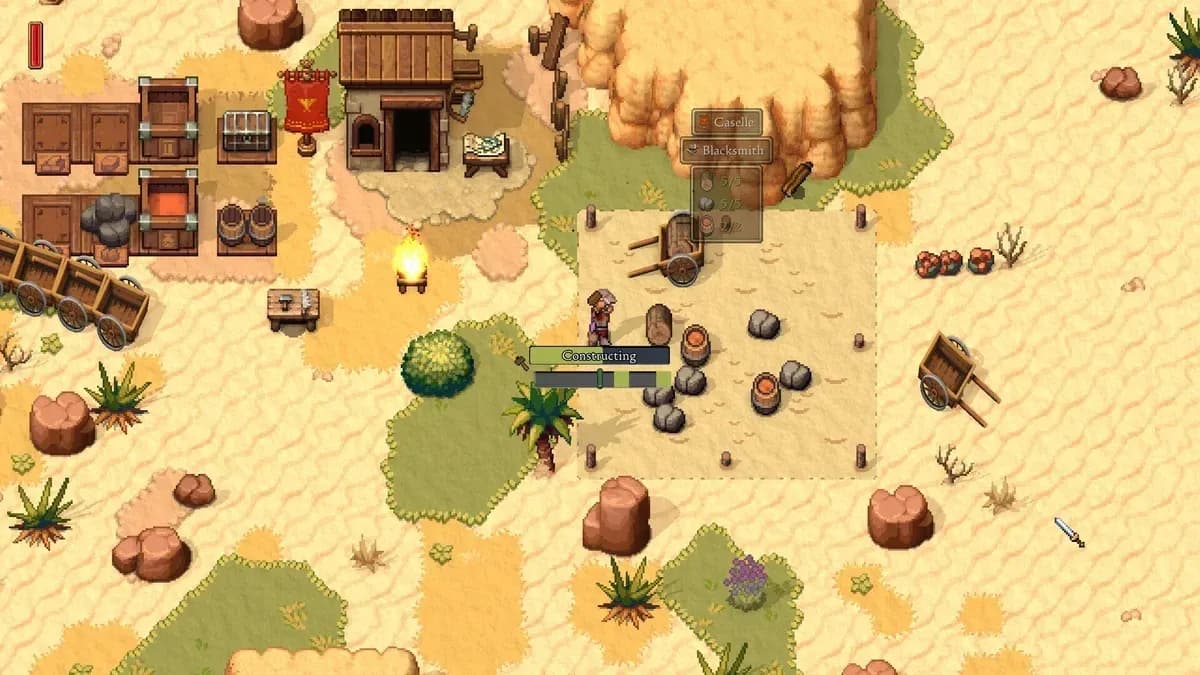
The short answer: physicalized resource management. Most survival games let you carry hundreds of items in a magic backpack. Romestead doesn't. You physically pick up and carry resources, then throw or drop them where they're needed. Chop a tree and you get a large lumber block. Place it on a stump to split it into smaller pieces. Pick up stones and stack them into piles.
This system sounds like friction, but it doubles as a combat tool. If you're hauling a stone and an enemy rushes you, throw it at them. Deal with the threat, then get back to work. It's one of those mechanics that feels awkward for the first hour and then becomes second nature.
The game is also built around action games conventions more than pure city-builders. You're out in the world fighting, looting, and exploring just as much as you're managing your settlement back home.
Choose your starting profession
Which profession should you pick?
Character creation asks you to choose from 8 professions. Each one gives a +5 bonus to a specific skill and a small set of starting gear. The key thing to understand is that your profession doesn't lock you into a playstyle. Every skill can be maxed out regardless of your starting choice. Professions just give you a head start in one area.
Here's a full breakdown:
For new players, Mechanicus and Woodcutter offer the smoothest early game since construction and resource gathering are your primary activities in the first few hours. The Scholar is worth considering if you want to experiment with scrolls early. Whatever you pick, don't stress over it.
Your favor points can be reset later by drinking the Canteen of Youth, sold by a level 2 merchant. Experiment freely in the early game rather than agonizing over every decision.
How do biomes and world generation work?
Every Romestead campaign generates a unique world from a seed you configure at the start. Despite the procedural generation, all worlds contain the same 5 biomes, progressing roughly in difficulty order.

Five biomes, one procedural world
- Plains: Your starting biome. Essential resources, tutorial content, and the first villagers are all here.
- Forest: Outside the Plains, denser and more claustrophobic with unique buildings and tougher encounters.
- Desert: A noticeable difficulty spike. Resources thin out and most enemies are aggressive on sight.
- Volcano: The current endgame in Early Access. Extremely hostile NPCs that demand serious preparation, particularly for solo players.
- Swamp: Divided into two areas connected by a river. Resources and enemies overlap with other biomes.
Your spawn point is almost never the right place to build your first town. Scout toward the center of the map and look for a location that sits near coal deposits, water sources suitable for mills, and the borders of multiple biomes. A central position cuts travel time for the entire run. A trading post that moves resources between towns does exist, but it's late-game tech, so a bad starting location will cost you hundreds of trips before you can fix it.
Keep your first town compact. Place structures like the Altar and Town Banner close together so your defensive walls cover less ground and raids have fewer weak points to exploit.
How does the god worship system work?
One of the first tutorial objectives is building an Altar. This structure is your main progression gate throughout the entire game, not just an early tutorial step.
At the Altar, you sacrifice items to worship specific gods. Each offering fills a meter tied to a particular deity. Fill it once and you earn 1 Worship Point, which you spend on permanent buffs ranging from stronger building defenses to townsfolk finding extra items during their work shifts. Gods appear as shadowy figures at first. Fill a god's meter once and their image unlocks.
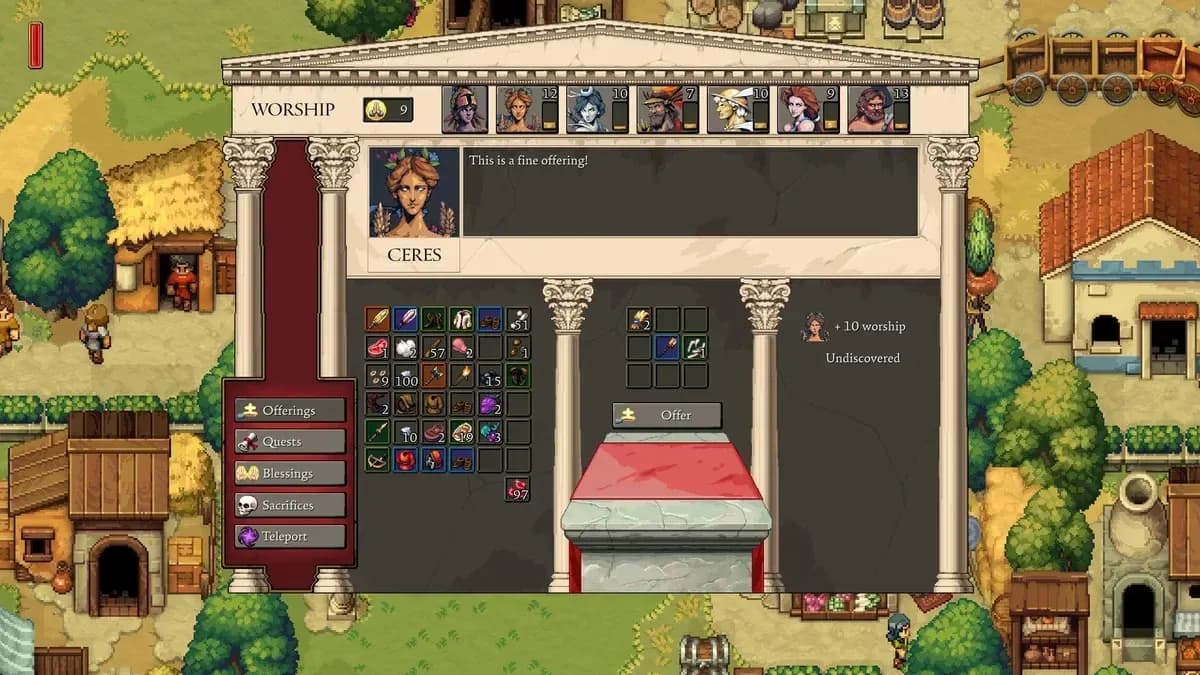
Altar worship and offering menu
The item you offer determines which god receives the worship. Sacrificing a foraged item, for example, appeases Diana, goddess of Nature, Hunting, and the Moon. The full pantheon in Romestead:
- Diana: Goddess of Nature, Hunting, and the Moon
- Minerva: Goddess of wisdom
- Ceres: Goddess of agriculture and crops
- Mars: God of War
- Mercury: God of speed, innovation, and trade
- Venus: Goddess of love and beauty
- Vulcan: God of fire and forge
Mercury is worth prioritizing for fast travel. Once you've made enough offerings and unlocked teleportation through Mercury, you can link two level 2 Altars together for instant cross-map travel. Upgrading an Altar to level 2 requires the carpenter's upgrade bench. It's a long process, but the payoff removes most of the late-game tedium.
Always check your Workbench after completing an Altar quest and claiming its reward. Many essential buildings, including the Clay Pit (unlocked via the Declaration of War quest), are hidden behind these progression steps.
How do you survive night raids?
Once the sun goes down, zombies and other hostile creatures move on your settlement. Without defenses, they target both you and your citizens. The basic answer is wooden barricades to slow them down and catapults to deal active damage during the assault. You survive either by killing everything before dawn or by holding out until sunrise.
Town layout matters here as much as the structures you build. A compact settlement with walls covering minimal ground is far easier to defend than a sprawling one with gaps everywhere.
What are the most important beginner tips?
Recruit citizens carefully
As you explore, you'll find lost Romans to recruit back to your settlement. Two citizen perks are quietly dangerous and worth avoiding:
Citizens level up individually in their assigned roles. A disloyal blacksmith means you've invested significant time into a worker who will reach the legendary crafting threshold at half the speed of a normal citizen.
Always carry a tent
Craft a tent at the leatherworker and keep it in your inventory. Placing it sets your spawn point at that location. Before entering a dungeon or boss fight, drop the tent right outside the entrance. If you die, you respawn nearby instead of trekking back across the map. When you're done, switch to Furniture Mode to pick the tent back up.
Gear up steadily
Solo play is unforgiving if your armor falls behind. Work through the tiers rather than camping on starter gear.
Legendary items carry extra perks and are the strongest gear in the game. For the Volcano biome specifically, legendary gear is close to mandatory in solo play.
Build roads early
Roads cost nothing to place and build quickly. Connect distant resource nodes like far-off clay deposits as soon as you identify them. Pick up the Road Maker favor to double your road-laying speed since every tile you place also builds a second adjacent tile simultaneously. Favors can be reset later, so slotting Road Maker in temporarily just for infrastructure work is a smart move.
Automate food production with the Logistics tent
The Logistics tent drops after defeating the Cyclops boss in the Desert biome. It links buildings so they pass resources down a production chain automatically while you're out exploring. The basic bread chain looks like this:
- Farmstead produces wheat
- Watermill grinds wheat into flour
- Bakery turns flour into bread
- Food Storage fills automatically
Note that the bakery currently produces only 10 loaves per order in Early Access and requires manual re-ordering, so plan your food storage around that limit.
For higher-tier food, plan your supply lines around a single target dish rather than spreading across multiple recipes. Ischia Marina, for example, provides strong health regeneration and natural resistance but requires dates, honey, garum, and strange crab meat. That's a date farm, beehives, and a dolium producing garum all working in parallel.
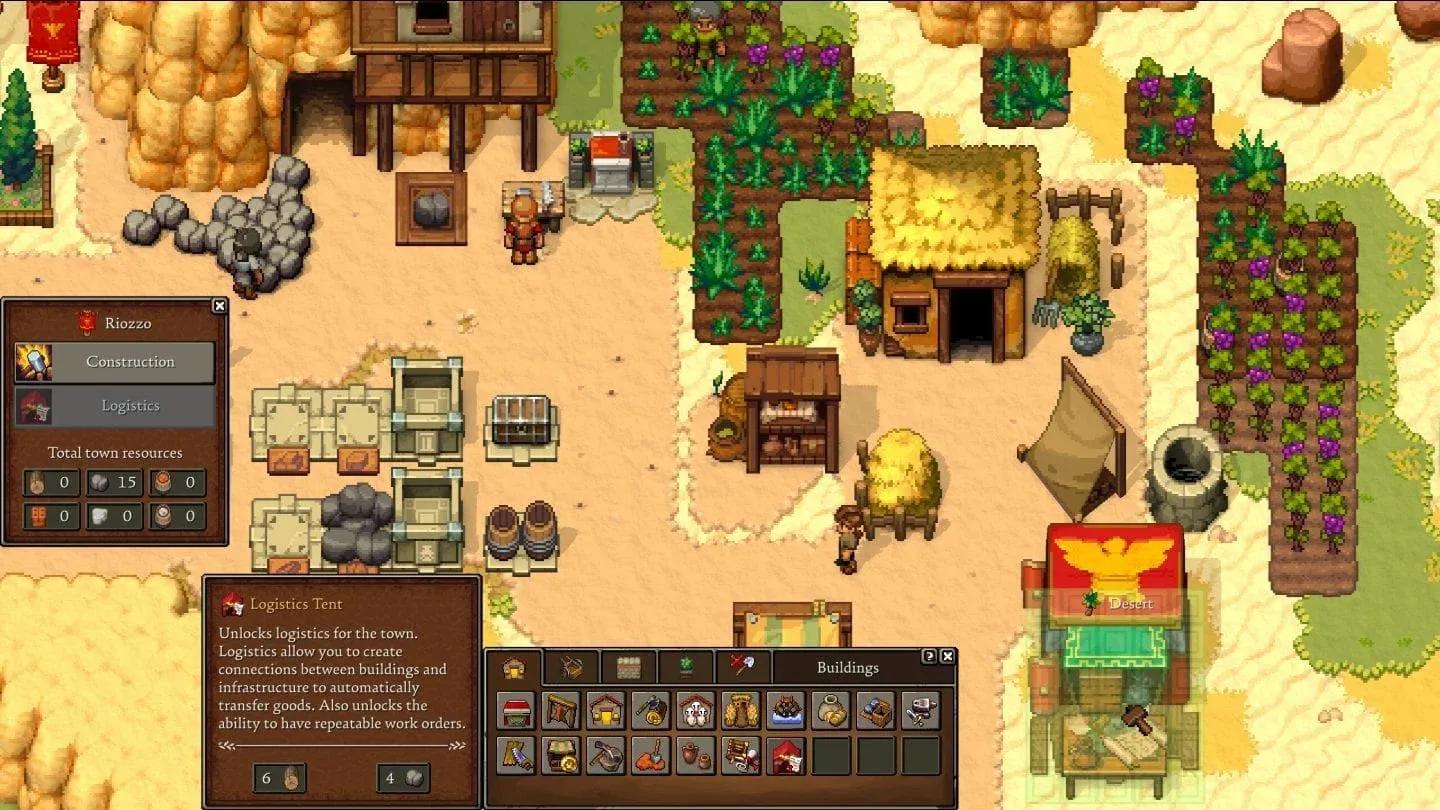
Logistics tent automates production
How do you beat the first boss?
Progression eventually locks until you defeat the Guardian of Minerva, a giant owl. After killing it, offer its Eye at the Altar to unlock new crafting recipes and push deeper into the game. This is the first hard gate in Romestead, and no amount of base-building bypasses it.
Before the fight, place your tent outside the boss area. Stock up on health potions from the merchant (there's currently no craftable recipe for base potions, so the merchant, dungeons, and camps are your only sources). Make sure your armor tier is current before attempting it.
Don't attempt the Guardian of Minerva fight with starter gear. Upgrade to at least Copper Set armor and stock health potions from the merchant beforehand.
Playing with friends: co-op and SaveSync
Romestead supports up to 8 players in co-op. The most effective approach is dividing roles: one player manages logistics and base operations while others handle exploration and combat. The game's SaveSync system lets the host share world saves with other players, meaning campaigns continue even when the original host is offline. Any player can take over server administration, which removes the usual co-op bottleneck of waiting for a specific person to be available.
For more strategies and system breakdowns, the Romestead guides collection covers additional topics as the game continues to develop through Early Access.