

Saros throws a boss at you at the end of every biome, and these fights are not the kind you can brute-force without understanding what is actually happening on screen. Each Carcosan Overlord has multiple health bars, distinct attack patterns across phases, and specific mechanics that can wall you completely if you walk in blind. There are 9 total bosses in the game, 8 of which are tied to trophies of varying rarity, with the final boss linked to three separate trophies.
How many bosses are in Saros?
Saros features 9 boss encounters total. The first, the Consort, serves as a tutorial boss and does not count as a standard biome Overlord. The remaining 8 are the main story Overlords, one per biome, listed in the order you encounter them:
Consort
The Consort appears at the very end of the tutorial area, which does not count as a numbered biome. You only get one attempt before a cutscene triggers and Arjun ends up in the Passage, though the save file system lets you retry if needed.
The arena has several pillars, and using them as cover is the fastest way to simplify this fight. Blue projectiles from the Consort can be absorbed with your Soltari Shield. Yellow projectiles and beam attacks are best dodged with your dash. Red or Nova projectiles cannot be dashed through, so jump to avoid direct contact. Surviving the fight rewards you with a Halcyon.

Overlord health phase tracker
How to beat Prophet (Shattered Rise)
Prophet is the first full Overlord encounter and sets the template for how Saros boss fights work. It has 3 health bars and cannot take damage until you expose its weakspot.
Phase 1 and 2: Destroy all the yellow buds positioned around the arena. Once they are gone, Prophet's central weakspot opens. Absorb the blue projectile barrages with your shield to charge your Power Weapon, then unload on the exposed weakspot while dodging the corrupted yellow waves. The boss also spawns large bulbs in the arena during the second health bar that shoot projectiles but can be destroyed for potential Aether drops.
Phase 3: The arena narrows as Prophet erects vine walls on both sides. The movement space shrinks significantly, but the attack pattern stays the same. Keep destroying buds, expose the weakspot, and cycle through absorbing blue projectiles and dodging yellow ones until it falls.
How to beat Bastion (Ancient Depths)
Bastion is a giant mechanical turret with its head exposed from the start, meaning you can deal damage immediately without needing to expose a weakspot first. The arena is filled with Jump Network Pads that become important as the fight progresses.
Bastion fires simultaneous barrages of blue and corrupted yellow projectiles. Position yourself to absorb the blue ones without walking into the yellow ones. The key threat is the expanding yellow ring attack, which covers ground-level movement entirely. When you see it coming, use the jump pads to gain height and clear the rings entirely.
After each health bar depletes, Bastion retracts its head and spawns stationary bots around the arena. Kill them all before the boss returns. From the second health bar onward, Bastion introduces Nova attacks, red projectiles that cannot be dashed through. When a full wall of red Nova projectiles fills the arena, the jump pads are your only reliable escape route.
How to beat Rhabdom (Shattered Descent)
Rhabdom is the easiest Overlord in the game by a significant margin. It only has one health bar and takes a few seconds before performing its first attack after spawning. That window is free damage. Pop your Overdrive immediately and chain Power Moves to bring it down to roughly 50% health before it can even respond.
Once it starts moving, Rhabdom jumps toward you and launches red projectiles in all directions. Stay at range, use the grapple ability to reposition around the arena, and hold higher ground to fire down on it. There are jump pads on either side to help avoid the AoE barrages.
How to beat Legion (Blighted Marsh)
Legion is the first flying boss in the game and looks overwhelming at first because it is a swarm of enemies surrounding a central core. The key detail: only the bright red central enemy counts toward the health bar. Killing the surrounding enemies does not deplete Legion's health, and the boss continuously spawns more of them anyway.
Legion has two attacks worth specific preparation. The first has the entire horde form a circle around you and fire Nova projectiles inward. Rotate and parry these to clear them, typically requiring 2-3 parries. The second has the horde launch blue homing projectiles while the central enemy fires a corrupted beam. Shield the blue projectiles and dodge the beam.
Use the Repeater Crossbow for this fight since its Alt-Fire splits projectiles that home in on the surrounding enemies while still dealing damage to the central target. Focus all fire on the central enemy and use Overdrive and Power Weapon charges whenever available.
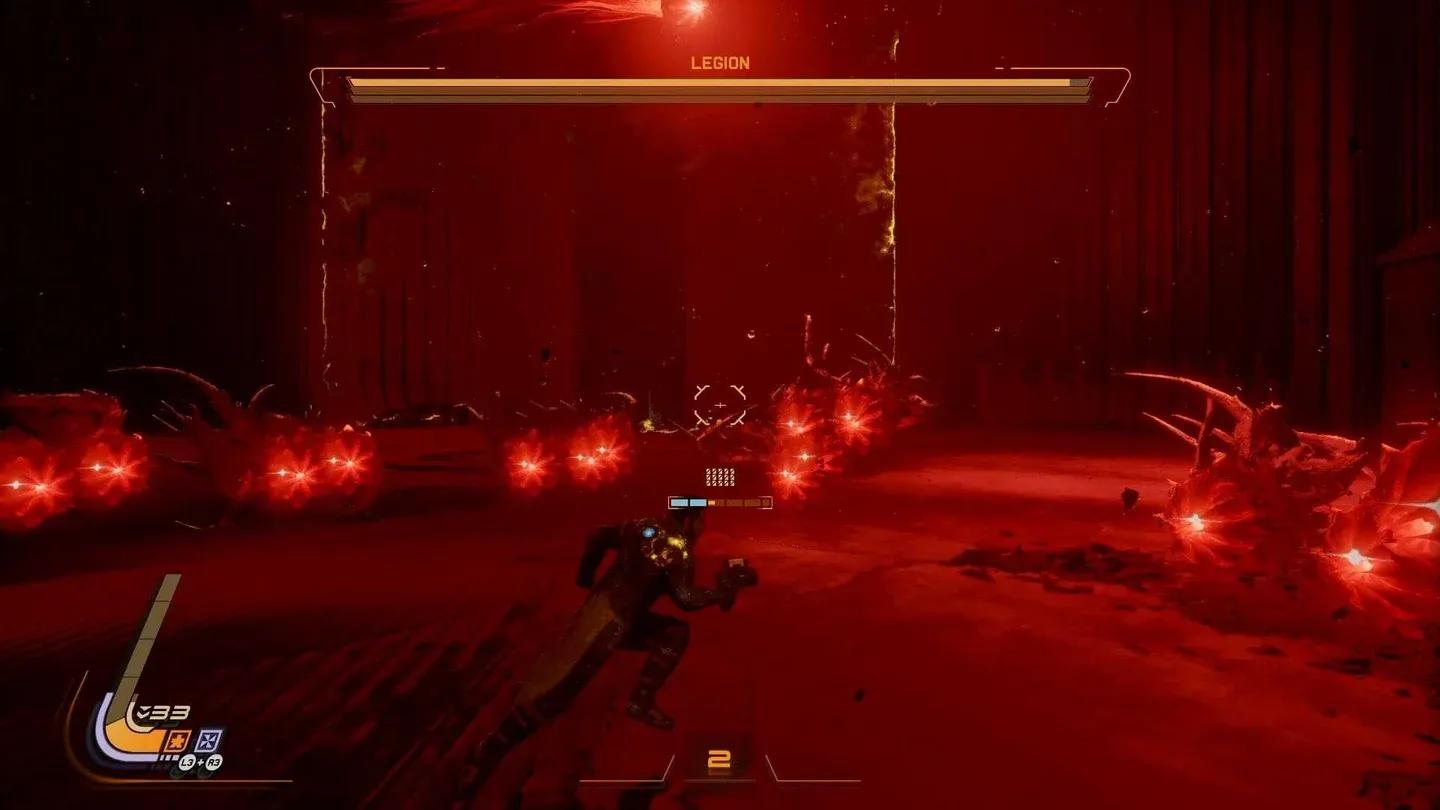
Legion central enemy target
How to beat Architect (Desecrated Fortress)
Architect is the dragon-like creature you see flying through the background of earlier biomes. The fight finally arrives in the fifth biome and it is one of the more demanding encounters.
Architect alternates between hovering in front of you to attack and flying circuits around the arena for strafe runs. It has no weakspot and takes damage at all times, but hitting it during movement is the challenge. Use autohit weapons like Handcannons or Rifles, or waiting for the boss to stop moving if you prefer Crossbows. The Annihilator Shotgun can still work because of its Alt-Fire, but standard shotguns are generally a poor fit since the boss spends so much time at range.
Red projectile attacks are frequent and numerous. A well-timed Parry clears space to deal damage before the next wave. As health bars deplete, Architect destroys sections of your platform, shrinking your footing. The boss also occasionally lands directly on the platform and launches you backward, so be ready to grapple back immediately.
How to beat Shepherd (Acolyte's Haven)
Shepherd is a massive sea creature with multiple tentacles. The fight opens with a tentacle phase where you need to clear the tentacles slamming down on the boat before the boss's head becomes targetable.
Once the head is exposed, Shepherd fires wave-pattern attacks using blue, yellow, and red projectiles. Absorb blue, absorb yellow, and parry red back at the boss. This cycling keeps your Power Weapon charged almost constantly.
Phase 2 is where players get caught out. The boss retreats into the sea at 50% health and reappears from the other side, giving you a smaller movement area. Red projectiles come in from the sides. Save your Overdrive for phase 3, which is the easiest phase and where it deals the most value. Using it in phase 2 is wasted because the boss retreats before you can finish the health bar.
How to beat Priestess (Cathedral)
Priestess is one of the more mechanically distinct fights in the game because raw damage output matters less than understanding the phase triggers.
Phase 1: Three smaller Priestesses appear. Destroy two of them to make the main boss damageable. Halfway through the first health bar, the three return, so repeat the process. The blue and yellow projectile waves during this phase are generous for charging Power Weapons.
Phase 2: The arena transforms and the Priestesses grow larger. Do not shoot them this time. Instead, find the three bells positioned around the arena and hit each one with your melee attack. Hitting all three makes two of the three Priestesses vanish, leaving only one to fight. There are three bells in this phase and they are the only way to progress.
Phase 3: The arena shifts to multiple platforms. Hit the two bells at the start to begin damaging the boss. The platforms periodically fall away, so keep moving. The boss will occasionally become invulnerable again, requiring you to destroy two more bells before damage resumes.
How to beat King (Yellow Shore)
King is the final Overlord and the hardest fight in the game, not necessarily because of the mechanics but because of the stakes. There is no Second Chance available throughout the entire Yellow Shore biome, meaning the boss must be cleared in a single life.
Phase 1: King uses exclusively blue projectile attacks that can all be absorbed, which means your Power Weapon stays charged. Periodically he raises a yellow shield that must be broken with your Blazing Strike melee ability. The moment the shield goes up, he also launches expanding red rings. Jump and dash to clear them, then break the shield.
Phase 2: King switches to red Nova projectiles entirely. Parry or avoid them. The yellow shield returns on the same pattern. Despite being the final boss, the constant projectile spam actually keeps your Power Weapon fueled, making him more manageable than his placement suggests.
Phase 3: King becomes highly mobile, teleporting across the arena to fire projectiles from multiple angles including behind you. Move the camera frequently and stay aware of where he reappears. He also begins using heavy melee attacks, telegraphed by a brief backward tilt before he lunges. Anticipate the lunge and dodge sideways rather than backward.
For more Saros strategies and guides across all genres, browse more guides on GAMES.GG.