
Everything you need to know about Starfield's skill system
Starfield gives you 82 skills to work through across five distinct categories, and the gap between a well-built character and a scattered one is enormous. Some skills simply unlock abilities you cannot access any other way, like using boost packs or ship targeting. Others multiply your damage output, carry capacity, or crafting efficiency in ways that compound over dozens of hours. Knowing which ones to grab first, and understanding how the rank challenge system works, makes a real difference from the opening hours onward.
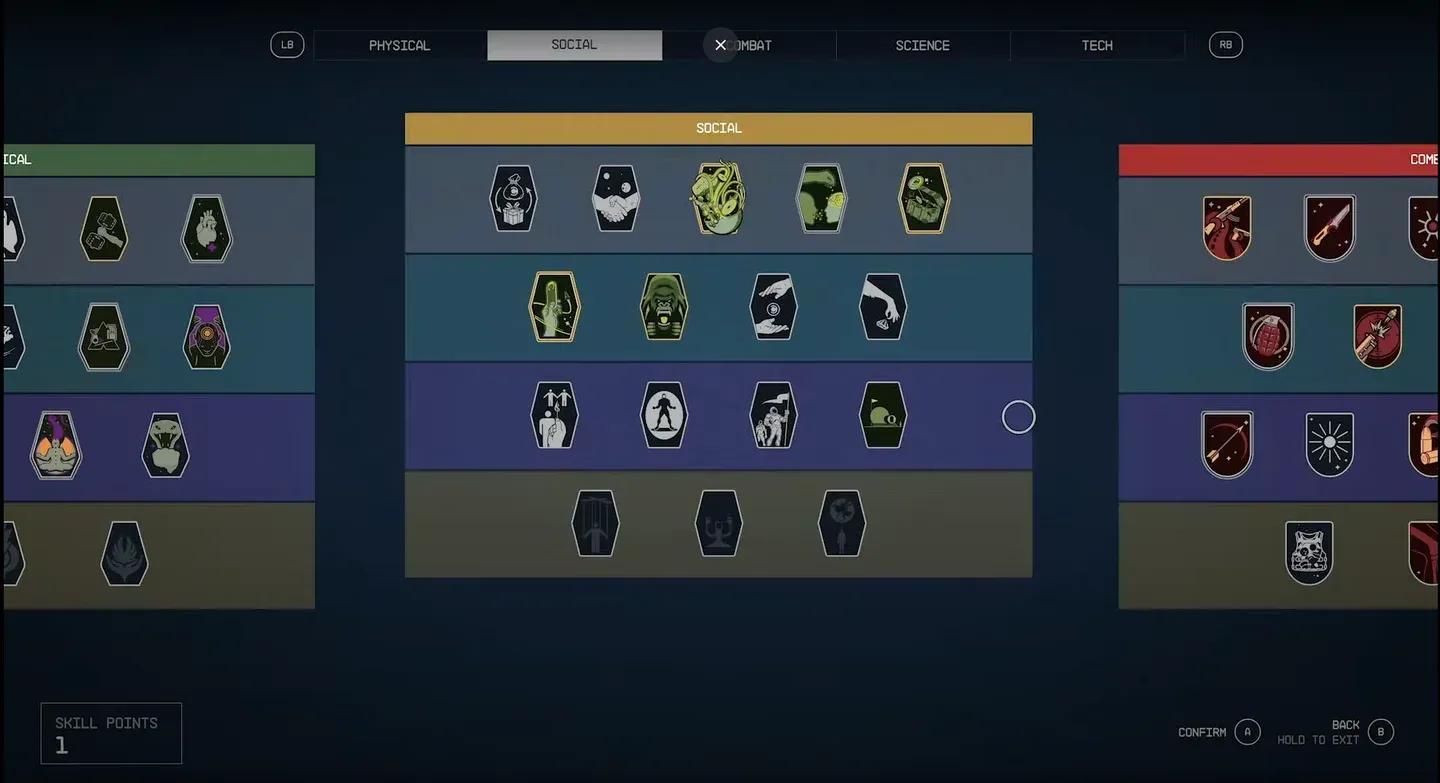
Physical skill tree overview
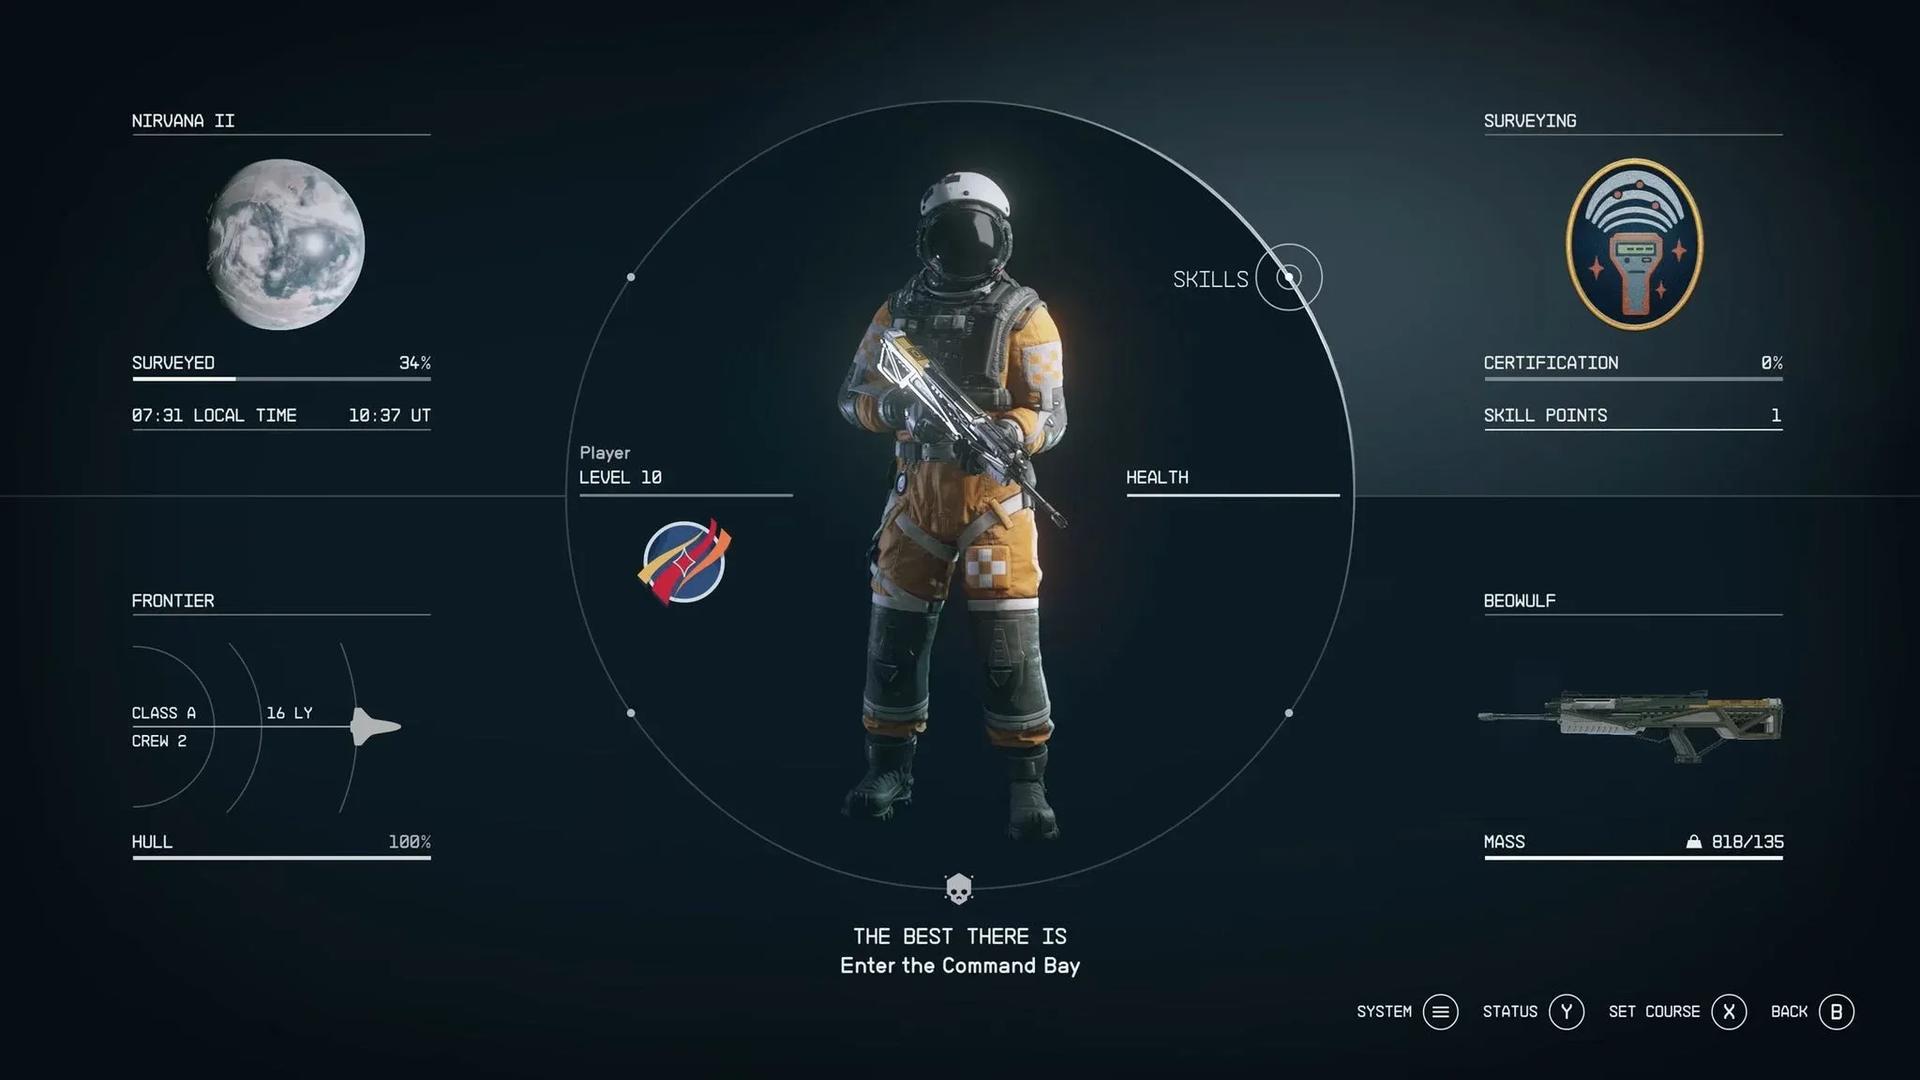
How does the Starfield skill system work?
Unlike Bethesda's older games, where skills leveled up passively through use, Starfield requires you to actively invest skill points and then complete specific in-game challenges to advance each skill's rank. After spending one skill point to unlock a skill, you're given a challenge to complete before you can spend another point on that same skill.
Each skill has four ranks. Rank 1 activates the moment you unlock the skill. Ranks 2, 3, and 4 each require finishing the associated challenge first, then spending an additional skill point. The Fextralife Starfield Skills wiki documents this structure across all five categories.
The five skill categories are:
- Physical: Health, oxygen, carrying capacity, and survivability
- Social: Dialogue options, NPC manipulation, and companion management
- Combat: Weapon damage and combat effectiveness
- Science: Crafting, research, and resource gathering
- Tech: Ship systems, boost packs, and security
Each category uses a four-tier structure. All tier 1 skills are available immediately. Reaching tier 2 requires spending 4 skill points in that category, tier 3 requires 8, and tier 4 requires 12. This means investing heavily in a single category pays off faster than spreading points thin across all five.
What are the best Starfield skills to unlock first?
Some skills unlock abilities that are simply unavailable without them. These are non-negotiable early picks regardless of your build.
Boost Pack Training is the one most players regret skipping early. Without it, boost packs are completely inert items taking up inventory space. At Rank 4, the skill doubles all fuel efficiency and regeneration bonuses from lower ranks. Targeting Control Systems transforms ship combat by letting you lock onto enemy vessels and target specific subsystems, with Rank 4 reducing lock-on time by 60% and dealing 20% increased system damage.
Weight Lifting deserves a mention because Starfield's encumbrance system is punishing. Rank 4 adds 100 kg of carry capacity and grants 50% resistance to stagger, which is a meaningful combat benefit on top of the quality-of-life improvement.
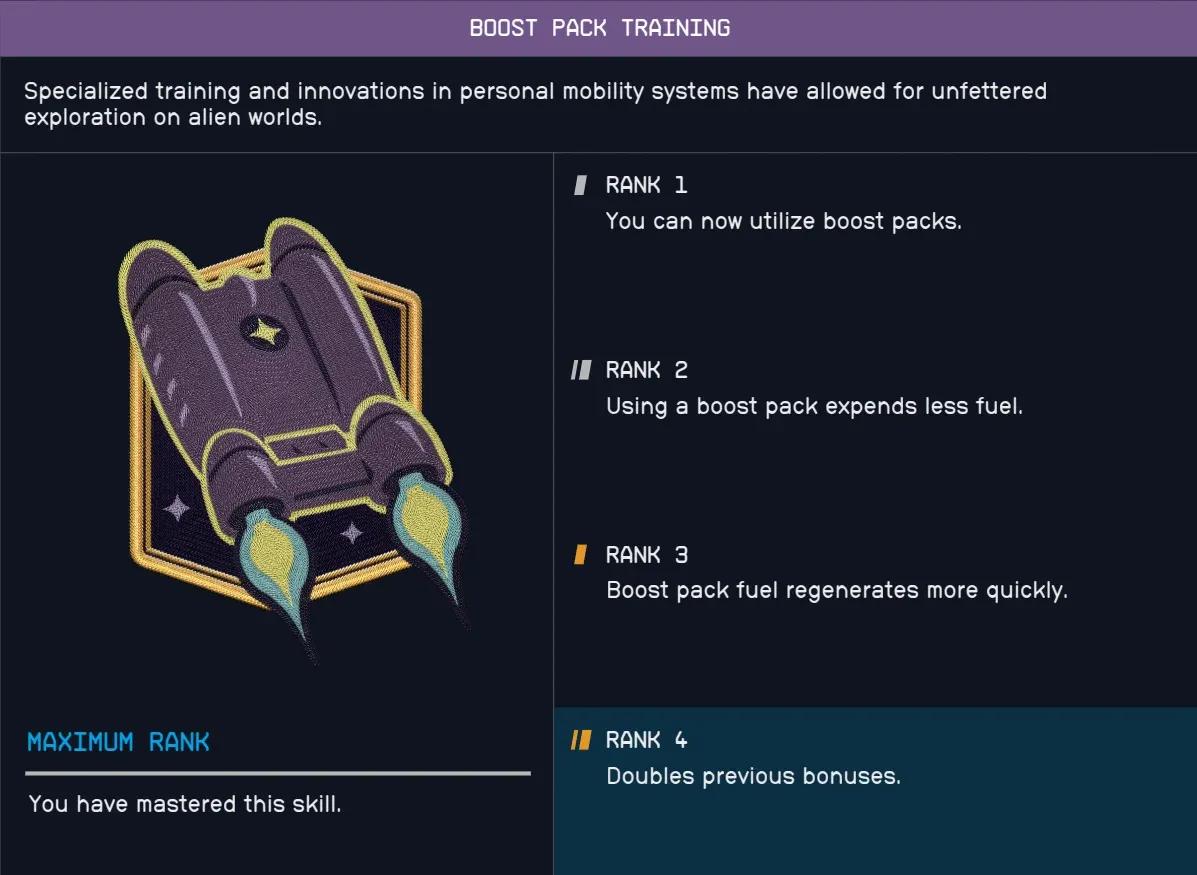
Boost Pack Training rank details
Physical skills: full breakdown and rank challenges
Physical skills cover your body's core stats. Most of the early-tier options here are straightforward stat boosts, but the tier 3 and 4 options open up some genuinely interesting playstyles.
Tier 1 physical skills
- Boxing: Unarmed damage scales from +25% at Rank 1 to +100% at Rank 4, with Rank 4 adding a knockdown chance. Challenges require killing 20, 50, and 100 enemies unarmed.
- Fitness: Increases available oxygen by 10% per rank up to 30%, with Rank 4 making sprinting and power attacks significantly less oxygen-hungry.
- Stealth: At Rank 1, adds the Stealth Meter and makes you 25% harder to detect. Rank 4 pushes this to 100% harder to detect, adds 20% bonus sneak attack damage for suppressed weapons, and makes doors you open while sneaking silent to enemies.
- Weight Lifting: Carry capacity increases of 10, 25, 50, and 100 kg across the four ranks.
- Wellness: Maximum health increases by 10% per rank, topping out at 40% at Rank 4.
Tier 2 physical skills
- Energy Weapon Dissipation: Reduces energy damage taken, with Rank 4 giving a 25% chance to reflect energy damage back at attackers when your health drops below 50%.
- Environmental Conditioning: Builds resistance to airborne, thermal, corrosive, and radiation damage across ranks, with Rank 4 reducing the chance of gaining afflictions from environmental sources.
- Gymnastics: Rank 1 unlocks the combat slide and reduces fall damage by 15%. Rank 2 improves Zero-G movement. Rank 4 increases jump height and grants a speed boost after sliding or mantling.
- Nutrition: Food and drink effectiveness scales from 10% to 50% more effective at Rank 4.
- Pain Tolerance: Physical damage reduction of 5% per rank, with a 5% chance to ignore physical damage entirely when health is low at Rank 4.
Tier 3 and 4 physical skills
- Cellular Regeneration: Progressively increases natural injury recovery chance. Rank 4 gives a 20% chance to avoid gaining an injury when you otherwise would.
- Decontamination: Same structure as Cellular Regeneration but for infections.
- Martial Arts: 15% increased melee/unarmed crit chance at Rank 1, disarm chance at Rank 2, 10% damage reduction while unarmed or melee at Rank 3, and 50% damage reflection when blocking at Rank 4.
- Concealment: Rank 1 immediately gives 2.5x ranged and 4x melee sneak attack damage, scaling to 4x ranged and 10x melee at Rank 4. Rank 3 adds a Chameleon-like ability when completely still while sneaking.
- Neurostrikes: 10% stun chance with unarmed attacks at Rank 1, EM damage added at Rank 2, 20% stun chance at Rank 3, and area knockdown on stun at Rank 4.
- Rejuvenation: Adds out-of-combat health regen at Rank 1, with Rank 4 providing fast regen outside combat and meaningful regen even during combat.
Social skills: full breakdown and rank challenges
Social skills handle NPC interactions, companion management, and the economic side of the game. Several of these unlock entirely new dialogue options or NPC control abilities.
Tier 1 social skills
- Commerce: Buy 5% cheaper and sell 10% more at Rank 1, scaling to 20% cheaper and 25% more at Rank 4. Challenges involve buying or selling 25, 75, and 150 unique items.
- Gastronomy: Unlocks specialty food and drink crafting at Rank 1, up to exotic recipes at Rank 4.
- Persuasion: 10% increased persuasion success at Rank 1, scaling to 50% at Rank 4.
- Scavenging: Adds chances to find extra credits, ammo, and aid items in containers. Rank 4 highlights tracked resources when using the hand scanner.
- Theft: Rank 1 unlocks pickpocketing entirely. Rank 4 adds 50% success chance and the ability to pickpocket holstered weapons.
Tier 2 social skills
- Deception: Ships 10% stronger will surrender at Rank 1, scaling to 50% stronger at Rank 4. Contraband scans become 50% less effective at Rank 4.
- Diplomacy: Force NPCs at or below your level to stop fighting at Rank 1. Rank 4 makes targets permanently stop fighting unless attacked again.
- Intimidation: Force NPCs to flee, scaling from your level or below at Rank 1 to 20 levels above you at Rank 3.
- Isolation: +10% weapon damage and 15 Damage Resistance per equipped spacesuit and helmet at Rank 1 when operating without companions, scaling to +40% damage and 60 Damage Resistance at Rank 4.
- Negotiation: Unlocks bribery in speech challenges at Rank 1. Rank 4 occasionally makes bribery free.
Tier 3 and 4 social skills
- Instigation: Force NPCs to attack their own allies. Rank 4 makes them fight until dead.
- Leadership: Companions gain affinity 25% faster at Rank 1. Rank 4 doubles Combat and Physical Crew Skill bonuses on companions and gives them a chance to revive themselves.
- Outpost Management: Adds cargo links, robots, and crew stations at outposts. Rank 4 doubles extractor production speed.
- Manipulation: Force NPCs to obey commands for increasing durations, up to a substantial time at Rank 4.
- Ship Command: Increases maximum active crew from 4 at Rank 1 to 8 at Rank 4.
- Xenosociology: Apply pacify, flee, frenzy, and obey commands to alien creatures up to 10 levels above you across the four ranks.
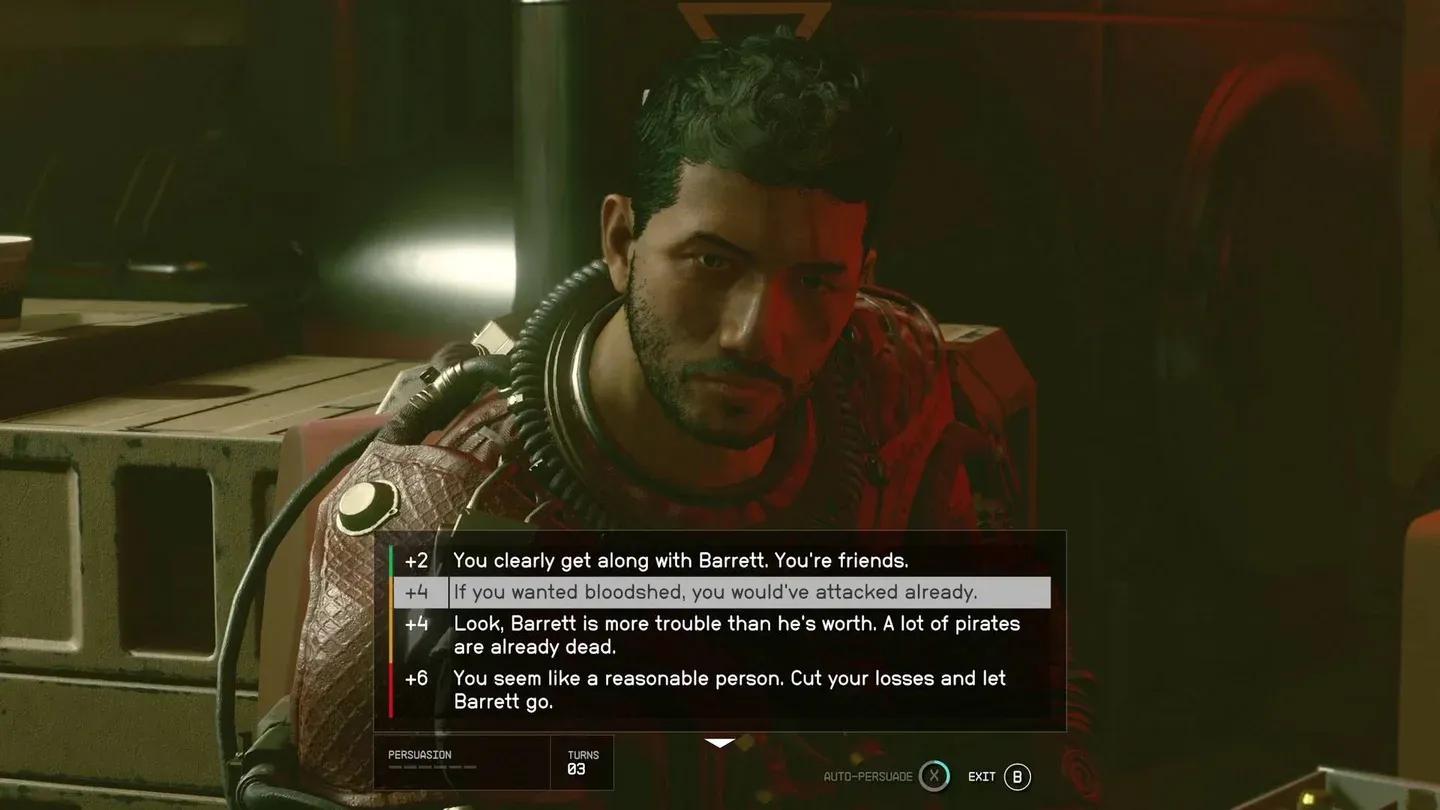
Persuasion speech challenge screen
Combat skills: full breakdown and rank challenges
Combat skills are the most direct path to increased damage output. Most follow a simple pattern: 10/20/30% damage increases at Ranks 1-3, with a unique bonus at Rank 4. Pick the weapon type you actually use and invest there rather than spreading across multiple weapon categories.
Tier 1 combat skills
- Ballistics: 10/20/30% damage at Ranks 1-3, +30% range at Rank 4.
- Dueling: +25% melee damage and 10% damage reduction at Rank 1. Rank 2 adds a 20% speed boost for 10 seconds after melee kills. Rank 4 heals 10% of your health on melee kills.
- Lasers: 10/20/30% damage at Ranks 1-3, 5% chance to set targets on fire at Rank 4.
- Pistol Certification: 10/25/50% damage scaling, with Rank 4 granting +25% critical hit chance for 5 seconds after pistol kills.
- Shotgun Certification: 10/20/30% damage, Rank 4 adds a stun chance on kills.
Tier 2 combat skills
- Demolitions: Rank 1 adds grenade trajectory arc and 25% larger explosion radius. Rank 2 adds 25% explosive damage. Rank 4 doubles all previous bonuses.
- Heavy Weapons Certification: 10/20/30% damage, Rank 4 gives 25% Physical resistance while aiming down sights.
- Incapacitation: EM weapon damage increases of 5/10/15%, with Rank 4 giving a 15% chance to deal 300% EM damage.
- Particle Beams: 10/20/30% damage, +5% crit chance at Rank 4.
- Rifle Certification: 10/20/30% damage, Rank 4 adds 30% faster reload while standing still.
Tier 3 and 4 combat skills
- Marksmanship: Crit chance with non-automatic ranged weapons increases by 3/8/15% across Ranks 1-3. Rank 4 doubles crit damage without a scope and knocks down enemies with scoped crits.
- Rapid Reloading: Rank 1 speeds up ballistic weapon reloads by 30%. Rank 2 extends this to energy and EM weapons. Rank 3 covers particle beam weapons and adds a 50% chance to avoid reload interruptions.
- Sniper Certification: Reduces scope sway at Rank 1, extends breath-holding at Rank 2, adds +25% headshot crit chance at Rank 3, and gives 50% more damage while actively scoped at Rank 4.
- Targeting: Hip-fire accuracy improvements at Ranks 1-3, with enemy marking that scales from 1 enemy within 25m to 4 enemies within 100m. Rank 4 adds a 10% disarm chance on hip-fire hits.
- Armor Penetration: Attacks ignore 15/30/50% of target armor across Ranks 1-3. Rank 4 reduces enemy armor by 25% for 6 seconds after a critical hit.
- Crippling: Human enemies have a 30% increased chance to enter a downed state at Rank 1. Rank 4 extends all effects to all enemy types and doubles damage to downed enemies.
- Sharpshooting: Headshot crit damage +50% at Rank 1, leg crit damage +50% at Rank 2, all crit damage +50% at Rank 3. Rank 4 grants +25% ranged crit chance for 20 seconds after a ranged crit kill.
Science skills: full breakdown and rank challenges
Science skills are the backbone of crafting, outpost building, and resource gathering. They are less immediately exciting than Combat skills but become increasingly valuable as you invest in outposts and weapon modification.
You can find a complete breakdown of all Science skill effects and their interactions with crafting systems on the Starfield Wiki's Skills page.
Tier 1 science skills
- Astrodynamics: Grav jump range +15% at Rank 1, fuel cost -15% at Rank 2, both effects at +30% at Rank 3, and -50% fuel cost at Rank 4.
- Geology: More common, uncommon, rare, and exotic inorganic resources from surface objects across the four ranks.
- Medicine: Med Packs, Trauma Packs, and Emergency Kits restore 10/20/30/50% additional health at 10/20/30/50% faster rates. Rank 4 adds a chance to cure afflictions.
- Research Methods: Crafting and research resource costs reduced by 10/20/40/60% across ranks. Rank 4 also doubles the frequency of sudden development bonuses during research.
- Surveying: Adds scanner zoom and increases scan distance from 20m at Rank 1 to 50m at Rank 4.
Tier 2 and higher science skills
- Botany and Zoology: Mirror structures for plants and creatures respectively, improving organic resource yields and scanner information across ranks.
- Scanning: Reveals uncommon through unique inorganic resources on planet surfaces, and provides increasingly detailed ship information in space. Rank 4 shows complete cargo manifests.
- Spacesuit Design and Weapon Engineering: Each follows the same pattern of unlocking improved, superior, and advanced crafting tiers across ranks.
- Astrophysics: Extends planetary scanning range from current system moons at Rank 1 to any planet within 30 light years at Rank 4, with trait discovery chances scaling from 10% to 50%.
- Chemistry: Unlocks improved through exotic chem crafting across four ranks, with Rank 4 occasionally tripling crafting output.
- Outpost Engineering: Unlocks improved through advanced outpost modules, with Rank 4 cutting module construction costs by 50%.
- Aneutronic Fusion: Ship reactors produce 1/2/3/5 extra power units across ranks.
- Planetary Habitation: Rank 1 allows outposts on extreme temperature planets and increases max outpost count by 4, with each subsequent rank adding extreme pressure, toxic/corrosive atmosphere, and extreme gravity tolerance.
- Special Projects: Unlocks experimental research and rare through unique manufactured component crafting.
Tech skills: full breakdown and rank challenges
Tech skills cover ship combat, ship customization, boost pack usage, and lockpicking. Several of the most impactful early-game unlocks sit here.
For a deeper look at how these interact with the game's core systems, the Starfield Wiki's Basic Game Mechanics page covers the underlying rules that Tech skills modify.
Tier 1 tech skills
- Ballistic Weapon Systems: Ship ballistic weapons gain 10/20/30% damage and recharge improvements, with Rank 4 dealing 50% more damage to individual ship systems.
- Boost Pack Training: Required to use boost packs. Rank 2 reduces fuel consumption, Rank 3 speeds fuel regeneration, Rank 4 doubles both bonuses.
- Piloting: Rank 1 unlocks ship thrusters. Rank 2 improves turning rate. Rank 3 unlocks Class B ships. Rank 4 unlocks Class C ships.
- Security: Rank 1 allows hacking Advanced locks with 2 bankable auto-attempts. Rank 4 reaches Master locks with 5 auto-attempts and lets you spend a digipick to eliminate irrelevant puzzle keys.
- Targeting Control Systems: Unlocks ship targeting at Rank 1. Rank 4 reduces lock-on time by 60% and deals 20% increased system damage in targeting mode.
Tier 2 tech skills
- Energy Weapon Systems: Ship energy weapons gain 10/20/30% damage and targeting cost reductions of 15/30/45%. Rank 4 makes them recharge 30% faster.
- Engine Systems: Ship top speed +10% at Rank 1, boost duration and cooldown improvements at Rank 2, +20% top speed at Rank 3. Rank 4 causes all enemies to disengage while you're boosting.
- Payloads: Ship cargo capacity increases of 10/20/30/50% across ranks.
- Shield Systems: Ship shield capacity increases of 20/40/80% at Ranks 1-3, with Rank 4 occasionally blocking 100% of incoming damage.
Tier 3 and 4 tech skills
- Missile Weapon Systems: 10/20/30% ship missile damage and targeting cost reductions of 20/40/60%. Rank 4 adds 20% increased range, travel speed, and reload speed.
- Particle Beam Weapon Systems: 10/20/30% damage and 10/20/30% targeting cost reductions. Rank 4 increases critical hit chance.
- Robotics: 10/20/30% increased damage to robots and turrets across ranks, with escalating NPC-style control options for robots at each rank.
- Starship Design: Unlocks improved through experimental ship module installation across ranks.
- Starship Engineering: Ship systems repair 10% faster at Rank 1, 25% damage mitigation at Rank 2, 25% faster repair at Rank 3. Rank 4 occasionally repairs an entire system when you repair one block.
- Automated Weapon Systems: Turret weapons gain 10/20/30% damage and targeting cost reductions, with Rank 4 making turrets recharge 40% faster.
- Boost Assault Training: Rank 1 damages nearby enemies when you boost and may ignite them. Rank 2 adds knockdown chance. Rank 3 lets you hover while aiming during a boost. Rank 4 slows time by 70% while hovering.
- EM Weapon Systems: Ship EM weapons gain 10/20/30% damage and 15/30/45% targeting cost reductions. Rank 4 adds a small chance to instantly disable enemy engines.
How to level up skills efficiently
Earning skill points requires gaining XP and leveling up. Each level grants one skill point. The challenge system means that simply unlocking a skill isn't enough to maximize it. You need to actively use the skill in the way the challenge demands.
Some practical notes on challenge completion:
- Boxing challenges (kill 20/50/100 enemies unarmed) are best done on low-level enemies in early areas where you can survive without weapons.
- Fitness challenges (deplete oxygen 20/50/100 times) happen naturally if you sprint frequently, but you can accelerate this by deliberately sprinting until your oxygen is gone.
- Weight Lifting challenges (sprint 1,000/2,500/5,000 meters at 75%+ load) are easiest when you're already carrying a lot of resources, so don't fast-travel when you're heavily loaded.
- Stealth challenges require actual sneak attacks, not just sneaking. Find guards in settlements and practice on them.
- Piloting challenges require destroying ships, which means engaging in space combat rather than avoiding it.
For more detailed strategies on building your character from the ground up, the Starfield Wiki's Basic Game Mechanics page explains the underlying systems that affect skill progression.
For more builds, strategies, and game guides across all platforms, browse the latest guides at GAMES.GG to find what fits your playstyle.