
Ryze is one of the most exciting units ever added to Teamfight Tactics. As a 7-cost unlockable with the Rune Mage trait, he adapts to whatever regions you have active, turning your board composition into a direct power multiplier for his ability. The more regions you stack, the more devastating his Runic Blast becomes. Whether you want a pure damage carry or a utility-focused powerhouse, Ryze can do it all, but only if you know how to build toward him correctly.
What Does Ryze Do in Set 16?
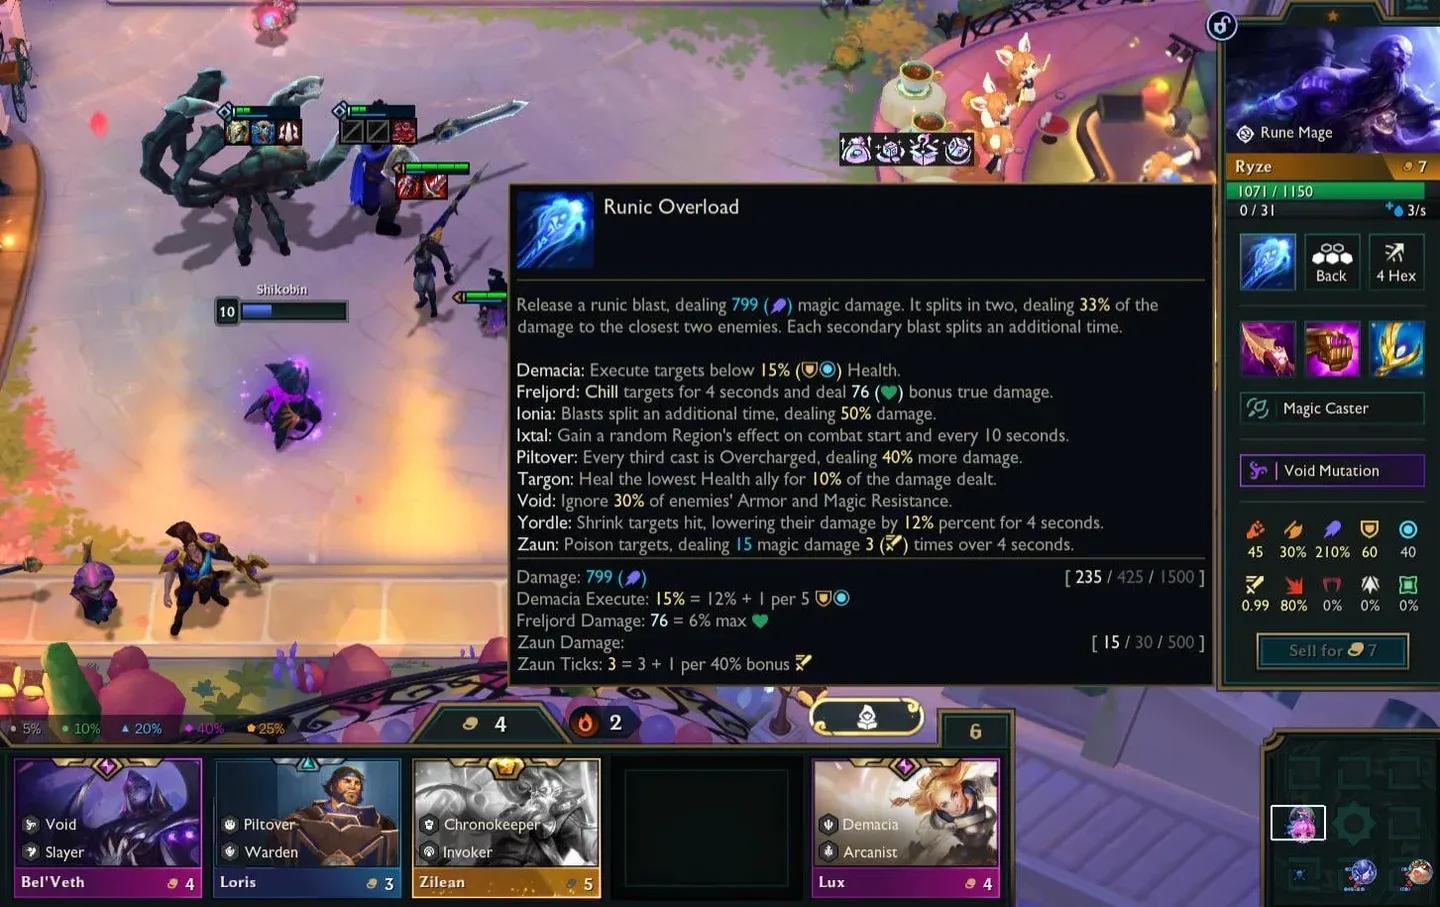
Ryze's core ability fires a Runic Blast that deals magic damage to a target, then splits into two secondary blasts hitting the two nearest enemies. Each of those secondary blasts splits once more, creating a chain of magical punishment across the enemy board.
What makes him truly special is his Rune Mage trait. While Ryze benefits from all active region traits on your board, he contributes to none of them. Instead, each active region modifies his Runic Blast with an additional effect:
- Bilgewater - Blasts explode on impact, dealing Physical Damage to adjacent enemies
- Demacia - Execute targets below a certain HP threshold
- Freljord - Chill targets for 4 seconds and deal bonus true damage
- Ionia - Blasts split an additional time
- Ixtal - Gain a random region's effect at combat start and every 10 seconds
- Noxus - Blasts pierce through targets
- Piltover - Every third cast becomes Overcharged, dealing increased damage
- Shadow Isles - Blast damage scales with the number of souls collected
- Shurima - Knock up enemies for 1 second, with a chance to drop Gold or Treasures
- Targon - Heal the lowest-HP ally for a percentage of damage dealt
- Void - Ignore a percentage of enemies' Armor and Magic Resistance
- Yordle - Shrink targets on hit, reducing their damage output for 4 seconds
- Zaun - Poison targets
Stack Demacia and Zaun together, for example, and every Runic Blast applies both an Execute and Poison simultaneously. The stacking potential here is what separates a mediocre Ryze from a board-wiping monster.
Runic Blast chain reaction
How to Unlock Ryze in TFT Set 16
Ryze does not appear in your shop naturally. To unlock him, you must reach level 9 and have 3 different region traits active for at least one round. As of Patch 16.6, this requirement was reduced from 4 regions down to 3, making him noticeably easier to bring online.
There are 13 total regional traits in Set 16, and they fall into three categories based on how many units you need to activate them:
One-Unit Region Traits
Targon only requires a single unit to activate. Dropping in Aphelios, Zoe, Leona, or Taric instantly counts as one region toward your unlock requirement. This makes Targon the easiest region to slot into almost any board.
Two-Unit Region Traits
Yordle, Piltover, Shadow Isles, and Void each need two units. Shurima also needs two, but you must have Azir fielded for at least two rounds for it to count.
Three-Unit Region Traits
Bilgewater, Demacia, Freljord, Ionia, Ixtal, Noxus, and Zaun all require three units. The smart shortcut here is using dual-region units. Kennen, Xin Zhao, and Vi each carry two region traits, letting you activate multiple regions simultaneously with fewer board slots.
Always build your board with at least 4 regions active before hitting level 9. That way, Ryze unlocks on the very next round after you level up, instead of requiring an extra wait.
What Items Should You Build on Ryze?
Ryze supports two distinct item paths depending on what components you collect throughout the game.
Damage Carry Build
The premier damage setup pairs Nashor's Tooth with Jeweled Gauntlet and Striker's Flail. This works because Nashor's Tooth restores mana whenever Ryze crits, letting him chain casts far more frequently than normal. The result is a Ryze who fires constantly and deals massive burst damage across the entire enemy board.
When you can't build this exact setup, strong alternatives include Spear of Shojin, Rabadon's Deathcap, and Archangel's Staff.
Utility Build
For a more supportive role, Morellonomicon applies anti-heal to shut down healing-heavy boards, Void Staff spreads magic resistance shred across the enemy team, and Blue Buff accelerates Ryze's cast frequency without relying on crits.
Artifact Options
Top artifact picks for Ryze include Dawncore, Zhonya's Paradox, and Seeker's Armguard. If you're running a Bilgewater comp, Blackmarket Explosives (available through the 7 Bilgewater shop toggle) is an exceptional option worth hunting for.
Which Augments Work Best for Ryze?
Augment selection splits into two goals: getting to level 9 with enough HP and gold, and boosting Ryze's Runic Blast power directly.
Economy Augments
Silver tier:Fire Sale steals a random 3-cost or lower unit from your shop, accelerating your level push. Late Game Specialist grants 33 gold the moment you hit level 9, which is perfect for stabilizing after a greedy level push.
Gold tier:Forward Thinking takes all your gold at 3-2 and returns it on 4-2 with an extra 70 gold attached. This is arguably the best Fast 9 accelerant in the game if your board can survive the wait. Slammin' provides XP but requires all your components to be on the board, so plan your items before selecting it.
Prismatic tier:Level Up reduces XP costs across the board, getting you to level 9 faster than almost anything else. Upward Mobility rewards intentional loss-streaking with free rerolls and HP every time you level up. Invested gives you free rerolls once you're above 80 gold at round end, helping you find 4 and 5-cost carries after hitting level 9.
Combat Augments
The Trait Tree gives you 3 random emblems and 3 gold, often making 4-region activation trivial and sometimes pushing you to 5 or 6 regions. The World Runes grants 2 region-specific emblems (no useless non-region emblems) and awards 6 XP per player combat when you have 4+ regions active. Bronze for Life amplifies every Bronze trait you have active, and since many Ryze comps naturally run several Bronze traits, the Prismatic version delivers both damage and durability.
Spreading Roots gives two random emblems, while U.R.F. provides a spatula and boosts Attack Speed and Mana Regen for units holding Spatula or Frying Pan items.
How Does Fast 9 Work for Ryze Comps?
Nearly every Ryze comp operates as a Fast 9 strategy, meaning you prioritize reaching level 9 over rolling down at level 7 or 8. Here's what makes Fast 9 viable:
Key Encounters to Look For
Scuttle Puddle supercharges every PvE round with extra resources, making it arguably the strongest Fast 9 encounter in the game. Gold Subscription drops a chunk of gold at the start of every stage, which alone is often enough to commit to the strategy. Emblem Ensemble grants three random emblems at the very start of the game, dramatically simplifying your region activation for Ryze.
Economy Fundamentals
Hit each 10-gold interval as consistently as possible to maximize interest income. Reach 50 gold quickly and stay there. If you're lose-streaking, avoid holding 3-cost pairs on your bench early since you'll naturally see them again once your economy is healthy. Winning streaks are equally valuable since they generate streak gold and preserve HP simultaneously.
Never arrive at level 9 with only 1 life remaining. Ryze requires one additional round after you hit level 9 to unlock, so you need at least 2-3 lives to survive that wait. Play the 4-region board without Ryze for one round, then he appears the following turn.
Traits That Accelerate Fast 9
Ionia on the Path of the Enlightened grants bonus XP each turn: 1 XP per turn at 3 Ionia, 2 XP at 5 Ionia, and 4 XP at 7 Ionia. Yordle at 8 units averages 6 gold per turn in Stage 4, which is extraordinary for your economy. Bilgewater generates Silver Serpents and provides strong early board power to maintain streaks while building toward level 9.
Best Ryze Team Comps in TFT Set 16
S-Tier: Demacia Ryze
Ryze serves as the primary carry, with Sylas as secondary damage dealer, Taric as the main tank, and leftover items going to Sett or Xerath. This comp activates 4 regions: Ionia, Demacia, Targon, and Shurima.
The trickiest part is unlocking Xerath, which requires alternating wins and losses. Win a round, then deliberately item-strip your carry to guarantee a loss the following fight, then win again. If you're critically low on HP, skip the loss setup and win-streak to unlock Renekton instead.
Unlocks needed: Ryze (level 9 + 3 regions), Xerath (alternate win/loss for 3 turns), Sett (solo frontline a unit in rows 1-2 at level 8), Sylas (level 9 + sell a 2-star Garen), Kennen (5 star levels of Ionia, Yordle, or Defender), Galio (8 star levels of Demacia).
S-Tier: FlexiMel
Mel carries the primary damage load with Ryze and Sylas as secondary dealers and Swain tanking the frontline. This comp has multiple unlock requirements, so economy management is critical.
Play around a strong AP Noxus opener and unlock LeBlanc as early as possible to hold AP items and win-streak through the mid game. Do not roll at level 8 unless you're bleeding HP. Once at level 9, prioritize getting Xerath, Ryze, and Sylas online since those three units are the difference between a top 4 and a first-place finish.
A-Tier: Bruiser Bear
This comp gives Ryze 4 regions: Targon, Ionia, Freljord, and Yordle. Ryze leads damage with Lissandra and Volibear supporting, while Wukong or Taric handles tanking.
To unlock Volibear, you need a unit with 3400 HP or higher on your board. Prioritize HP items throughout the game to hit this threshold. If you're struggling to reach level 9, rolling at level 8 for an upgraded Lissandra and Wukong can stabilize your board enough to survive into Stage 4.
B-Tier: Boom and Runes
This comp activates 5 regions for Ryze: Targon, Zaun, Ionia, Piltover, and Yordle. Ziggs acts as secondary carry alongside Ryze, with Wukong or Taric tanking and Sett holding leftover items.
The Yordle path is the most natural route into this comp since it provides economy, free rerolls, and helps unlock Kennen along the way. Once above 50 gold, start holding final board units on your bench to prepare for the level 9 rolldown.
C-Tier: Bilgewater Ryze
Play Bilgewater throughout the early and mid game, then transition at level 9. This comp activates 4 regions: Freljord, Bilgewater, Yordle, and Targon. The Bilgewater shop provides Blackmarket Explosives at 7 Bilgewater, which is exceptional on Ryze.
Farm Silver Serpents aggressively to unlock Tahm Kench early. Focus on HP items to hit the 3400 HP threshold for Volibear. You can also chase Illaoi 4 if you naturally find copies throughout the game.
C-Tier: BFL Ryze (Bronze for Life)
This comp shines specifically when you're offered the Gold or Prismatic Bronze for Life augment, since it naturally runs 7 Bronze traits. Yunara and Ryze share carry duties with Wukong or Taric tanking.
Because this comp doesn't rely on 5-cost units beyond Ryze, you can delay level 9 and instead roll at 4-2 to upgrade your 4-costs. This saves significant HP and can dramatically improve your final placement.
C-Tier: Zaun Ryze
Ryze and Azir split carry duties with Nasus as the primary tank. This comp activates 4 regions: Zaun, Shurima, Piltover, and Yordle.
Note that Nasus requires you to lose 2 combats with Azir on your board, so plan those losses deliberately. Once at level 9, play Taric temporarily since his Targon trait counts as a region while you wait for Nasus to unlock.
C-Tier: Noxus Ryze
This version runs only 3 regions (Noxus, Shurima, Targon) but compensates with high-power individual units. Ryze and Azir carry damage, Nasus tanks, and flex slots can hold Mel, Fiddlesticks, Ambessa, or Shyvana depending on your items.
If you reach level 9 without completing all your unlocks, put 1 item on Ambessa and let her die in combat. The following round, both Ryze and Mel will unlock simultaneously, letting you swap in your final board immediately.
Scouting and Positioning Tips
Scouting is non-negotiable when playing Fast 9. Since you're intentionally taking losses to build economy, position your carries against opponents with the weakest, non-itemized frontlines. Killing more units per fight reduces the damage you take, and consistently doing this across 10 rounds can save roughly 2 lives worth of HP. That margin is often the difference between reaching level 9 with a comfortable health buffer versus arriving there on 1 life.