

The Stargazer trait in TFT Set 17: Space Gods is unlike most traits in the game because it literally changes every single match. Each game rolls a different constellation, and that constellation determines which hexes get empowered and what bonuses those hexes provide. That means your board positioning, your carry choice, and even your econ strategy all shift depending on what you see at the start of the game.
Understanding each constellation before you queue up is the difference between a top-4 finish and an 8th-place bleed-out. Here is everything you need to know.
What is the Stargazer trait in TFT Set 17?
Stargazer is an origin trait that empowers specific hexes on the board each game. The constellation chosen at the start of the match determines what those hexes do. More hexes reveal as your player level increases, so the trait scales naturally as the game progresses.
The six champions that carry the Stargazer tag are:
- Talon (1-cost) — Rogue
- Twisted Fate (1-cost) — Fateweaver
- Jax (2-cost) — Bastion
- Lulu (3-cost) — Replicator
- Nunu (4-cost) — Vanguard
- Xayah (4-cost) — Sniper
The trait covers a solid spread of roles. Jax and Nunu anchor the front line through Bastion and Vanguard synergies respectively, while Xayah serves as the primary late-game carry. Talon functions as a mobile debuff applier, and Lulu brings a unique passive that adapts to the active constellation.
All seven Stargazer constellations explained
Each constellation has a distinct playstyle attached to it. Treating them as interchangeable is the fastest way to lose.
Constellation selection overview
The Boar: economy and stat stacking
The Boar rewards winning. Allies in empowered hexes gain Health, Attack Damage, and Ability Power, with Stargazers benefiting more. On top of that, you earn gold for every combat win:
The Boar is strong in the early and mid game but has a ceiling. You will likely want to pivot into a higher-cap composition in the late game rather than forcing 6 Stargazers.
The Mountain: snowball with emblems
The Mountain rewards winning streaks in a different way. Every 5 player combats, you earn a Stargazer emblem. The bonuses stack as you reach higher emblem counts:
- 3 emblems: 15% Health
- 4 emblems: plus 15% Attack Damage and Ability Power
- 5 emblems: plus 15 Armor and Magic Resist
- 6 emblems: plus 15% Attack Speed
- 7 emblems: plus 12% Durability
- 8 emblems: all previous bonuses increase by 20%
- 9 through 11: escalating rewards that culminate in "The stars beckon all enemies"
This constellation wants a strong opener. Starting with core Stargazers and well-itemized units early means you win fights, stack emblems faster, and compound your lead.
The Altar: sacrifice and scale
The Altar plays completely differently from the two above. When any unit dies in combat, they are sacrificed. After 60 total sacrifices, Stargazers in empowered hexes gain an additional 25% Health and 40% Attack Speed. At the 3-unit breakpoint, allies in empowered hexes gain 10% Health and 15% Attack Speed on each death.
The strategic implication here is clear: play weaker early, let units die, and econ up so you are powerful once the 60-sacrifice threshold is crossed.
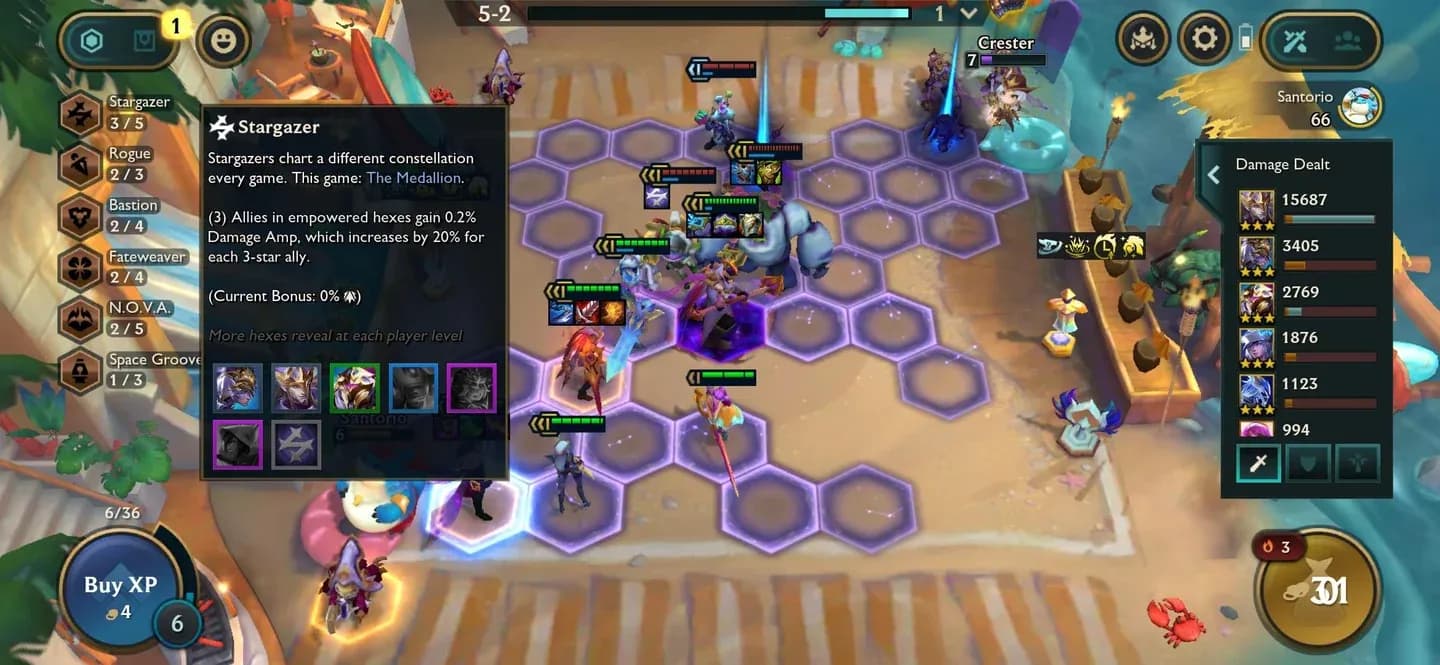
The Medallion: 3-star your units
The Medallion is straightforward. At the 3-unit breakpoint, allies in empowered hexes gain 15% Damage Amplification. That amplification increases by 3% for each 3-star unit on your team.
The implication is that you want to prioritize hitting 3-stars, particularly for any units sitting in empowered hexes. Cheap units like Talon and Twisted Fate are easier to triple, so they become high-priority targets in this constellation.
The Huntress: attack speed and mark synergy
The Huntress marks the highest-Health enemies and gives allies in empowered hexes Attack Speed. Stargazers in those hexes also heal for 10% of their max Health when a marked enemy dies:
This constellation pairs well with Xayah, whose Temporal Shot ability scales with takedowns. Positioning her in an empowered hex while the marks are active gives her both the Attack Speed to cast more often and the healing to survive longer.
Xayah in empowered hex corner
The Fountain: mana regen and healing
The Fountain gives allies in empowered hexes 1 Mana Regen per second. Stargazers in those hexes get more and heal the lowest-Health ally with their abilities:
- 3 Stargazers: 3 Mana Regen, 10% Ability Damage converted to healing
- 5 Stargazers: 5 Mana Regen, 18% Ability Damage converted to healing
This constellation lends itself to a stall composition. Archangel's Staff in the backline accelerates mana generation further, and a tanky front line keeps the healing loop going long enough to win through attrition.
The Serpent: durability and poison
The Serpent is the most defensive constellation. Allies in empowered hexes gain Damage Reduction, and Stargazers within those hexes also poison enemies, repeating a portion of damage dealt as magic damage over 3 seconds:
- 3 Stargazers: 15% DR, 30% poison damage
- 5 Stargazers: 20% DR, 45% poison damage
- 7 Stargazers: 25% DR, 60% poison damage
This is explicitly a stall composition. A tanky front line with Jax and Nunu sitting in empowered hexes lets the poison chip away while your board survives long enough to win through sustained damage.
TFT Stargazer champion breakdown
How does each Stargazer champion fit into the comp?
Talon (1-cost, Rogue) uses Diviner's Judgment to stab a target for physical damage over time, then leaps to the highest percent-Health enemy within range. His ability costs only 30 mana, meaning he casts constantly and applies his bleed to multiple targets across a fight. He is a strong early-game unit and a reliable debuff spreader.
Twisted Fate (1-cost, Fateweaver) draws a card valued between 1 and 9 with Fate's Gambit and throws it at his target. Overkill damage bounces to the nearest enemy. His Fateweaver trait lets him draw twice and take the better result, making his damage more consistent than it appears on paper.
Jax (2-cost, Bastion) enters a defensive stance with Counter Star-ike, reducing incoming damage and generating a shield. When the stance ends, he strikes nearby enemies for magic damage and stuns them. He is the go-to early front-liner for Stargazer compositions and pairs well with higher-cost Bastions in the late game.
Lulu (3-cost, Replicator) has a passive that changes based on the active constellation, making her uniquely tied to whatever game you are playing. Her active, It's Raining Stars, deals magic damage to nearby enemies with secondary effects that also shift per constellation. She is the most flexible Stargazer and worth holding in almost every game.
Nunu (4-cost, Vanguard) gains a shield with Calamity, then summons an astrolabe that crashes down on clustered enemies for magic damage before pushing through the board for additional damage. All enemies hit are knocked up. He is the premium late-game tank for Stargazer boards.
Xayah (4-cost, Sniper) fires a blast with Temporal Shot dealing physical damage, and earns a drone for each takedown. Each drone adds additional physical damage to her next cast. She functions like a scaling carry who gets stronger the longer a fight goes, making her ideal in constellations with empowered corner hexes.

Nunu Calamity astrolabe hit
Positioning tips for Stargazer boards
Because empowered hexes shift with the constellation, there is no single correct board layout. Here is a general framework based on constellation type:
- Carry constellations (Boar, Huntress, Medallion): Place Xayah or your primary carry in an empowered hex as a priority. Front-liners fill remaining empowered hexes.
- Stall constellations (Serpent, Fountain): Pack Jax and Nunu into empowered hexes. Backline units benefit less from DR or poison, so prioritize tanks.
- Scaling constellations (Mountain, Altar): Early positioning matters less. Focus on winning or surviving to hit your power spike, then re-evaluate hex placement once your board is complete.
For more TFT Set 17 strategies and tier lists, browse more guides at GAMES.GG to stay ahead of the meta.