गेम, लेख, गाइड खोजें...CtrlK
साइन इन करेंशुरू करें
Starfield में जहाज कस्टमाइज़ेशन, स्टेट्स और ज़मीन व अंतरिक्ष युद्ध के लिए 5 बेहतरीन बिल्ड्स में महारत हासिल करें।

लेखक Nuwel
सामग्री लेखक
Google पर और अधिक GAMES.GG गाइड देखें
हमें पसंदीदा स्रोत के रूप में जोड़ें और हमारे गाइड आपके परिणामों में सबसे पहले दिखाई देंगे।

Starfield के बेस्ट बिल्ड: 6 मेटा सेटअप जो काम करते हैं
शॉटगन ब्रॉलर से लेकर स्टील्थ स्नाइपर तक, ये 6 Starfield बिल्ड्स हर प्लेस्टाइल के लिए सटीक स्किल्स, हथियारों और ट्रेड्स के साथ उपलब्ध हैं।
Starfield Outpost Guide: बेस निर्माण और प्रबंधन के लिए टिप्स
Starfield में आउटपोस्ट बनाने, पावर देने, क्रू असाइन करने और कार्गो लिंक सेटअप करने का तरीका जानें।

Starfield उपलब्धियाँ और ट्राफियां: हर अवॉर्ड कैसे जीतें
Starfield की सभी उपलब्धियां और ट्रॉफियां 75 घंटे में पूरी करें। इस गाइड में कहानी, फैक्शन, क्राफ्टिंग और लेवल 100 तक पहुँचने का पूरा रोडमैप शामिल है।
Starfield आपको गेम खेलने के दो अलग तरीके देता है: ज़मीन पर आप अपना character कैसे build करते हैं, और सितारों के बीच सफर करने के लिए आप अपना ship कैसे तैयार करते हैं। दोनों ही systems इतने गहरे हैं कि आप घंटों इनमें बिता सकते हैं, और दोनों ही उन players को reward देते हैं जो समझते हैं कि हर stat असल में क्या काम करती है। यह guide ship construction को बेसिक से समझाती है, और फिर 5 सबसे मज़बूत character build archetypes को breakdown करती है, जिसमें यह भी शामिल है कि maximum output के लिए हर एक में legendary weapon traits कैसे slot करें।
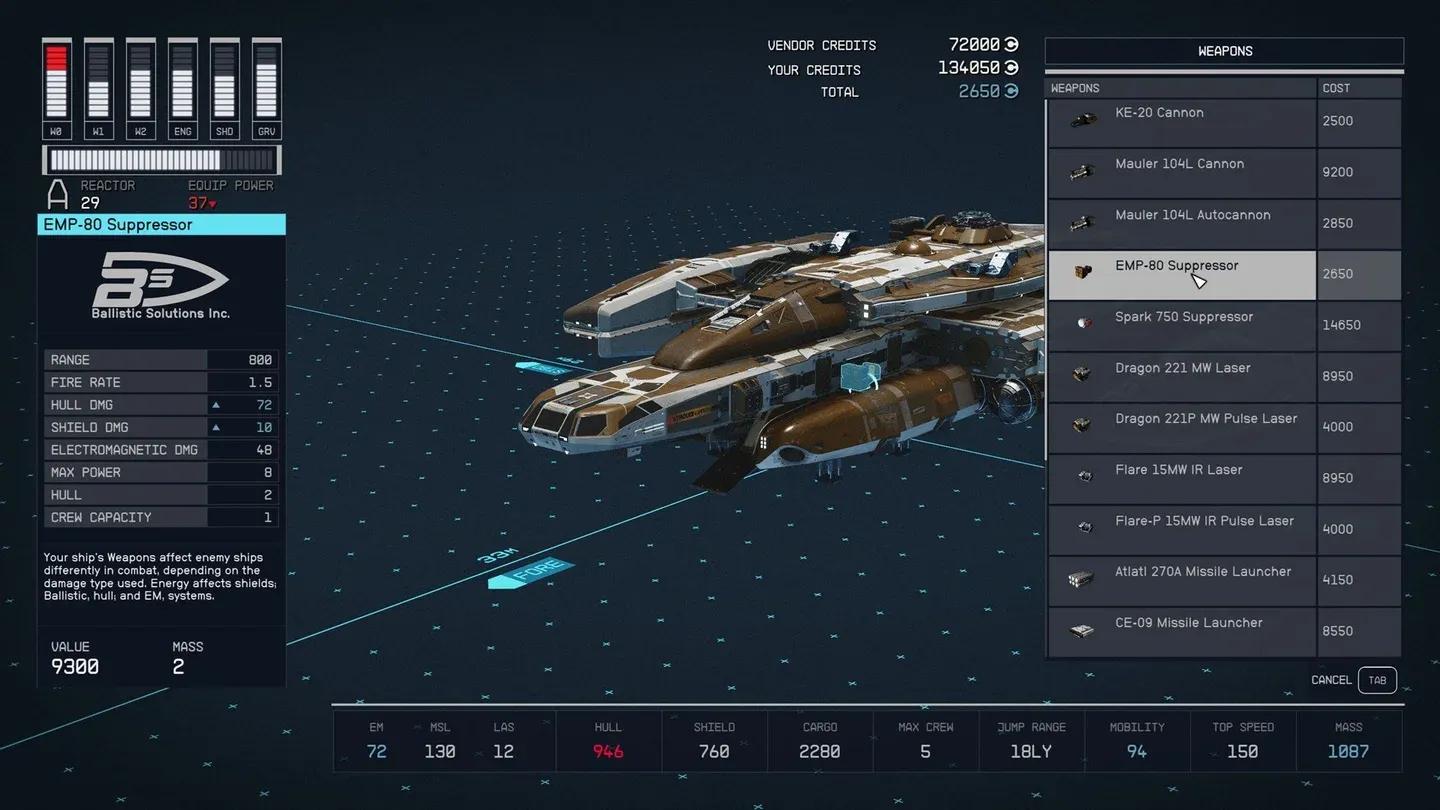
Ship builder module selection
आप Starfield में शुरुआत से ship नहीं बना सकते। हर build की शुरुआत एक ऐसे ship से होती है जो आपके पास पहले से है, जिसे आप Settled Systems के populated इलाकों में landing pads के पास मिलने वाले ship technician के पास जाकर modify करते हैं। technician सीधे parts बेचता है, और parts कभी भी आपके inventory या cargo hold में नहीं रहते; वे builder interface में सिर्फ खरीदने योग्य options के रूप में मौजूद होते हैं।
कुछ कड़े नियम हैं जो तय करते हैं कि आप क्या कर सकते हैं और क्या नहीं:
Parts की compatibility और manufacturer-specific modules पर ज़्यादा जानकारी के लिए, Steam community ship crafting guide देखें, जिसमें level restrictions और यह बताया गया है कि कौन सा shipyard किस manufacturer के parts रखता है।
Ship builder में हर number का कुछ ठोस असर होता है। यहाँ बताया गया है कि हर stat क्या काम करती है:
| Stat | क्या control करती है |
|---|---|
| LAS | Laser weapons से होने वाला damage |
| BAL | Ballistic weapons से होने वाला damage |
| MSL | Missile weapons से होने वाला damage |
| Hull | Ship health (कुल durability) |
| Shield | Hull को hit लगने से पहले absorb किया गया damage |
| Reactor | Distribute करने के लिए उपलब्ध कुल power |
| Cargo | Items और resources के लिए storage capacity |
| Shielded Cargo | Contraband के लिए capacity, जो scanners से छिपी रहती है |
| Crew Capacity | Board पर मौजूद अधिकतम crew members |
| Fuel | Helium-3 reserve; ज़्यादा fuel का मतलब है ज़्यादा लगातार grav jumps |
| Jump Range | प्रति grav jump अधिकतम light-year दूरी |
| Mobility | Combat में maneuverability और turn rate |
| Top Speed | अधिकतम velocity |
| Mass | कुल ship weight; ज़्यादा mass speed, agility, और jump range को कम करता है |
Mass वह stat है जो ज़्यादातर builders को परेशान करती है। हर module का वज़न होता है, इसलिए आप जितना ज़्यादा सामान जोड़ेंगे, ship उतना ही धीमा और कम agile होगा। दूसरी तरफ, भारी ships में ज़्यादा Hull होता है, इसलिए एक फुर्तीले fighter और एक मज़बूत fortress के बीच हमेशा एक trade-off होता है।
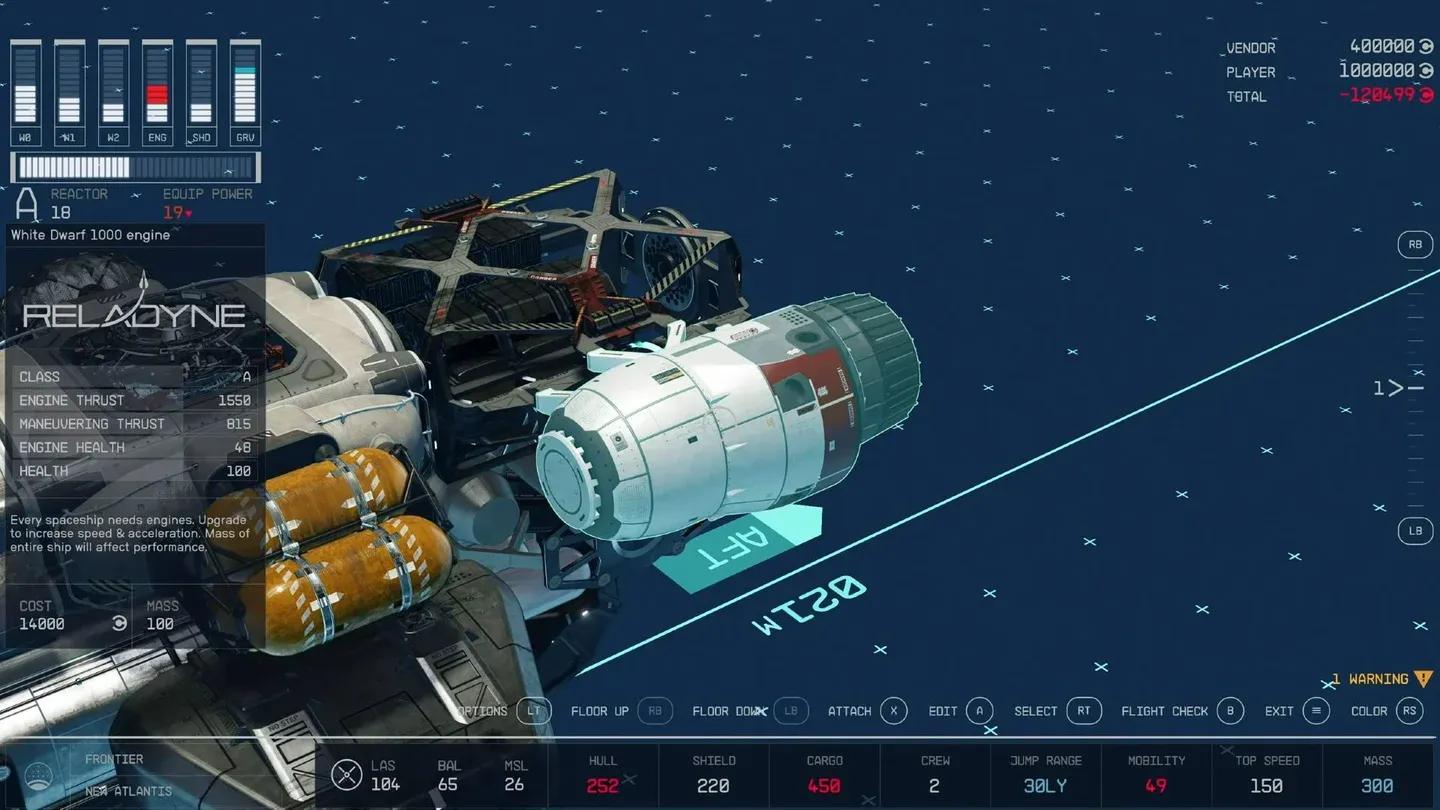
Full ship stats breakdown
Ship components को essential और optional categories में बांटा गया है। यहाँ एक quick reference है:
Essential (इनके बिना ship उड़ नहीं सकता):
Optional लेकिन महत्वपूर्ण:
आपका reactor एक total power budget सेट करता है। D-pad का उपयोग करके, आप combat के दौरान छह systems में उस power को तुरंत redistribute कर सकते हैं:
इसका व्यावहारिक मतलब यह है कि अगर आप लड़ाई में हैं और भागने का कोई इरादा नहीं है, तो GRV से सारी power हटाकर weapons या engines को देना मुफ्त damage है। ज़्यादा SHD allocation के साथ shields तेज़ी से recharge होती हैं, इसलिए क्या हो रहा है उसके आधार पर mid-fight power toggle करना एक असली skill है जो औसत pilots को effective pilots से अलग करती है।
Ships को खास मकसद के लिए बनाया जाता है और आप उनके बीच अदला-बदली करने के लिए कई vessels स्टोर कर सकते हैं। तीन archetypes ज़्यादातर playstyles को कवर करते हैं:
Piracy और bounty hunting: ज़्यादा shields, engines, laser weapons, और missiles को प्राथमिकता दें। Lasers shields को हटाते हैं, missiles boarding के लिए ships को disable करने के लिए engines को target करते हैं। Speed और agility के लिए mass को कम रखें। Jump range और बड़े hab modules पर कम ध्यान दें।
Exploration और surveying: Fuel tanks, एक high-quality grav drive, बड़े cargo holds, और workstations वाले diverse hab modules को stack करें। Agility और weapons secondary हैं; आपको range और storage चाहिए। आपात स्थिति के लिए कुछ weapons रखें।
Cargo और smuggling: Shielded bays सहित अधिकतम cargo holds, मज़बूत shields, और एक शक्तिशाली reactor। Attack power से ज़्यादा survivability मायने रखती है; अगर कुछ गलत होता है, तो लक्ष्य भागना है, न कि firefight करना।
नीचे दी गई builds 2026 तक के सबसे effective character archetypes का प्रतिनिधित्व करती हैं। हर एक को balance changes के बीच भी functional रहने के लिए डिज़ाइन किया गया है और यह तब भी काम करती है चाहे आपके पास legendary rerolling systems का access हो या न हो।
Ronin build पूरी तरह से stealth approach और एक या दो-hit kills पर टिकी है। Early game में, छोटे fast-swinging blades अपने wide arcs के लिए अच्छे काम करते हैं। Late game और NG+ में, Va'Ruun Painblade-style weapon जैसे भारी blades बेहतर armor penetration और damage scaling प्रदान करते हैं।
Priority skills:
Weapon traits जिन्हें target करें: Rapid (attack speed), Instigating (full-health targets के खिलाफ bonus), और Lacerate या Radioactive जैसा damage-over-time modifier उन दुश्मनों के लिए जो पहले hit के बाद बच जाते हैं। अपने primary blade पर defensive traits से बचें; हर budget point तेज़ी से मारने की तरफ जाना चाहिए।
यह build किसी के पता चलने से पहले ही outposts को साफ कर देती है। इसकी कमज़ोरी cramped ships और zero-g environments हैं, इसलिए close-quarters स्थितियों के लिए backup के तौर पर एक suppressed pistol रखें।
Priority skills:
Reckless modifier यहाँ काफी मज़बूत है। Reckless incoming damage को बढ़ाकर multiplicative damage boost देता है। अगर आप लंबी दूरी से hit नहीं हो रहे हैं, तो नुकसान न के बराबर है जबकि हर engagement जल्दी खत्म हो जाती है। इसे अनजान targets के खिलाफ bonus damage के लिए Instigating-type trait के साथ pair करें, फिर तीसरा crit-boosting modifier जोड़ें। Reload speed जैसे utility options की चिंता करने से पहले दो offensive traits को प्राथमिकता दें।
इस list की सबसे flexible build। High-damage pistol के साथ pair की गई mid-range assault rifle boarding actions, base assaults, और urban contracts को कवर करती है, बिना respec की ज़रूरत के। अगर आप loadout को लगातार adjust किए बिना ground और ship content के बीच घूमना चाहते हैं, तो यह सही choice है।
Priority skills:
Weapon traits: Rifles के लिए, recoil reduction, stability, और aim करते समय bonus damage को target करें। Pistols के लिए, raw damage, stagger, और armor penetration handling से ज़्यादा मायने रखते हैं। यह build high-quality non-Exotic weapons पर पूरी तरह से काम करती है, इसलिए अपने core skills को max करने की कीमत पर rare drops के पीछे न भागें।
Energy weapons mid-to-long range पर ज़ोरदार हमला करते हैं, armor को प्रभावी ढंग से penetrate करते हैं, और chaotic fights में clear visual feedback देते हैं। इसका trade-off यह है कि आपको अक्सर line of sight की ज़रूरत होती है, जिसका मतलब है कि sniper की तुलना में खुले में ज़्यादा देर तक खड़ा रहना।
Priority skills:
इस build के लिए Reroll priorities: Heat-management traits (overheat से पहले ज़्यादा shots, जो sustained DPS को प्रभावी ढंग से बढ़ाता है), armor-ignoring traits, और disorient या stagger जैसे crowd-control effects। Reckless-style boost यहाँ काम कर सकता है, लेकिन केवल तभी जब आपकी positioning अनुशासित हो। Beam users snipers की तुलना में ज़्यादा देर तक sight में रहते हैं, इसलिए incoming damage एक वास्तविक जोखिम है।
यह build space को primary game loop मानती है। ज़्यादातर skill points Tech और Pilot-related perks में जाते हैं। Ground combat एक single reliable rifle या shotgun से संभाला जाता है, न कि specialized loadout से।
Priority skills:
Ship weapon strategy: कम से कम दो weapon types चलाएं। Lasers पहले shields को हटाते हैं, फिर shields हटने के बाद ballistics या missiles hull को shred करते हैं। Shields हटने के बाद भी कुछ laser power active रखें ताकि hull पर काम करते समय regen को रोका जा सके। Power को इस तरह distribute करना कि lasers पहले online आएं, और फिर shields हटने के बाद ballistics या missiles को reassign करना, कठिन encounters के लिए standard sequence है।
Ship module selection और कौन से parts हर class level पर सबसे अच्छे काम करते हैं, इसके लिए Steam community ship crafting guide को serious ship build शुरू करने से पहले bookmark करना फायदेमंद है।
| Build | Primary role | Key skill | Weak point |
|---|---|---|---|
| Ronin Melee Assassin | Planetary stealth kills | Concealment | Ranged enemies |
| Stealth Sniper | Outpost clearing | Marksmanship | Cramped ships, zero-g |
| Ballistic Bounty Hunter | All-purpose ground combat | Ballistics | No specialization peak |
| Laser Specialist | Mid-range DPS | Lasers | Requires line of sight |
| Ship Combat Ace | Space dogfights | Piloting | Weak ground loadout |
कुछ mechanics तब भी लागू होते हैं चाहे आप कोई भी build चलाएं:
हर genre में और अधिक Starfield strategies और guides के लिए, GAMES.GG पर नवीनतम guides ब्राउज़ करें ताकि आपकी builds current बनी रहें क्योंकि Bethesda इस अप्रैल में Free Lanes update और Terran Armada expansion के माध्यम से गेम को update करना जारी रखेगा।