
Marathon overhauled its progression in Season 2 with the Cradle system, replacing much of the old faction-based grind with something more flexible and player-driven. Every Runner Shell now has six stat categories you can develop independently, and the whole thing is tied to an energy currency you earn just by playing. If the old system left you feeling locked out of upgrades because an extraction went sideways, this new setup is a meaningful improvement.
How does the Cradle system work?
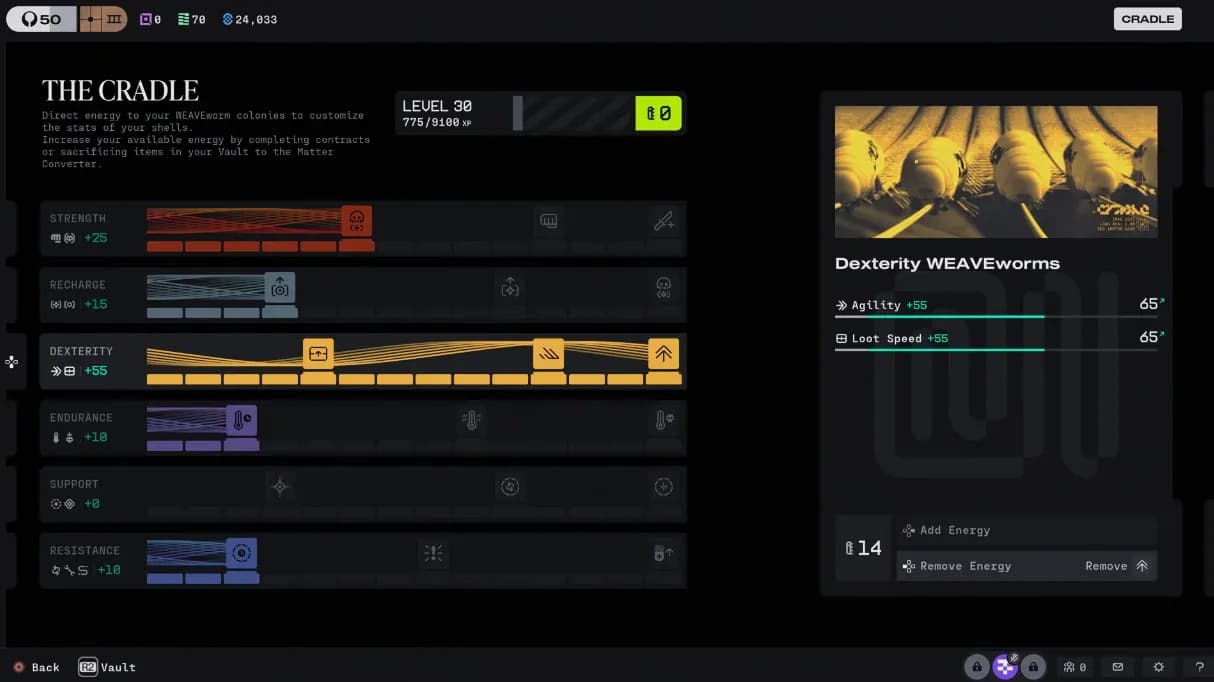
Every Runner Shell you pick comes with six distinct stat categories: Strength, Recharge, Dexterity, Endurance, Support, and Resistance. Each category has its own progression track filled with nodes. Unlocking a node grants permanent bonuses to your shell, and you unlock nodes by spending energy.
Energy is the core resource here. You earn it two ways:
- Completing contracts across the game's various objectives
- Exchanging items from your Vault through the Matter Converter
Cradle node upgrade screen
Neither method requires you to successfully extract every single run, which is the biggest quality-of-life improvement over the old faction system. The Matter Converter path in particular means even a failed run where you stashed loot beforehand can still push your progression forward.
Don't wait until your Vault is overflowing before converting items. Feeding the Matter Converter regularly keeps your energy income steady between contract completions.
What happened to the old faction system?
The faction system hasn't vanished entirely in Season 2, but its role has shrunk considerably. You can still earn upgrades through faction standing, and those upgrades cover things like improving your armory and finding cores. What factions no longer control is the development of your shell's core stats. That responsibility now sits entirely with the Cradle.
For players who spent Season 1 grinding faction contracts only to get wiped before extracting, this is a direct fix. The Cradle lets you make progress on your stats through multiple paths, so a bad session doesn't completely stall your build.
Faction upgrades still unlock armory perks
How to level up efficiently with the Cradle system
Reaching the level cap requires hitting level 84 to fully unlock every node across all six stat trees. That's a significant investment, and trying to spread energy evenly across all six categories from the start is a reliable way to feel underpowered for a long time.
The smarter approach is to match your upgrades to the Runner Shell you're actively using. Each shell has natural strengths, and the Cradle rewards you for leaning into them rather than building generically. Check out the Marathon Runner Shells guide covering every class, ability, and best team comp to identify which stat categories align with your chosen shell before you spend a single point.
Spreading energy across multiple stat tracks simultaneously delays your first node unlocks significantly. Focus on completing one node path before branching out.
Prioritize nodes over raw stat points
The most important concept in the Cradle is the distinction between raw stat points and nodes. Nodes are the milestones within each track that deliver the actual permanent upgrades. Dumping energy into a track without reaching its next node means you're sitting on unrealized potential.
Always calculate how many energy points separate you from the next node in your priority track, then commit to hitting it before touching anything else. Partial investment in three different tracks gives you nothing concrete. Full investment in one track gives you a locked-in bonus you keep regardless of what happens in your next run.
Node milestones lock in permanent bonuses
How to earn energy faster
Contracts are the most reliable energy source, but the extraction requirement can make them inconsistent if you're playing in a contested zone. The Matter Converter gives you a fallback. Prioritize looting your Vault after every session and converting items you don't need for active contracts.
For contract-specific strategies, the Parasitism 1 contract walkthrough covers how to knock out all three objectives in a single run, which is one of the cleanest ways to stack energy without burning multiple sessions.
What should you upgrade first?
There's no universal meta path through the Cradle right now. The right answer depends entirely on your shell and playstyle. That said, a few principles hold across every shell:
- Pick one stat track and stick with it until you hit its first node
- Match the stat to your shell's identity rather than chasing raw numbers
- Use the Matter Converter consistently so you always have energy queued up for your next node
- Don't ignore contracts even when extractions feel risky, since they remain the fastest single source of energy
If you're still getting oriented in the game's zones and contracts, the broader Marathon guides collection has targeted walkthroughs for specific objectives, keys, and locations that will keep your contract progress moving alongside your Cradle development.