
What is Bonestone and why does it matter?
Mina the Hollower runs on a bones economy, and bones are fragile. You lose them on death, which means every risky encounter is also a potential setback. Bonestone Dust sidesteps that entirely. It's a secondary currency that works like a permanent savings account: once you have it, dying doesn't take it away. The catch is that spending it requires knowing where to go and what buttons to press, and the game doesn't spell that out clearly. This guide covers everything you need to know.
Swapping to Bonestone in shops
How do you get Bonestone Dust?
Bonestone accumulates through two main routes. The first is picking up gems and other treasures scattered across Tenebrous Isle. When you collect one of these, it converts directly into Bonestone rather than regular bones. The second route is more deliberate: finishing a Spark Generator repair. Every bone you're carrying at the moment you complete a Spark Generator gets converted into Bonestone automatically. That means arriving at a generator with a full wallet is genuinely worth doing. Bank your bones by grinding before you push to the end of an area, and you'll walk away with a stack of safe currency instead of risking it all.
How to spend Bonestone in shops
Every shop in the game defaults to pulling from your regular bones when you make a purchase. To switch over to Bonestone, open the shop menu and press the top face button. On PS5 that's Triangle, on Xbox it's Y, and on Switch it's X. This is the same button used for Sidearms outside of menus, so it's easy to miss in a shop context.
Once switched, your bones counter swaps out for your Bonestone counter and purchases draw from that pool instead. There's also a quality-of-life feature worth knowing: if you don't have enough of one currency to cover a full purchase but the two together would cover it, the game automatically bridges the gap. You won't get stuck mid-transaction because you ran slightly short on one type.
Bonestone covers shop costs
How do you level up using Bonestone?
Normally, leveling up in Mina the Hollower is automatic. Collect enough bones, hit the threshold, and a stat upgrade menu appears. Bonestone doesn't trigger that process on its own since it sits in a separate pool. To spend Bonestone on a level-up, you need to convert it back into bones first, and that requires the Bonestone Dust machine found in any Underlab checkpoint.
The machine sits in the top-right corner of the Underlab. Interact with it to open its interface, then set the number counter to however much Bonestone you want to convert. Confirm the amount and stand near the tube on the left side of the machine. That tube is where the bones physically shoot out, and they'll scatter if you're standing too far away. Once the bones land and you've collected them, if the total pushes you past your current level threshold, you'll level up immediately.
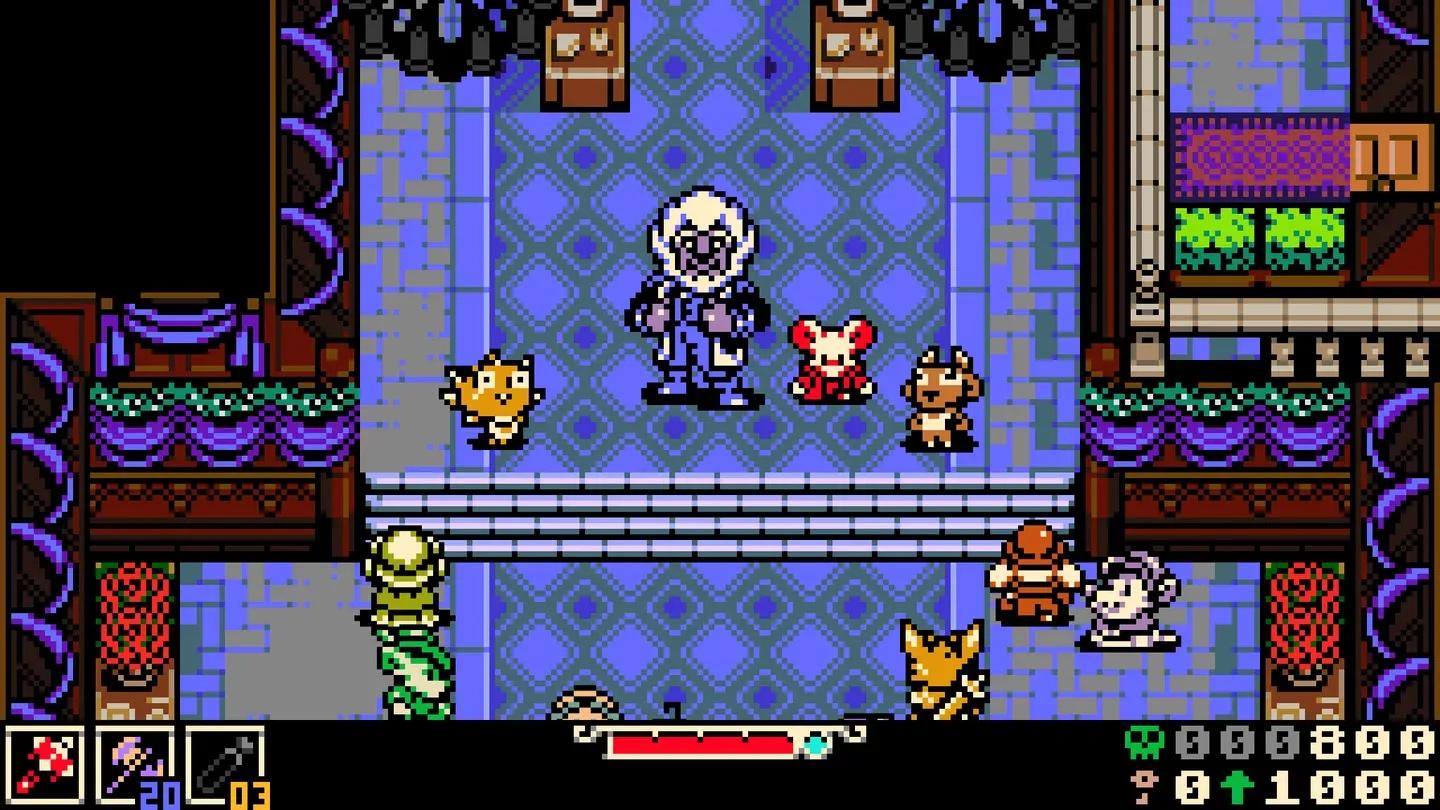
Underlab Bonestone machine
Bonestone vs. bones: when to use each
The general rule is to treat Bonestone as a reserve. Spend your regular bones first and let Bonestone cover the difference or fund purchases you can't afford to lose. If you're heading into a tough zone or a boss fight, having a Bonestone cushion means a death doesn't set you back as hard.
What else should you know about managing currency?
Sidearm locations are static in Mina the Hollower, which ties into currency management more than it might seem. Losing a Sidearm on death and needing to backtrack to recover it costs time and potentially more bones. Once you unlock the Underlab upgrade that lets you keep Sidearms after dying, that pressure eases up, but until then, knowing your fallback routes matters.
The Stolenoid trinket, which pulls pick-ups toward you, pairs well with the Deboning Wand, which increases bone drops while making them bounce. Running both means you collect more bones faster and lose fewer to awkward pickup geometry. More bones collected means more Bonestone potential at the next Spark Generator. For a full breakdown of which trinkets are worth equipping, check out the best trinkets guide for Mina the Hollower.
Trinket synergy for bone farming
Breaking environmental objects also drops Plasma Roses, which build up your health meter. That's worth mentioning in a currency guide because staying healthy reduces the chance you'll die and lose your bones before converting them. Every system in this game connects, and the bone economy is no exception.
If you're still getting oriented on Tenebrous Isle, the Mina the Hollower beginner's guide covers weapons, survival basics, and the early progression loop. For everything else across all of the game's systems, the full Mina the Hollower guide collection has you covered.