

Dire Marsh at night is one of the most punishing places in Marathon. Hostile squads, hazard zones, and elite enemies make every run feel like a countdown to disaster. But if you know where to look, the same map that kills most players is hiding some of the best Purple and Gold loot in the game, locked behind a multi-room gauntlet and a gold shield Warden boss. This guide covers everything: how to get the Observation Labs keycard, two ways into the Upper Complex, the full button gauntlet sequence, and how to spend your Cradle XP once you make it out alive.
How do you get the Observation Labs keycard?
The Observation Labs keycard is a random drop, and there is no shortcut around that. You cannot buy or craft it. The most reliable farming method is activating Network Towers scattered around Dire Marsh's points of interest. Each tower costs 3 UESC CERTs to activate, which triggers a drop sequence for Supply, Weapons, and Gear Caches.
Each Cache contains 3 chests, and the keycard can appear in any of them. Hit whichever Cache is geographically closest to you and keep moving. The RNG is genuinely random across all Cache types, so there is no single Cache that guarantees the drop.
Wardens that spawn randomly around the map can also drop the keycard, but hunting elite enemies for a chance at a single item is a high-risk approach that ends most runs prematurely. Stick to the Cache method.
This encounter works in both Standard and Sponsored Survival modes, so you are not locked into a specific queue.
How to open the Upper Complex: two methods compared
Once you have the keycard, you need to breach the facility. There are two distinct entry methods, and your choice affects how many enemies you fight on the way in.
The garage method is cheaper but forces a fight. The corner method costs 5 extra CERTs and lets you slip in quietly. If you are already low on ammo or took damage farming the keycard, spending the extra CERTs to avoid the entrance fight is the smarter call.

Green button gauntlet sequence
How does the button gauntlet work?
The Upper Complex is a sequential three-room puzzle, and each room follows the same structure: find and activate the upstairs terminal, then shoot all the green buttons it reveals to unlock the next door.
- Room 1: Activate the terminal, shoot 3 green buttons
- Room 2: Activate the terminal, shoot 4 green buttons
- Room 3: Activate the terminal, shoot 5 green buttons
Before you start randomly spraying walls, equip a weapon with Darksight Optics. The scope reveals hidden numbers next to each green button. Shooting them in ascending numerical order (lowest number first) triggers a bonus loot room after the boss fight. This is optional but worth doing if your ammo holds up.
There are also 7 red buttons hidden across the entire complex that unlock an additional loot room. Skip them unless you have a huge buffer of time before exfil. Hunting all seven takes long enough that most squads miss extraction trying.
How do you defeat the gold shield Warden?
The back room contains one final terminal. Insert the Observation Labs keycard here to start the main event. Three waves of enemies spawn in sequence, and each wave requires you to fight them off while shooting another set of green buttons to advance the encounter. Survive all three waves and the game drops a gold shield Warden.
The Warden hits hard. Use cover aggressively, manage your distance, and do not try to trade shots in the open. Once the Warden is down, the final security door opens to a room stocked with Purple and Gold loot. Grab what you need and head straight for an exfil before another squad intercepts you on the way out.
For more on unlocking high-value areas like this one, the guide on how to open Observation Labs in Dire Marsh Night goes deeper on the specific room layouts and loot distribution.

Gold shield Warden boss fight
How should you spend Cradle XP after a successful run?
Surviving the Upper Complex means walking out with gear worth converting. The Cradle is the primary stat upgrade system outside of Implants, and every item you do not need can be turned into Cradle XP via the Matter Converter in your Vault.
To convert items, open the Vault, hover over an item, select Convert Matter (C on PC), add any additional items with Shift + RMB, and confirm. XP scales with item rarity: an Enhanced Base Backpack gives 250 XP, while a Deluxe version gives 2,200. Weapons, backpacks, weapon mods, salvage, consumables, keys, equipment, shields, implants, and cores all convert. Sponsored Kits and ammo do not.
Cradle progress is shared across all Runner Shells and resets each season. Each Cradle level grants one Energy point to invest in one of six WEAVEworm categories:
You can freely redistribute Energy at any time during the season without penalty, so experimenting with different distributions costs nothing.
What are the best Cradle stats to upgrade?
Three WEAVEworms are worth prioritizing regardless of your Runner Shell or loadout.
Endurance comes first. Higher Heat Capacity means more running, sliding, and jumping before you need to cool down, which directly affects your survivability in gunfights and your mobility across Tau Ceti IV.
Resistance is second. Self-Repair Speed accelerates how fast healing consumables work, which gets you back into fights faster. Hardware and Firewall are useful but less urgent if you play with a Mechanic's Kit in your loadout.
Recharge rounds out the universal three, lowering ability cooldowns across all Shells. After those three, the remaining points depend on your playstyle: melee builds benefit from Strength, support loadouts gain more from Support, and so on. Enough Energy investment in any WEAVEworm also unlocks additional perks, such as Quick Vent in Endurance, which shortens the delay before heat recovery begins.
For a full breakdown of how to spend your Energy nodes efficiently each season, the Marathon Cradle system guide covers every category in detail.
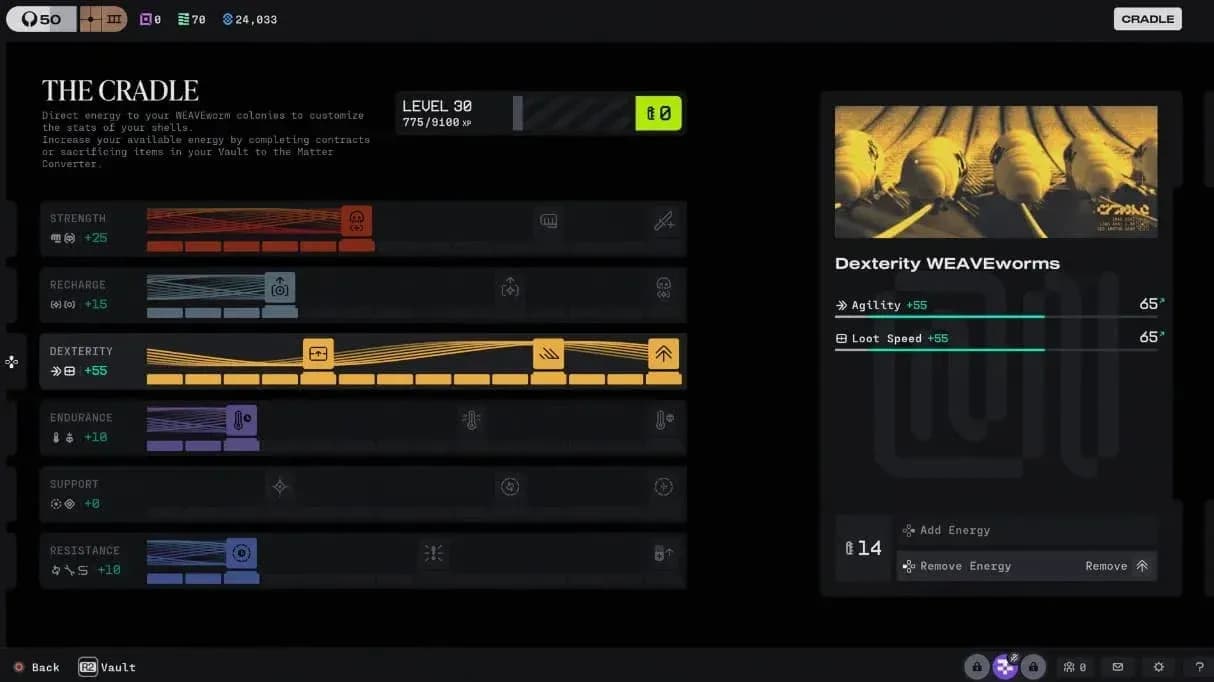
Cradle WEAVEworm stat menu
Getting the most out of every Dire Marsh run
The Upper Complex gauntlet is one of the highest-effort, highest-reward activities in the game right now. The keycard RNG is the main friction point, but once you have it, the encounter itself is repeatable and predictable. Learn the button order, bring Darksight Optics, and do not skip the corner stairwell entry if your resources are stretched thin.
For everything else Marathon throws at you, the full Marathon strategy guides collection has you covered on contracts, key locations, and faction progression.