
Nox's Bayou is where Mina the Hollower stops being forgiving. Deep water punishes every wrong step, bomb-throwing frogs chase you across boats, and two bosses stand between you and the Swampy Generator. The area is split across Boat Bog, Big Lagoon, Moonlit Path, Thick Thicket, Tainted Lair, the Swampy Generator itself, and the Forgotten Fen sidequest. This guide walks every section in order, flags every collectible worth grabbing, and breaks down both bosses so you know exactly what to do when the fight goes sideways.
Boat Bog entry point
How do you get to Nox's Bayou?
Exit Ossex to the south into Southern Outskirts: Commons. Take the second left near the wooden sign and push west as far as you can, then turn north into the Western Wilds: Occupied Bridge. When you hit red rocks blocking your path, burrow a channel from a lava tile toward them. The lava flows through your tunnel and detonates the rocks on contact. Continue south through the Backwaters: Shanty Swamp, ride the clockwise-moving floating platforms, and exit southwest to enter Nox's Bayou: Boat Bog. You can burrow through the double fence at the entrance.
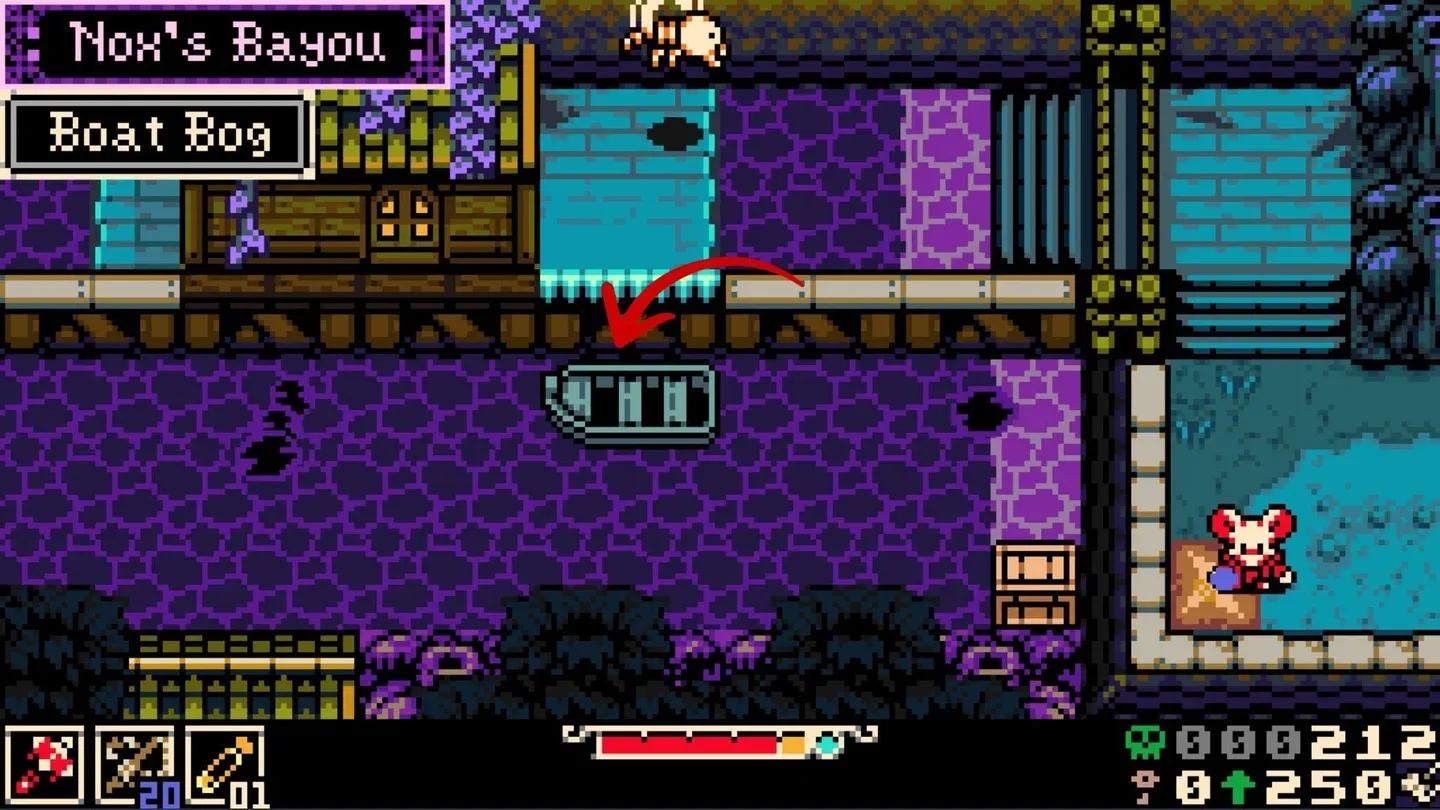
Boat Bog
Boat Bog holds 4 trinkets, 7 Bonestone Chests, 3 Kears, 1 Health Rose, and 1 Weapon Chest across the full Nox's Bayou run, so it pays to be thorough from the start.
Burrow jump over the water at the top of the screen to board the first small green boat. Mosquitoes float around this area and are not aggressive, but they disrupt your jump timing. Swat them if you are still working toward filling the Glutton's Jar; otherwise ignore them.
The dinosaur-type enemies here take roughly three hits, but if you are too slow they submerge and resurface at a random position. Prioritize these quickly. Ride boats across the barriers, burrow under the gate, and take the two lily pad platforms south to a large empty pool with a golden tap at its center. Clear the green monsters, grab buried pickups, then burrow into the tap to raise the water level. The newly flooded south ledge holds a Bonestone Chest.
With water raised, take the north exit. In the room with three boats, look for a small tunnel at the top right near a shanty building. Burrowing through leads to a watery platform guarded by water-skater enemies and a second Bonestone Chest in the top right corner. Return to the main room, ride the upper boat left, clear the bush, and exit top left.
The next screen introduces a giant blue fish enemy that throws flammable projectiles. These ignite the water in waves of fire you have to jump over. Rush the fish and take it out before it floods the ground with flames. The following screen is the same situation. Note that bombs hitting the grating remove it and reveal bones in the water, but also expand the fire zones. Push left quickly and head north to reach the Big Lagoon.
Big Lagoon
Before touching the golden tap here, sweep the entire zone for bones and buried Plasma Vials. Once you flood this room you are dealing with a lurking water beast in addition to everything else.
Along the top of the area, hit a barrel toward the left wall to open a hole. Drop in, fight through the dark room, and open the chest for Kear 1. Back outside, check the top right corner for a shack with a burrow hole underneath. The area inside is semi-visible but holds bones and a Plasma Vial.
When you reach the south end, destroy the vines and defeat the large frog guarding the tap, then burrow in to raise the water. The water beast that was shadowing you in earlier sections is now active. A large shadow beneath the surface means it is targeting you. Linger in one spot too long and it will snatch you in its jaws. Move constantly.
The sinking lily pads here follow a sequence. Jump onto one just as it starts to sink. The moment it goes under, the pad ahead surfaces. Time your jumps to that rhythm.
At the bottom left corner, a new opening leads to a small swim-through area with the Vascular Syrup trinket on the far side. At the top right, the Swamp Shack is now accessible.
What does the Swamp Shack sell?
The Pit Preserver is worth buying before you do anything else in this region. It makes swimming through the water-heavy sections significantly more manageable. Buy the Kear too and use it on the lock at the back of the shop. The chest behind it holds a Red Weapon Chest that likely contains a starting weapon you skipped or an upgrade for one you have.
Lucky's Lair
At the southern point of the Big Lagoon, destroy a breakable wall and drop through the hole to find the Beckoning Collar sidearm. Head right and drop down another hole to reach Lucky's Lair. Talk to Lucky in the bottom left corner for a tip about Pinky, a shop owner in the Bayou, plus a free Kear. Exit through the front door or climb back up, then leave the Big Lagoon through the small tunnel at the bottom left corner.

Golden tap floods the lagoon
Moonlit Path
Access this long narrow river through the small tunnel at the bottom left corner of the Big Lagoon. Head south first to grab a chest and drop a shortcut rope on the right. Then navigate north over the sinking lily pads and barriers toward the top left staircase. Hit the green tentacle barriers when you reach them so they retract into the ground, then climb the stairs. The moon's reflection in the water ahead looks off. That is not a coincidence.
How to beat the Mock Moon
The Mock Moon rises out of the water and the fight starts before most players realize what is happening. The boss has four main attacks to watch for.
- Ripple trail: The Moon flies close to you and leaves a series of ripples that explode on a short delay. Run away from any ripple the moment you see it.
- Crash dive: The Moon rises into the air and slams down, dealing impact damage and generating a ring of ripples on landing. Burrow as soon as it rises. Underground movement is faster, which gives you enough distance before impact.
- Row attack: Ripples cover the battlefield in rows with narrow safe gaps between them. Find a gap and hold your position until they clear.
- Lights out: Once the Moon loses enough HP it extinguishes all light sources except itself, the ripples, and any torches you left standing. Dark spaces are generally safer than lit ones. Move slowly and remember where the deep water sits at the arena's edges.
If ranged sidearms are in your loadout, use them. The Beckoning Collar lets your summoned creature attack while you stay mobile, which helps a lot during the lights-out phase when the Moon's movement becomes harder to track.
After the Mock Moon goes down, head through the top of the arena to find the Iron Lung trinket in a Trinket Box on the left. Iron Lung extends your burrow distance, which is directly useful for the rest of this region. There is also a mirror on the right side of the room. Walk into it and hold forward for about three seconds to phase through. Inside, hit the calcified switch to activate a fast travel shortcut back to Ossex. Use it to restock before continuing.
Exit the arena bottom right, go down the stairs, turn right back into the Big Lagoon, follow the top path, break the rock, and climb the stairs into the Thick Thicket.
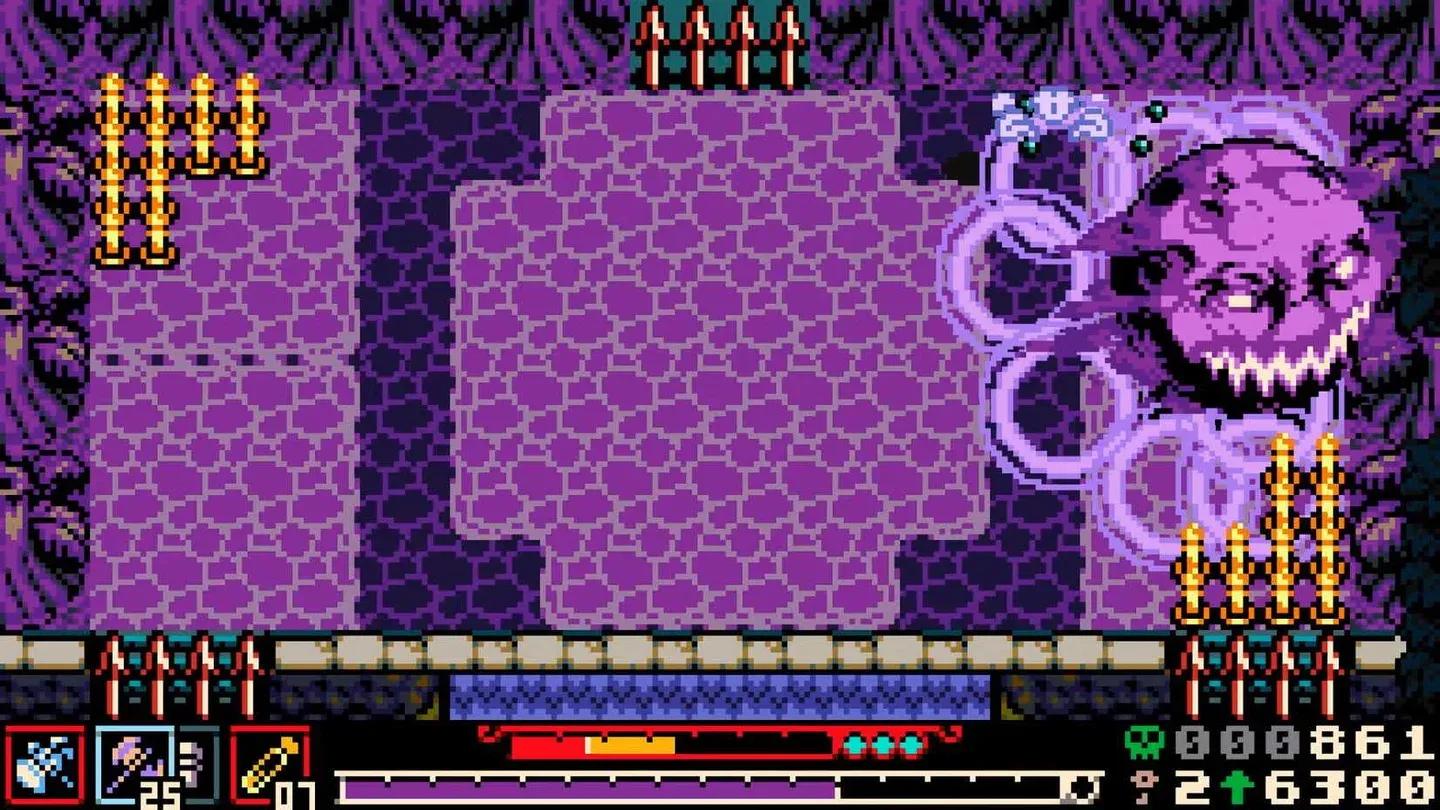
Mock Moon darkness phase
Thick Thicket
The long-necked plant enemies here work like a combination of Mario's Piranha Plants and Zelda's Deku Babas. They spit thorn trails across the arena floor. The thorns break in one hit but deal damage on contact, so clear them before moving through.
Destroy the first plant and the bushes behind it, then head north into an area mixing plants, spikes, and water enemies. A small tunnel in the water on the right hides a Bonestone Chest before you take the left path.
The lily pads along the top of the next section disappear extremely fast. Do not try to ride them. Instead, wait until one is within jump range, dash across, and burrow jump to the far side. Destroy the bushes in the top right to continue.
The next room has a Bonestone Chest partially hidden by foreground leaves in the upper right corner. Grab it before engaging the two carnivorous plants.
The long bridge ahead is the hardest traversal section in Thick Thicket. Mosquitoes and hag enemies that throw green projectiles fill it. Burrow to dodge the throws, and use ranged sidearms to disrupt the hags before they can reposition. At the fork near the bottom, go left first to find a breakable wall leading to a cave with a Kear inside. Then take the other path down to the Underlab, drop the shortcut rope, and head right into the Tainted Lair.
Tainted Lair
This square room has two golden taps, one on each side, and the bomb-throwing fish enemies from earlier show up again here. Your first goal is the staircase at the top of the room.
Drop to the center pit, climb the right stairs, and reach the north stairs while dodging grenades. Head further north, cross platforms to the top right, destroy the bushes, climb the stairs, and defeat the frog blocking the first tap. Turn it to raise the water halfway.
With the water half-raised, go back to the room north of the tap area and look along the north wall for a small opening you can burrow through while swimming up from lily pads. This leads to a shortcut toward Septemburg and a Bonestone Chest on the right side of the large pipe.
Return to the tap room, use the lily pads along the bottom to reach the second tap on the left, and burrow in. Both taps turned means the water is high enough to reach the southern stairs. The Underlab checkpoint is to the left of the next room. Press the button on the right side to clear the spikes, then go back left to grab the Bonestone Chest before exiting top right.
Before riding the boats east, equip the Wallower's Gauntlets if you have them. A Huntsman Fork enemy chases you on the boats and a second waits at the far end. Use the explosive barrel to hit both at once. A Fog Thrower sidearm sits in the top left corner of this area before the boss chamber. Pick it up if you want extra options for the fight ahead.
How to beat Nox's Beast
Nox's Beast is the shadow that was tracking you through the Big Lagoon. The fight starts with a few seconds of the beast attacking its own guards. Land free hits immediately.
- Bubble spew: The Beast sits still and scatters poisonous green or red gas bubbles across the arena. These linger for a long time. Track their positions and burrow around them rather than trying to run through.
- Inhale: The Beast surfaces in the center and sucks in everything nearby, including the bubbles and you. Burrow hard toward the arena edge the moment it starts inhaling.
- Swimming phase: The Beast cruises the arena trying to bite you and converts shallow water into deep water as it moves. This shrinks your walkable ground progressively. Use burrow constantly to stay above water. Never stand directly over the Beast or it will surface and chew you.
- Slam and bounce: The Beast leaps and crashes its fists down, creating deep water at each landing spot. Burrow clear of each impact, then counterattack once it settles. Watch for the snout breaking the surface to read where it will resurface next.
The chewing attack hits hard. Keep health topped up throughout the fight. Defeating Nox's Beast drops a pile of Bones and a Health Rose, and lowers the spikes on the right side of the arena so you can reach the Swampy Generator.
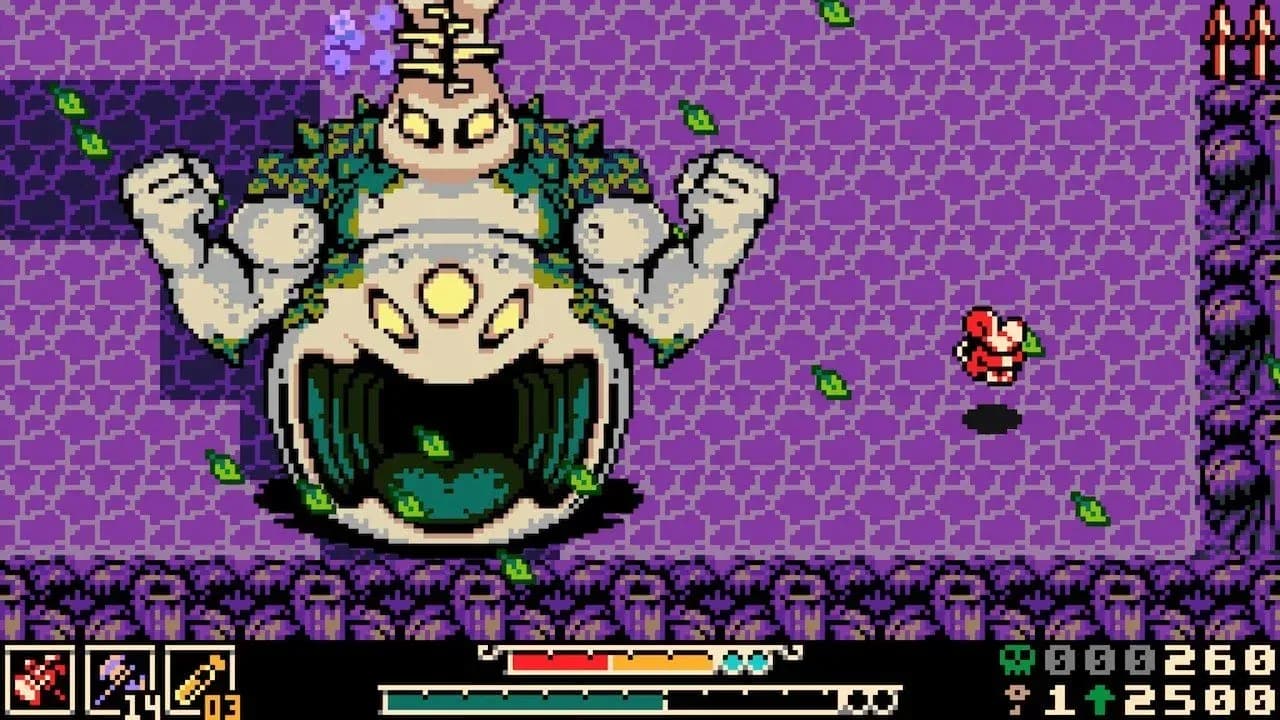
Nox's Beast arena flood phase
Swampy Generator
The path to the Generator is covered in waterfalls that block your view of the ground. Push straight through the first set, drop to the bottom of the next waterfall, then loop up and around its top. Break the log at the end of the path, use the Underlab on the right, break the wall on the left, and climb the stairs to the tower.
The Generator tower minigame here adds thorn plants and green orb-shooting bugs on top of the standard power surge mechanic. Burrow into spark holes to release electricity that breaks blue barriers, clears enemies, and pushes the surge line back. Falling knocks you to the start, not a death screen, so there is no pressure.
At the top of the tower, Thorne appears and claims the Generators are spreading the blight across the land. There is no evidence to support this claim at this point in the game. Repair the Generator and head back down.
Exit south to Boat Bog, drop down the rope, and go left under the waterfall to reach the Forgotten Fen. Check the right corner near the rope for the Twill Weave trinket, which increases your Defense.
Forgotten Fen and the Bayou Band
Cliff is a frog stuck in a bucket at the bottom of the rope in the Forgotten Fen. He wants to rejoin his bandmates back in Boat Bog's large open area with the square-pattern moving platforms. Burrow under the bucket to pick him up.
You cannot swim while carrying Cliff. The method is to throw him toward the next platform, swim across to him, then pick him up again. Whenever enemies appear, set Cliff down and clear them before continuing.
Head west, drop down, cross the bridge east, climb up and right, and retrace the route back to Boat Bog's main clearing. Place Cliff on the northern stage with his bandmates. The Bayou Band reunites and rewards you with the Tumbling Tutu trinket.
With Iron Lung equipped, the Fishing Hole at the top right of the area is now reachable. Otherwise, head back to Ossex and stock up before tackling the Kindlewood.
Full Nox's Bayou collectibles checklist
For more on saving your progress between sections, check the guide on how saving works in Mina the Hollower so you know exactly when your burrow hole saves are locking in your collectible runs. If Thorne's appearance at the top of the Generator tower has you curious about what comes next, the boss guide for Thorne covers the full fight phase by phase. For everything else across the island, the full Mina the Hollower guide collection has walkthroughs for every region and boss you will face after leaving the Bayou.