
Signature arcs are some of the biggest power spikes you can give any character in Neverness to Everness. Each one is built specifically around its owner's kit, and knowing what each arc actually does, and how to get it, is the difference between a character performing at their ceiling and one that feels half-finished. This guide covers every signature arc currently in the game, what the effects do in practice, and the fastest ways to get your hands on them.
Play Neverness to Everness Now
Jump in today and start your adventure with the latest rewards and bonuses available at launch.
Download Neverness to Everness
How do you get signature arcs in NTE?
There are four distinct ways to unlock signature arcs, and most players will use all of them at some point.
- Anomaly Commissions at Wertheimer Towers hand out the majority of free signature arcs as direct rewards. These are the most accessible and should be your first stop.
- Episodes and Spinoffs give out a small number of arcs when you defeat certain bosses a second time. Replaying those fights is worth it.
- Open-world exploration in Hethereau, specifically while driving a four-wheeled vehicle, lets you encounter bosses that drop arcs. At least one arc also comes from finding a specific anomaly near city landmarks.
- Arc Research Program banners are the gacha route. These banners require Tri-Keys, which work like Dice but are dedicated to arc pulls rather than character pulls.
Arc Research Program screen
All Character Signature Arcs
The table below gives you a quick reference for every signature arc in the game, including the character it belongs to, the arc's ATK stat, its substat, and its type.
S-Rank Signature Arcs
The Rain That Shook the World (Esper Zero)
The Hypervortex passive on this arc does two things: it deals 30% increased Cosmos DMG through Esper Zero's Redirect Skill and Ultimate, and it increases Cycle Intensity by 36 for 15 seconds after each Redirect Skill cast, resetting whenever it triggers again. The practical result is that Esper Zero's team gets faster, cleaner tag-ins, which makes the whole team's cycle reactions more consistent. If you're running Esper Zero as your Cosmos DPS anchor, this arc is the obvious pick. For more on optimizing Esper Zero's full kit, check out the Esper Zero build guide covering best Arcs, Cartridges, and team compositions.
Youthful Fantasy (Daffodill)
This one has the most involved setup of any signature arc. The Black Tome passive starts sealed with two chains. Each time any character on your team uses a Support Skill, one chain breaks. Once both chains are gone, the Black Tome activates for 20 seconds. During that window, it designates an enemy every 5 seconds, and designated enemies take an extra 20% Chaos DMG from Daffodill plus Chaos DMG equal to 2% of her ATK whenever they take Break Damage. Daffodill herself can trigger one of the chain breaks with her own Support Skill, so the setup is faster than it sounds in practice. The payoff against bosses is significant.
Camellia Society (Baicang)
High risk, high reward. Every time Baicang's HP drops without him taking enemy damage, he gains a CRIT DMG stack worth 12% for 5 seconds, up to 4 stacks for a maximum of 48% CRIT DMG. His basic attack Shadow Follows already reduces his own HP, so he naturally builds stacks during normal play. The arc then consumes 5% of his current HP on a 25-second cooldown to fire one of two attacks: Harsh Rebuke (5 hits at 24% ATK each) or Incessant Nagging (6 hits at 18% ATK each, with the final hit dealing double). Keep an eye on his HP, but the damage output makes the tradeoff worth it for a dedicated Baicang main carry.
Baicang's Camellia Society arc can put him in dangerous HP territory during long fights. Pair him with a healer or shielder to avoid losing him before the arc's cooldown resets.
Reality Refuge (Jiuyuan)
Jiuyuan's Rose Pact mechanic gets a direct upgrade here. The arc gives a flat 15% Anima DMG boost, but the more interesting part is the 10% Attachment DMG bonus that jumps to 20% for 6 seconds after she casts her Ultimate. When her Rose Pact Bullets inflict Lethal Rose Pact, the arc makes that attachment drain more HP from enemies. If Pact Settlement hasn't already executed the target by the time she uses her Ultimate, the arc squeezes out even more damage in that window.
Raging Flames (Hathor)
Hathor's arc rewards fast play. On top of a 15% Lakshana DMG increase, casting her Ultimate gives her a 10% boost to both Redirect Skill and Ultimate DMG for 10 seconds, with her Redirect Skill DMG climbing an additional 5% per cast up to 2 stacks during that window. The catch is that 10-second timer. Right after her Ultimate, you need to immediately hold and charge Aerial Command, let enemies build up her Express Delivery Power, and get her Ultimate charged again before the buff expires. Players who can maintain that rhythm will see noticeably higher damage output.
Ready-Ready (Nanally)
Nanally's arc turns her into a genuine boss specialist. The Commander Tiger Talisman system works like this: use her Redirect Skill to earn a Left Tiger Talisman, then use her Ultimate within 15 seconds to earn a Right Tiger Talisman. Holding both unlocks the Commander Tiger Talisman, which adds 10% damage to bosses for 10 seconds. On top of that, the arc gives 15% ATK and a 15% Basic Attack and Critical Riposte damage buff for 15 seconds per Redirect or Ultimate cast, stacking up to twice. The setup loop is clean and fits naturally into her rotation. For a full breakdown of Nanally's optimal build, see the Nanally build guide with best Arcs, Cartridges, and Awakening priorities.
Contemplative Cat (Chiz)
The simplest scaling condition in the game: Chiz deals 2.5% more Cosmos DMG for every 100,000 Fons she holds, up to 10 stacks. At 1,000,000 Fons, that's a 25% Cosmos DMG buff. The arc rewards players who have been actively farming Fons and keeping their balance high rather than spending it all immediately.
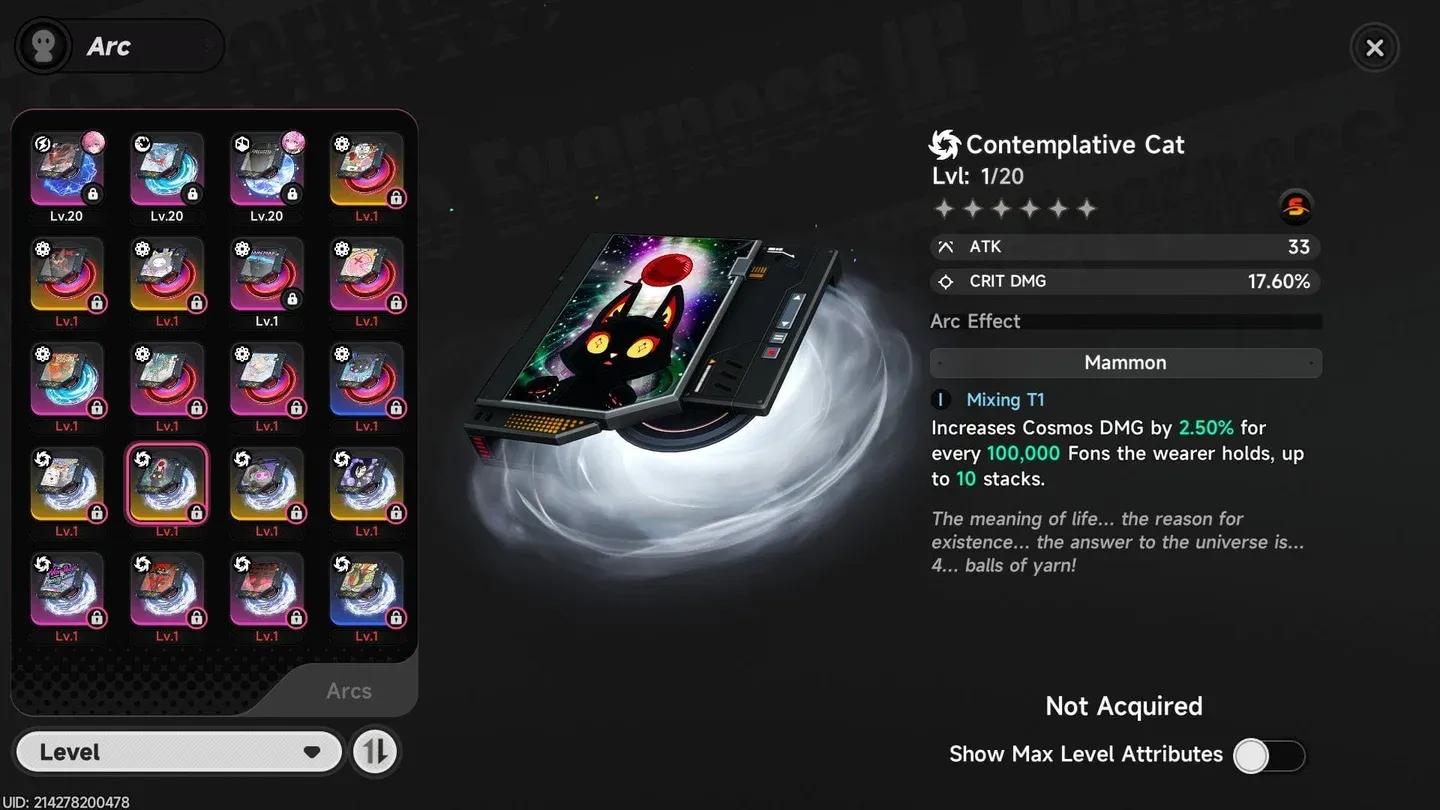
Chiz arc Fons scaling
A-Rank Signature Arcs
Blow Up the Crowd (Haniel)
Haniel becomes a passive off-field buffer with this arc. While she's off the field, the active character gains 10% ATK. Every time Haniel deals damage, that buff increases by 2%, stacking up to 4 times (for a maximum of 8% additional ATK) and triggering at most once every 2 seconds. The stacks reset when she switches back in, so the optimal loop is to bring Haniel in, use her Silent Moonlit Forest Guardian skill, land a few basic attacks to stack the passive buff, then switch to your main DPS to collect the full ATK bonus. When she's active, she also gets up to 10 stacks of 2% Psyche DMG per basic attack hit (triggering at most once every 0.3 seconds), though this resets on character swap.
Stellar Veil (Aurelia)
Aurelia's arc gives her a 12% Psyche DMG boost as a baseline, then stacks up to 10 additional 2% CRIT DMG buffs whenever she deals Psyche damage, triggering at most once every 0.1 seconds. In boss fights where she can keep hitting consistently, the CRIT DMG stacks accumulate quickly and make her a meaningful damage source.
Tears Beneath the Mask (Skia)
Skia's arc applies the Warning Gaze debuff to any enemy hit by his Ultimate, reducing their damage output by 18% for 20 seconds. This pairs directly with his Esper Cycle reaction Remora, which already slows enemies and cuts their damage. Stacking both effects makes Skia one of the better defensive utility picks in the game.
Eternal Waltz (Fadia)
Straightforward tank support. Fadia gets a 20% Max HP increase from this arc, making her significantly harder to kill. She also gains a 10% Mental DMG buff for 10 seconds after casting her Ultimate. Her primary role is absorbing damage for the team, and this arc leans directly into that.
Clear Skies (Mint)
Mint's kit revolves around her Redirect Skill and Ultimate, so Paper Squadron is exactly what she needs: a flat 20% Anima DMG boost to both of those skills. No conditions, no setup. Equip it and her burst hits harder.
Umbrella (Adler)
Adler's job is keeping shields up and staying out of the way. Rainman gives him 10% more HP and strengthens his shields by 10% as long as his HP stays above 50%. Since he's rarely the active character taking hits, maintaining that threshold is straightforward. The arc directly amplifies his core function.
Call of the Twisted City (Edgar)
Edgar's channeled healing gets a 12% Healing Bonus for 10 seconds after he casts a Redirect Skill. Given how much HP he can restore in a single channeled heal, the amplified output means your team recovers faster when it matters.
Which signature arcs are worth prioritizing?
If you're deciding where to spend Tri-Keys or which Anomaly Commissions to clear first, here's the short version based on the arc effects documented above:
- Camellia Society (Baicang) and Raging Flames (Hathor) have the highest ATK stats (43 each) and the most impactful damage passives for main carry roles.
- Ready-Ready (Nanally) is the top pick for boss content specifically, thanks to the Tiger Talisman system.
- Blow Up the Crowd (Haniel) delivers consistent off-field ATK buffing that benefits your entire team, making it strong regardless of your main DPS choice.
- Umbrella (Adler) and Call of the Twisted City (Edgar) are free or near-free through commissions and directly improve two of the game's most accessible support characters.
For deeper dives into individual characters and how their signature arcs slot into full builds, the Neverness to Everness strategy guides collection covers every character with recommended Cartridges, Modules, and team compositions.