
Clear Spiral Abyss 7.2 by giving your first team elemental coverage and healing, and your second team frequent Electro application. The November cycle in Genshin Impact puts immunity phases, shields, and a healing check between you and the final stars. Pick your teams around the enemies that can stop a run before choosing damage bonuses.
This guide covers Floors 11 and 12, including team options, enemy priorities, and the six Floor 12 bosses. It also explains how to target missing stars without needing one perfect pair of teams for every chamber.
November reset and floor bonuses
The November cycle begins on November 16, 2026, at 04:00 server time. The next reset is December 16 at 04:00 server time, when the floor bonuses and enemy lineup change.
Check the Ley Line Disorder before selecting your teams:
| Floor and half | Bonus | Team-building priority |
|---|---|---|
| Floor 11, both halves | All party members gain 60% Electro DMG Bonus and 60% Geo DMG Bonus | Use built Electro or Geo damage dealers when they fit the encounters |
| Floor 12, first half | Lunar-Crystallize DMG increases by 75% | Favor Lunar-Crystallize, or prepare multiple damage elements, healing, and blunt damage |
| Floor 12, second half | All party members gain 200 Elemental Mastery | Favor reaction damage without sacrificing the Electro application needed for boss mechanics |
The Blessing of the Abyssal Moon is Resounding Moon. Triggering Superconduct or Stellar-Conduct grants one stack. At three stacks, a shockwave deals True DMG at the opponent's position and consumes the stacks. You can gain one stack every 0.1 seconds, with one shockwave available every four seconds.

Which teams should you bring?
Unlike the roster restrictions in Genshin Impact's Imaginarium Theater 7.2, Spiral Abyss lets you choose your characters freely. Build around the full floor: a team that beats Prism Slime but cannot break Moongecko's anchor or clear its healing check will need changes later.
Recommended Floor 12 lineups
These are options, not a ranking. Choose the lineup your account can support, then check the encounter instructions below before committing your characters.
| Team | Why choose it? |
|---|---|
| Zibai, Linnea, Columbina, Illuga | A Lunar-Crystallize lineup that benefits directly from the floor bonus and suits the first-half bosses |
| Mualani, Mavuika, Emilie, Xilonen | An alternative with multiple damage elements; Burning can prepare Frostnight Herra for a non-Pyro damage window |
| Mitya, Odette, Yae Miko, Valeriy | An Electro-led Stellar-Conduct option for Wavebinder and Guardian Blade of Drifting Snow |
Alternatives and required roles
Without a Lunar-Crystallize lineup, bring at least two meaningful damage elements on the first half. Frostnight Herra can become immune to your leading damage element, while Prism Slime changes its immunity during absorption. You also need a healer and a way to deal blunt damage for Chamber 3.
For the second half, Cryo Traveler can enable Stellar-Conduct alongside an Electro character. Fischl is an option for Electro application, while Yae Miko and Mitya are useful against Wavebinder. Prefer Electro as your main damage source over a Cryo-led approach because Guardian Blade has elevated Cryo resistance.
Floor 11 walkthrough
Floor 11 combines groups of enemies with isolated targets. Keep area damage available for the first half, and avoid relying on Cryo damage against Icebound Reflections.
Chamber 1
The first half sends out a Voywolf Hunter, a Fanged Zealot, and a Ruin Drake: Earthguard in separate waves. Approach the ranged Hunter instead of waiting for it to close the gap. Finish the Earthguard promptly, since a prolonged fight lets it absorb an element and gain resistance.
The second half contains 12 Fishers of Hidden Depths, with four present initially and replacements appearing as enemies fall. Breaking one Fisher's initial shield staggers the linked group and pulls them together, creating an opening for area damage.
Focus on creating that shield-break opening before spending your strongest area attacks. Attacking scattered targets individually wastes the grouping mechanic.
Chamber 2
The first wave contains one Rugged Elder Leshy and two Juvenile Tree Segments. Move close immediately: leaving distance lets the Leshy jump toward you and separate from the other enemies. Hit the group together, then use the same area-damage approach against one Chimeric Skorp and two Chimeric Crocohoofs.
Stellar reactions can interrupt many of the Chimeric enemies' attacks, but they are not required to defeat them.
The second half contains one Radiant Glacial Wolf. This is not its Local Legend version. Use your normal single-target rotation, but dodge its claw attacks instead of leaving a fragile damage dealer exposed.
Chamber 3
The first half contains 12 Icebound Reflections, initially spawning four, with more entering as earlier enemies are defeated. They are immune to Cryo, so use another damage element and keep attacking the active group as replacements arrive.
The second half is one Wilderness Hunter. Lunar reaction damage lets you bypass its second HP bar. Without that option, use a built damage team and prepare to work through the additional health.
Floor 12 boss strategies
Each half contains one boss per chamber. The first half tests whether you can create damage windows; the second half tests elemental application before ending with a straightforward single-target fight.
Chamber 1, first half: Battle-Hardened Prism Slime
Prism Slime begins in Absorption Mode, periodically matching your on-field character's element and becoming immune to it. It also attempts to drain Energy, although that drain can be dodged. Treat this opening as setup, not your main damage window.
- Watch its current element and attack with a different one.
- Rotate between elements to keep filling the gauge without attacking into immunity.
- Once it enlarges, commit your damage rotation. Its elemental immunities disappear, and its resistances drop.
The boss eventually returns to Absorption Mode. Preserve access to another element instead of assuming your main damage dealer can handle every phase alone.

Battle-Hardened Prism Slime
Chamber 1, second half: Wavebinder
Wavebinder's Courage bar rises quickly while it drinks. Keeping that bar low makes the boss take more damage. Electro reduces it, and Electro attacks that trigger Stellar-Conduct reduce it further.
Stellar reactions can interrupt the drinking action, but interruption and meter reduction are separate jobs. Maintain Electro application throughout the fight instead of saving it entirely for a shield phase.
If Wavebinder forms a shield, concentrate Electro or Stellar-Conduct attacks on it. Breaking the shield damages and knocks back the boss. Stay near its tail when possible, since its slow turning makes that position safer than standing directly in front.

Wavebinder in Spiral Abyss
Chamber 2, first half: Frostnight Herra
Frostnight Herra starts with high resistances. Fill its Fury bar to stun it and lower its resistances; Lunar reactions build that bar especially quickly.
The danger is its elemental immunity after the stun. If Lunar reactions did not supply most of the damage during Fury buildup, Herra becomes immune to the element that dealt the most damage in that phase.
Choose one of these approaches:
- Lunar approach: Use Lunar reactions to build Fury, then attack during the lowered-resistance window.
- Multi-element approach: Deliberately let one element dominate the buildup, then switch to a different damage element after the stun.
Burning is an option for the second approach because it builds Fury quickly. Set the resulting immunity to Pyro, then use a different damage dealer, such as Mualani or Kinich, for the opening. Avoid spending the entire buildup on your only effective damage element.

Frostnight Herra boss encounter
Chamber 2, second half: Guardian Blade of Drifting Snow
Guardian Blade has elevated Cryo resistance, so use Cryo Traveler for reaction support if you bring them. Let another element handle most of your direct damage.
At low health, the boss creates a shield that makes it immune to damage. Pyro breaks this shield effectively, and Stellar reactions, especially Electro-triggered Stellar-Conduct, also work well.
Keep the relevant elemental application ready for this phase. If the shield survives its window, the boss recovers around 20% of its HP, adding another stretch of fighting to your clear.
Chamber 3, first half: Radiant Moongecko
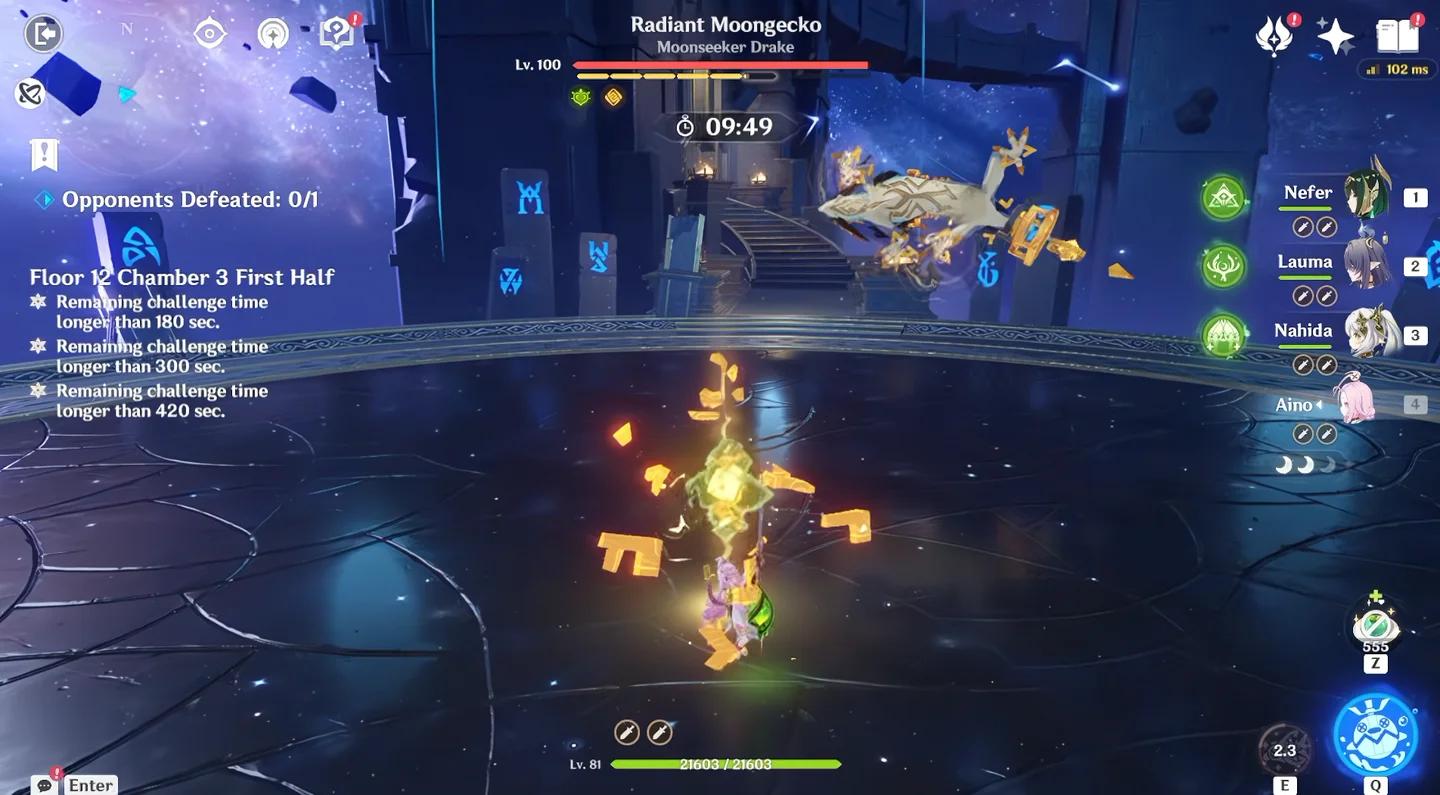
The Radiant Moongecko, also featured in Genshin Impact's Stygian Onslaught 7.2, opens with a Moonstone Anchor. The boss is immune to damage until you destroy it.
Use Geo damage, preferably Lunar-Crystallize, or another blunt damage source. Claymore attacks, Plunging Attacks, and Overloaded reactions can break the anchor. Chongyun is another option, using a dash cancel after his second Normal Attack to repeat the sequence.
Radiant Moongecko in the Abyss
The next check is Radiant Cocoon, a debuff applied to your characters that severely suppresses damage against the boss. Heal your main damage dealer to full health immediately, then clear it from other important damage contributors.
Save healing for that debuff instead of spending it immediately before the check. Barbara with Prototype Amber is an option; a Healing Bonus circlet can help a healer reach the required full-health recovery.
Chamber 3, second half: Perpetual Mechanical Array
The Perpetual Mechanical Array has no special elemental requirement here. Focus on single-target damage until it enters its defensive phase, usually around 35% HP, although the transition can happen earlier.
During that phase, the Array becomes immune and summons four Ruin Sentinels. Find the highlighted Sentinel and defeat it. Do not divide your damage evenly across all four.
Defeating the marked target disables the Array and reopens the damage window. Commit your strongest remaining rotation to the exposed boss to avoid spending time on another defensive phase.
Star targets, rewards, and retry planning
The three-star requirement uses the remaining chamber time across both halves. Use these thresholds when judging whether a run is on pace:
| Chambers | Three-star target |
|---|---|
| Floor 11, Chambers 1 and 2 | More than 300 seconds remaining, or 5:00 |
| Floor 11, Chamber 3 | More than 420 seconds remaining, or 7:00 |
| Floor 12, every chamber | More than 420 seconds remaining, or 7:00 |
Floor 12's complete Star's Bounty awards 200 Primogems and 60,000 Mora. Those rewards are separate from the chamber-clear rewards, so finishing the floor and earning every star are different goals.
If your timer slips, identify the mechanic responsible before changing damage gear. A Prism Slime immunity, an uncleared Radiant Cocoon, or Guardian Blade's healing can consume the time that a stronger attack stat would not recover.