
You can configure your GTA 6 controller settings on PlayStation and Xbox by starting with Partial targeting, Run movement speed, and turning Stand & Sprint off. After adjusting these core options, you can individually tune look sensitivity to match your preferences.
The useful options are spread across Control Scheme, Controller, Gameplay, and Camera, so changing the button layout alone will not cover everything. This setup focuses on easier movement, manageable aiming, and fewer repeated button presses on PlayStation 5 and Xbox Series X|S. Treat the recommendations as a starting point: change one group of settings at a time so you can tell which adjustment helps.
Choose your controller layout
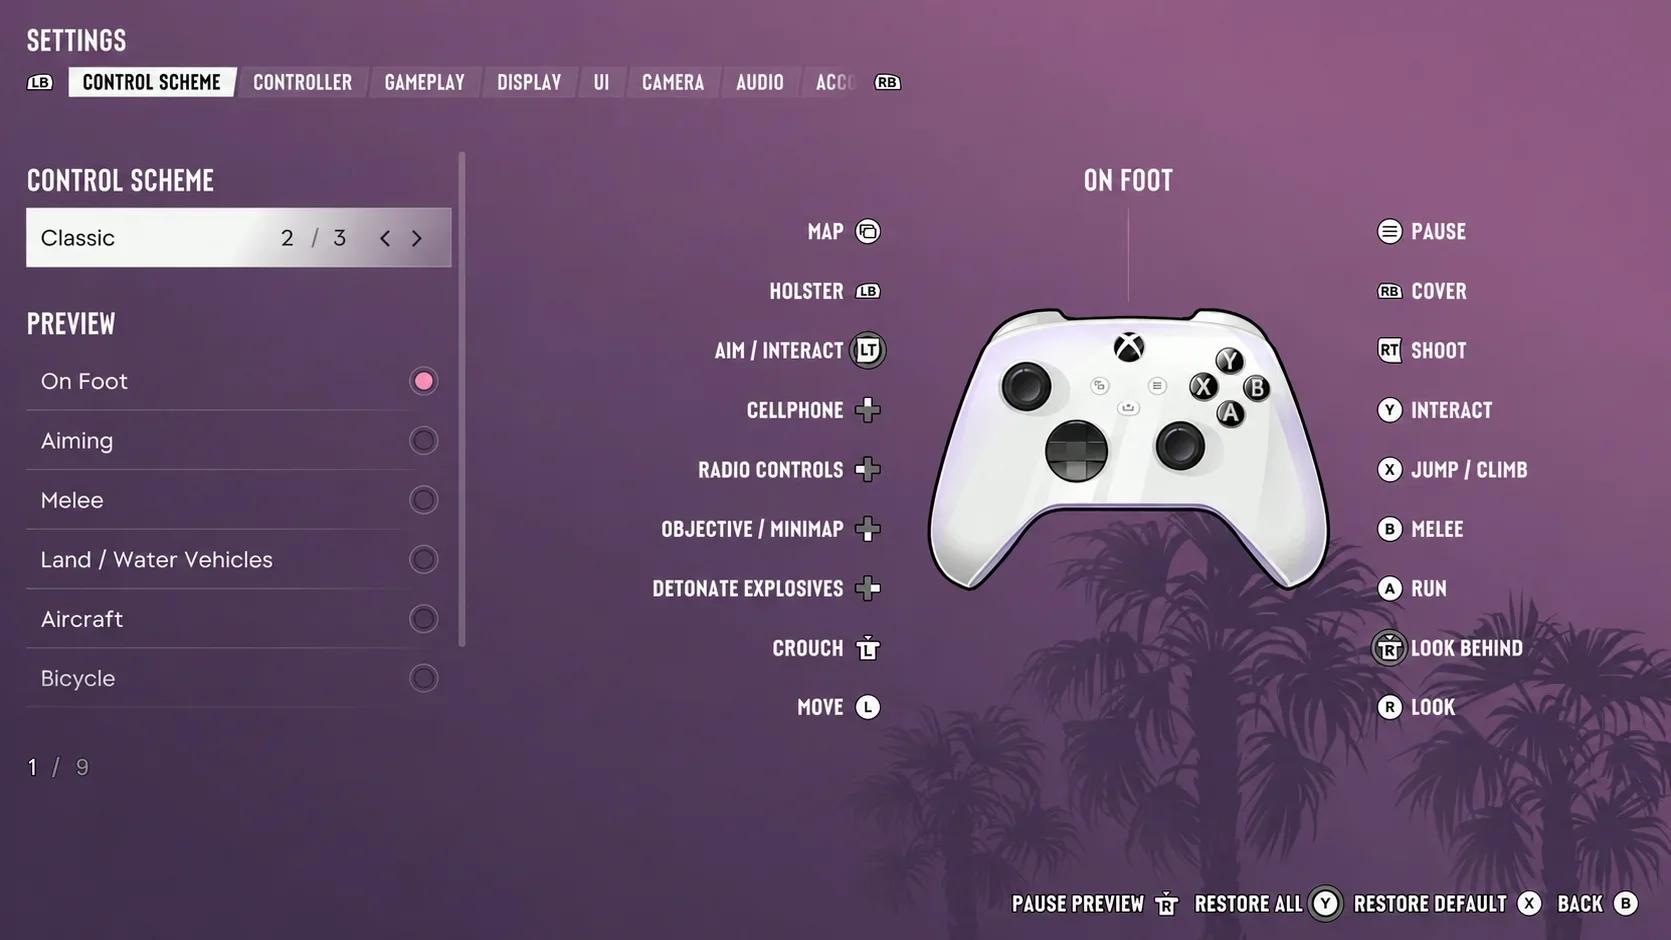
Open the pause menu, select Settings, and enter Control Scheme. You can preview controls for different activities, including on-foot movement, aiming, melee, vehicles, aircraft, and swimming. Check the activity you need instead of assuming that a button keeps the same function everywhere.
| Control scheme | What to expect | When to choose it |
|---|---|---|
| Default | The standard layout, with on-foot running assigned to the left-stick press | Start here if you do not need an older layout |
| Classic | An alternative for players who prefer the familiar earlier GTA control arrangement | Choose it if the new sprint assignment disrupts your muscle memory |
| Left-Handed | Aiming with the left stick and movement with the right | Choose it if you prefer those stick roles reversed |

Default buttons worth checking
On PS5, the default on-foot controls use L2 to aim, R2 to shoot, R1 for cover, and Cross to jump or climb. Their Xbox equivalents are LT, RT, RB, and A. Running uses L3 on PS5 or the left-stick press on Xbox.
Do not rebuild the entire layout because one action feels unfamiliar. First check whether the problem is the button assignment, movement speed, or camera response. Each has a separate setting.
Choose targeting before adjusting aim sensitivity
Open Gameplay and find Targeting under the combat settings. Partial is the recommended starting choice because it guides your aim toward a nearby target without fully locking onto it.
| Targeting method | What it does | Main trade-off |
|---|---|---|
| Lock-On | Locks onto the nearest enemy | Easier target acquisition, with less direct control over the initial selection |
| Partial | Guides your aim toward a nearby target without maintaining a full lock | Offers assistance while leaving more adjustment to you |
| Free Aim | Leaves target selection and aiming to you | More direct control, but you must line up shots yourself |
Choose your method before judging aim sensitivity. Aiming with a full lock and aiming freely ask different things of your right stick; switching between them while adjusting sliders makes it harder to settle on a setup.
Aim assist strength and vehicle shooting
Aim Assist Strength ranges from 0 to 5 and controls how much the reticle slows while tracking a target. Leave it at its current value for your first aiming check. Adjust it afterward if you want more or less slowdown around enemies.
Keep Drive-By Assist on if you want help shooting from vehicles. It automatically targets nearby enemies, reducing the aiming work you need to do while moving.
Quick Draw is another useful option to leave on. It lets the aim and fire triggers draw your last-used weapons. With two long guns, it draws the off-hand weapon instead.
Keep broader HUD and display changes separate from this aiming pass when adjusting Grand Theft Auto 6 console settings for aiming, driving, and visibility.
Tune look sensitivity and stick response
The Controller menu separates horizontal and vertical look sensitivity from horizontal and vertical aim sensitivity. Look sensitivity controls camera turning; aim sensitivity is a separate adjustment. Avoid increasing both simply because looking around feels slow.
Find a manageable turning speed
Use this order to make a controlled adjustment:
- Start with the current look sensitivity and turn the camera around your character.
- If turning feels too slow, try a look sensitivity value of 9.
- Stop the camera on a fixed object and check whether you repeatedly turn past it.
- Lower the value if stopping accurately becomes difficult.
- Check aiming separately before changing either aim sensitivity slider.
The value of 9 is a suggested trial setting, not a requirement for both axes or every controller. Keep horizontal and vertical adjustments separate if only one direction feels uncomfortable.
Leave Look Acceleration, Aim Acceleration, and Aim Response Curve at their defaults during this first pass. Changing these alongside sensitivity adds more variables before you have established a comfortable turning speed.
Deadzones, inversion, and feedback
Tune Deadzone (Left Stick) and Deadzone (Right Stick) for your controller instead of copying a fixed value across both sticks. Leave them unchanged initially unless you have a stick-response problem to address.
Keep inverted controls aligned with what you already use. Aircraft Movement has its own inversion option, so a preference for inverted flying controls does not require changing normal camera movement.
Lower Vibration & Haptics Strength if you find the feedback distracting or uncomfortable. This is a comfort preference, so there is no need to remove feedback that helps you read the action.
Reduce extra movement and button inputs
Under Gameplay, set Movement Speed to Run. A light push of the left stick still lets you walk, while pushing it fully makes your character jog without an extra run-button press. This does not mean every movement becomes a sprint.
Set Combat Movement Speed to at least Fast Walk. Choose Run if you want the faster movement option during combat; keep Fast Walk if that pace feels easier to manage.
Turn Stand & Sprint off if you want to avoid leaving a crouch through an accidental sprint input. With it enabled, the sprint action can automatically bring your character upright.
Accessibility settings for fewer repeated inputs
The accessibility options let you reduce tapping and holding without changing your entire control scheme. Start with the interaction that causes difficulty, then adjust its matching option.
| Setting | Suggested starting choice | What changes |
|---|---|---|
| Tap Assist | 2x if repeated tapping is uncomfortable | Increases tapping assistance, with options up to 5x |
| Hold Assist | Increase as needed | Provides hold assistance up to 4x |
| Fishing | Hold | Replaces rotating the right stick to reel in |
| Nitrous | Press | Activates nitrous with a press instead of requiring a hold |
| Simplified Mini Games | On if you want simpler interactions | Simplifies inputs for activities such as gym sessions, basketball, and vehicle hot-wiring |
These options address input effort. Accessible Combat and Reduced Vehicle Damage change the challenge of encounters and driving, so treat them as separate decisions.
Adjust camera framing and comfort
Open Camera after settling your stick response. Camera height changes the framing, while shake and bob add movement to the view. Adjust these separately from sensitivity so you do not try to correct unwanted camera effects by slowing your controls.
| Camera setting | Suggested starting choice | Purpose |
|---|---|---|
| Height (On Foot) | High | Places the camera higher than the low, close-to-shoulder view |
| Height (All Vehicles) | 3 | Uses a higher vehicle camera position |
| Camera Shake | Off if shaking makes tracking uncomfortable | Removes the shake effect |
| Camera Bob | Try 5 if the rocking feels excessive | Reduces bobbing to a more moderate setting |
Lower Motion Blur Strength in Display if you dislike blur during camera movement. Screen configuration is a separate step, covered by the Grand Theft Auto 6 TV settings for HDR, Game Mode, and VRR.
Keep a useful map shortcut
On Xbox, View Button can be assigned to the map or camera switching. If you want a wider camera distance and quick map access, assign it to the camera first, cycle to your preferred distance, and then change the assignment back to the map.
The camera-distance cycle has three positions. On PS5, the default map shortcut is the touchpad.
Check the setup before changing more
First, walk and jog through a quiet area, turn the camera toward a fixed object, and aim at separate points. Check whether you can stop where intended without repeatedly correcting your input.
Next, drive with your chosen camera height and check whether vehicle shooting assistance suits you. Review repeated-input activities separately; a comfortable aiming setup does not tell you whether tapping or holding assistance needs adjustment.
Sensitivity changes turning speed, not frame rate. Check Grand Theft Auto 6 performance mode support if the remaining issue concerns frame-rate options rather than how far the camera moves with a stick input.
Keep the settings that solve a specific problem. If one adjustment makes control worse, revert that setting before changing another.