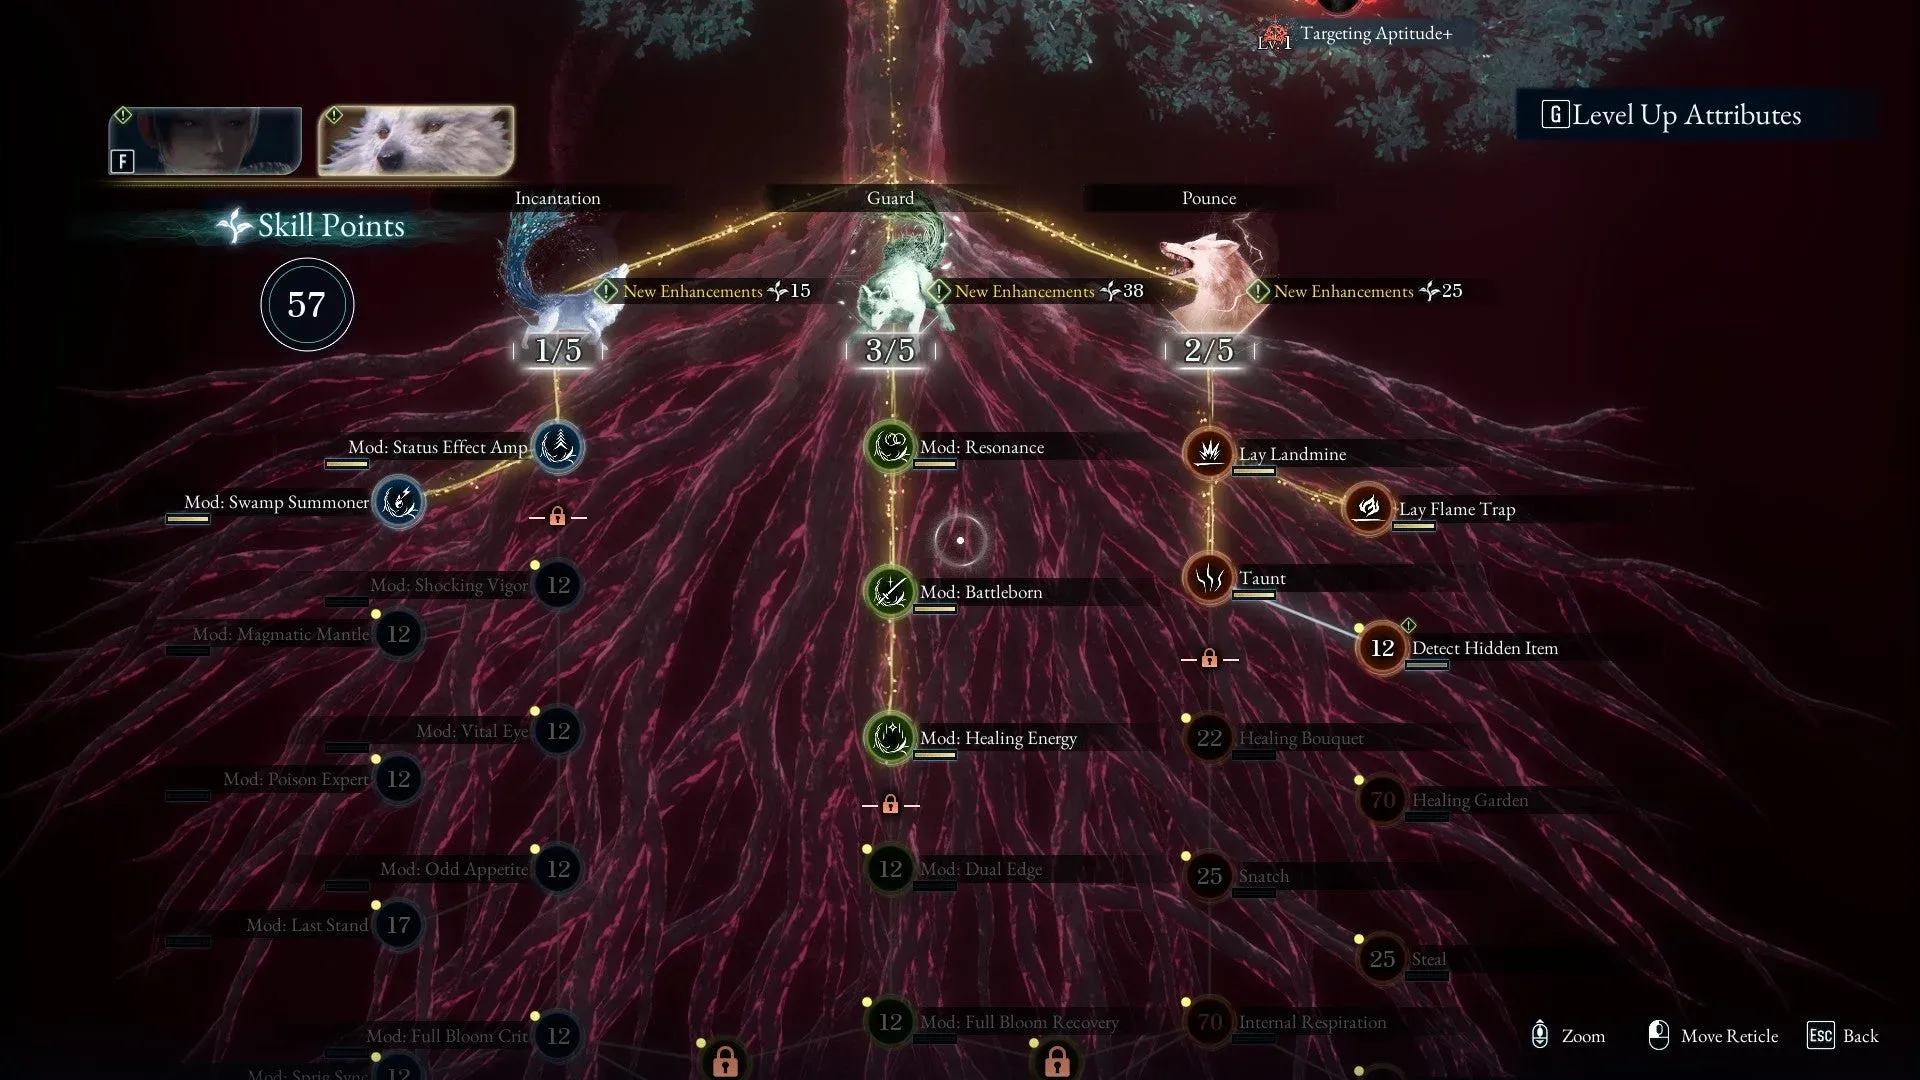


Beast of Reincarnation launched today from Game Freak, and within hours players were already hitting the same wall: a skill tree that branches in every direction, with no obvious signal about which path actually matters in the first few hours. The game has multiple interlocking progression systems, including Swords, Spirit Stones, Attributes, and Bloom Arts, and picking the wrong skills early forces painful backtracking later.
The key here is understanding that your early game build is built around one thing: parrying. Everything else flows from that.
The three skills you need before anything else
Your first priority is unlocking Iaido, Roll, and Helm Splitter. Getting all three requires hitting specific Attribute thresholds: 9 points in Strength, 9 in Florescence, and 9 in Vitality. That's your roadmap for the first zone or two.
Start by dumping points into Strength. From there, put 2 ranks into Entanglement Overdrive, grab Recovery Effect Boost, then take at least 2 ranks in Expand Entanglement Gauge. This lets you bank Entanglement charges to burst bosses when they stagger. From there, take 1 rank each in Iaido and Instant Entanglement.
Iaido hits hard and chains directly into Chimeric Flow and Nue skills. Instant Entanglement gives Emma a chance to instantly fill her Entanglement gauge, which is exactly the kind of passive that snowballs fights in your favor without requiring you to play perfectly.
Next, put 9 points into Florescence and take 2 ranks in Tracking Shot to unlock Roll. Roll is a straight upgrade to your Dodge and changes how survivable you feel in tighter encounters. Last, hit 9 Vitality to unlock Helm Splitter, an aerial AoE move that staggers groups of weaker enemies and chains into the Asagao skill line.
If you want a clearer picture of how long Beast of Reincarnation takes to beat before committing to a full build, that's worth checking before you start min-maxing.
What most players miss about Koo's side of the tree
Most players focus on Emma and treat Koo as a support afterthought. That's a mistake.
Koo's best early unlock is Status Effect Amp, which sits behind just 7 Florescence. This mod makes status effects build up faster on enemies, and since bosses stagger when a status lands, it directly creates more damage windows for you. It's arguably the highest-value mod in the early game.
After that, get to 9 Strength to unlock Taunt and Detect Hidden Item, then grab Mod: Resonance at 7 Vitality. Resonance causes the linked Bloom Art to recover Emma's Entanglement Gauge on use, which feeds directly back into your Iaido and Kiku combo pressure.
For Bloom Arts, prioritize these in order:
- Higanbana: Roots with Status Effect Amp equipped. Bind is the most powerful effect in the early game. It fully stops regular enemies and temporarily stuns bosses.
- Higanbana: Seeds with Perennial Bloom. A cost-efficient way to apply burning while giving Emma passive HP recovery.
- Sakura: Javelin with Resonance. A long-range nuke that becomes much more efficient once you invest in the Reduce FP augment on Koo's tree.
- Higanbana: Bloom for any shield-carrying enemies you run into.
Spirit Stones and armor choices that support this build
The build runs on crit. With that in mind, Spirit Stone priority looks like this:
- Florescent Recovery (6 Skill Power, +6% Crit Rate) for reliable damage and passive sustain
- Any Entangled variants (Assassination, Parry, Dodge, Counter, Riposte) for stacking Crit Rate
- Onslaught as a generic Attack booster if the Entangled options aren't dropping
With a solid spread of these equipped, Crit Rate lands somewhere in the 40-50% range, which is enough to feel consistent without needing perfect rolls.
For armor in the early zones, the Light Gambeson (5 Spirit Stone slots, 17 Defense, Low Enemy Awareness) is a strong opener because the slot count matters more than raw defense at this stage. The Garb of Tranquility (4 slots, 23 Defense, No Enemy Awareness, 60 Acid Resist) is the better pick if you want to stealth-kill your way through encounters, which is a legitimate strategy for thinning out groups before a fight starts.
How the playstyle actually works in practice
Early on, the toolkit is limited. The game wants you to avoid fighting multiple enemies at once whenever possible. That means using ranged weapons to pick off isolated targets, using Death from Above and assassination to remove a foe before combat triggers, and leaning on Higanbana: Roots to bind groups when things get chaotic.
Against bosses, the loop is: parry until they stagger, apply a status via Koo's Bloom Arts, then dump your Entanglement gauge into Iaido and the Kiku: Chaser combo (RB + RB + X + X) once it unlocks in the third zone. That combo is your primary boss damage tool for the rest of the playthrough.
Weapon choice against bosses matters more than most players expect. The Cirrus Sword is a reliable early option (its Clear Skies ability boosts both Emma and Koo's damage by up to 7% for 15 seconds on parry), but you'll want to swap to status weapons that match boss weaknesses whenever possible. Thunderwave for lightning, Hunter Sword for poison, Hazebringer for corrosion against Golems.
For players still deciding which version of the game to pick up before jumping in, the Beast of Reincarnation editions breakdown covers what each one includes and whether the extras are worth it. For everything else, the full Beast of Reincarnation strategy guides hub has you covered as the game continues to roll out across regions.