The DMZ trait system in Call of Duty: Modern Warfare 4 is one of the most consequential progression decisions you'll make. Each operator earns up to 18 Trait Points total, which is only enough to fully complete two of the three skill trees. That hard cap means every choice matters, and picking the wrong traits early can leave your operator underpowered when the pressure is highest in Hajin.

Warfighter skill tree overview
How does the DMZ trait system work?
Traits are unlocked as your operator levels up. Each level grants a Trait Point you can invest in one of three skill trees: Warfighter, Scout, and Survivalist. Six traits per tree are fixed (major traits, indicated by larger icons), while the remaining slots are filled with minor traits that appear in a randomized order, though they stay locked to their respective tree.
Because minor traits are randomized, you cannot guarantee a specific minor trait will appear for your operator. What you can do is recognize the high-value ones when they show up and prioritize them over weaker options.
One more thing to keep in mind: traits are tied to individual operators, not your account. If an operator is lost on a mission, you lose all their trait progress. Rescuing them costs cash, and that cost scales with how many traits they have, so a fully built operator is expensive to recover.

What are the best individual traits in MW4 DMZ?
These are the standout picks across all three trees. Some are major traits with fixed positions; others are minor traits that appear randomly. Grab every one of these the moment they become available.
Possum (Warfighter, major)
Possum is almost certainly the strongest trait in the entire system right now, and it would not be surprising to see it adjusted in a future patch. When you are fully killed (not just downed), Possum lets you activate a self-revive into Last Stand, restoring your health to maximum in the process. This works once per match. The psychological edge is just as real as the mechanical one: opponents who finish you off have no reason to expect you to get back up, which means you can catch them completely off guard. If another player has already looted your body, you will be operating with minimal gear, but if they have not, the window to turn the fight around is significant.
Equipment Professional (Warfighter, major)
Found on the first row of major Warfighter traits, Equipment Professional automatically recharges your lethal and tactical equipment slots after use, refilling up to the slot's maximum capacity. This removes the need to hunt for matching equipment mid-deployment and keeps your grenades topped up through sustained engagements.
Overwatch (Scout, major)
A major trait on the final row of the Scout tree, Overwatch makes any UAV tower you activate in Hajin stay active permanently rather than expiring on a timer. The practical benefit is obvious: a permanent minimap feed from every tower you visit. The secondary benefit is subtler. Active UAV towers signal that a player is nearby. Enemies who spot your towers will assume you are still in the area even after you have moved on, which can pull squads toward empty zones while you operate elsewhere.
Impact Smokes (Survivalist, major)
Impact Smokes automatically deploys a smoke grenade at your position the moment you are knocked down. Solo, this trait's value is situational. In a squad, it is genuinely strong: teammates can push through the smoke to revive you, and PvE enemies lose your exact position long enough to create a window. Even in a 1v1, if your opponent is also being pressured by AI enemies, the smoke can buy enough time to crawl to cover.
Plate Speed (Scout, minor)
Armor plating mid-combat is painfully slow by default. Plate Speed accelerates the animation considerably, letting you plate up during brief pauses in a firefight instead of committing to a full pause. This is a minor trait, so availability is random, but it is worth taking whenever it appears.
Fast Learner (Warfighter, minor)
Fast Learner slightly increases operator experience gain. The exact percentage is not disclosed, but in a mode where leveling up to unlock more traits is the primary progression loop, any acceleration is worthwhile. Grab it whenever the option comes up.
Expedited Extraction (Survivalist, minor)
Exfil timing in DMZ is longer than the in-game callout suggests. The flare has to deploy, the pilot has to arrive, the descent takes time, and there is still a 5-second countdown after boarding before the ascension sequence begins. Expedited Extraction shortens the wait by making extractions arrive much faster. In contested exfil scenarios, shaving time off that window can be the difference between a successful extract and getting shot out of the sky.
Quick Knife (Survivalist, minor)
Quick Knife replaces the standard weapon-butt melee with a knife attack. The benefit is not raw damage but efficiency: you do not need to manually switch to your knife before a stealth takedown, which removes the risk of being caught mid-swap when a PvE enemy detects you earlier than expected.

Survivalist tree key traits
What are the best trait combinations?
Since 18 points covers exactly two full trees, your combination choice defines your operator's role. Here is how each pairing plays out.
| Combination | Best For | Key Traits to Target |
|---|---|---|
| Warfighter + Scout | Aggressive attackers, main shooters | Possum, Equipment Professional, Overwatch, UAV Upgrade |
| Warfighter + Survivalist | Frontliners, solo players | Possum, Equipment Professional, Impact Smokes, Numb the Pain |
| Scout + Survivalist | Support roles, team-focused play | Overwatch, Container Looter, Impact Smokes, Faster Revive |
Warfighter and Scout
This pairing suits the operator who leads engagements. Possum keeps you in the fight after deaths, Equipment Professional keeps your grenades cycling, and Overwatch gives your squad persistent map awareness from every UAV tower you touch. UAV Upgrade extends the range and duration of UAV equipment, which compounds with Overwatch to cover more of Hajin. Viper Sense is worth picking up to counter drone and Machine Dog enemies, and Thermal Padding helps your squad move through areas covered by enemy UAV towers or Scorestreaks.
Start investing in Warfighter first since it provides the better early-game foundation, then branch into Scout for Container Looter before finishing both trees.
Warfighter and Survivalist
This is the durability build. Possum and Free Revive stack well together since both remove HP penalties associated with going down. Numb the Pain applies Painkiller and Smelling Salt effects when you revive, making you harder to finish immediately after getting back up. Quick Fix reduces health regen time, and Consumable Duration extends the effect window of any consumables you carry.
This combination works especially well for solo players who cannot rely on teammates to pick them up.
Scout and Survivalist
The support-oriented pairing. Container Looter gives a chance at bonus loot from caches, which helps the whole squad stay supplied. Overwatch provides permanent UAV coverage from towers. Faster Revive gets downed teammates back up before enemies can close in, and Impact Smokes creates the cover needed to make those revives safer. Numb the Pain gives revived operators a brief window of extra toughness.
This combination does not hit as hard in direct combat, but it keeps squads alive and resourced through longer deployments.
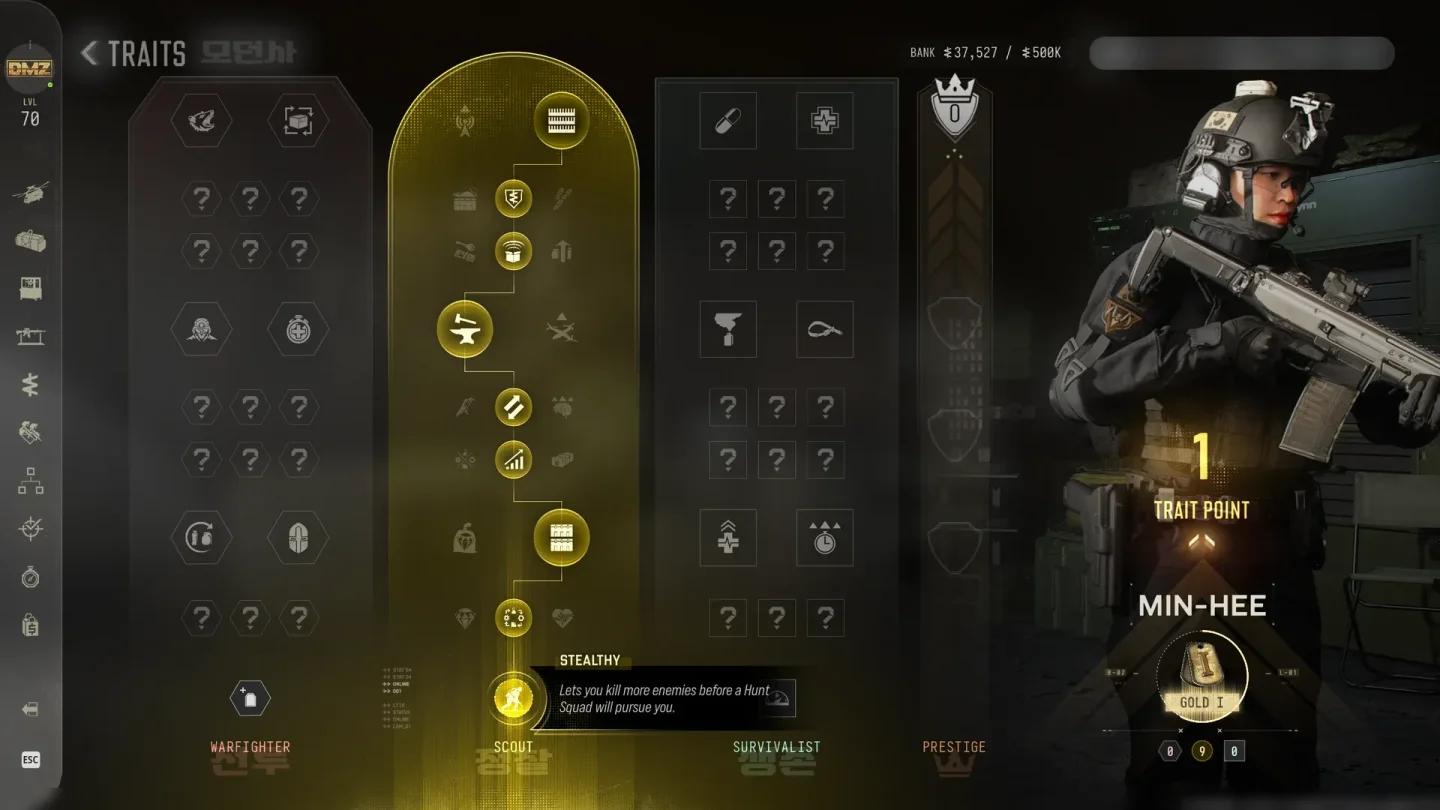
Scout tree UAV Upgrade node
Which traits should you skip?
Not every trait is worth the point. Traits that increase cash extraction yields or item stacking bonuses are tempting but represent a trade-off against survival. Surviving a deployment is more valuable than extracting slightly more cash from one that goes sideways. If you are choosing between a defensive trait and a loot-bonus trait, take the defensive option.
What happens if your operator is lost?
All trait progress is tied to the individual operator. Losing them in the field means losing every point you invested. You can rescue a lost operator by paying cash, but the price scales with their trait level. A fully maxed operator with 18 traits costs significantly more to recover than a low-level one. This is another reason to think carefully about which operators you take into high-risk situations.
For a full breakdown of every trait available across all three trees, the MW4 DMZ Operator Traits guide covers each one with complete effect descriptions. Before committing to a build, it is also worth understanding that trait choices in MW4 DMZ are permanent with no respec option, so planning your path before spending points will save you from getting locked out of the traits that matter most.
For everything else you need to get started in the mode, the full MW4 DMZ guide covering Operators, FOB Stations, and Hajin extraction has you covered from drop to exfil.