
WARDOGS has no fixed classes. Your role is whatever you carry to the fight, and every life costs real cash from your account. That makes the vendor screen the most important decision you make each match. Spend wrong and you are either too slow to reach the objective, too broke to keep playing, or carrying equipment that never gets used. This guide breaks down the best builds for every role and budget in Season 1, with weapon stats and armor weights grounded in firing range measurements and in-game data.
What actually makes a WARDOGS loadout good?
Three things decide whether a kit works: budget, weight, and purpose. You start each match with $10,000 and rebuy every life, so a cheaper primary means more fully-equipped respawns. Weight affects your movement class directly, and Level 4 armor alone sits at 18 kg before you add a single weapon. Purpose is the part most players skip entirely.
Before buying anything, ask yourself one question: what am I doing this life? Pushing the Control Zone, reviving teammates, hunting vehicles, holding a lane, or driving supplies are all valid answers, but they need completely different kits. A build that tries to cover all of them ends up worse at every single one.

How does armor weight affect your build?
Every armor tier adds significant kilograms before the rest of the loadout is considered. Level 1 body armor sits at 3 kg, Level 2 at 4.5 kg, Level 3 at 10.5 kg, and Level 4 at 18 kg. The jump from Level 2 to Level 3 is 6 kg of pure weight, which can push a mobile build into a completely different movement class.
The mistake most players make is treating heavier armor as a straight upgrade. For a Recon player who needs to reposition after every shot, or a Medic who needs to reach downed teammates quickly, Level 3 or 4 protection can actively make the loadout worse.
A simple rule that holds up in practice:
- Level 1 or 2: You need to move. Flankers, Medics, Pilots, Drivers.
- Level 2 or 3: You need to fight and move. Assault infantry, mobile Support.
- Level 3 or 4: You mostly know where you are fighting. Defensive gunners, fixed-position builders.
Best assault loadouts
Starter: T-21 economy fighter
The T-21 costs around $600, fires at approximately 700 RPM, and gives you a full-auto assault rifle that leaves most of the $10,000 budget for armor, ammunition, and utility. This is the right call when you are learning the maps, recovering from expensive deaths, or entering a Hot Zone fight where dying is likely.
The mindset here is: start cheap, survive, upgrade from the battlefield. Players regularly report looting better equipment mid-life and coming out ahead financially compared to buying premium gear upfront.
| Slot | Item | Approx. Cost |
|---|---|---|
| Primary | T-21 | $600 |
| Armor | Level 2 vest | ~$1,000 |
| Helmet | Level 1 or 2 | $200–$500 |
| Backpack | Field Backpack | ~$650 |
| Medical | Bandages | ~$400 |
| Utility | Smoke grenade | ~$100 |
| Sidearm | M1911 | ~$300 |
Core: M4 all-round infantry
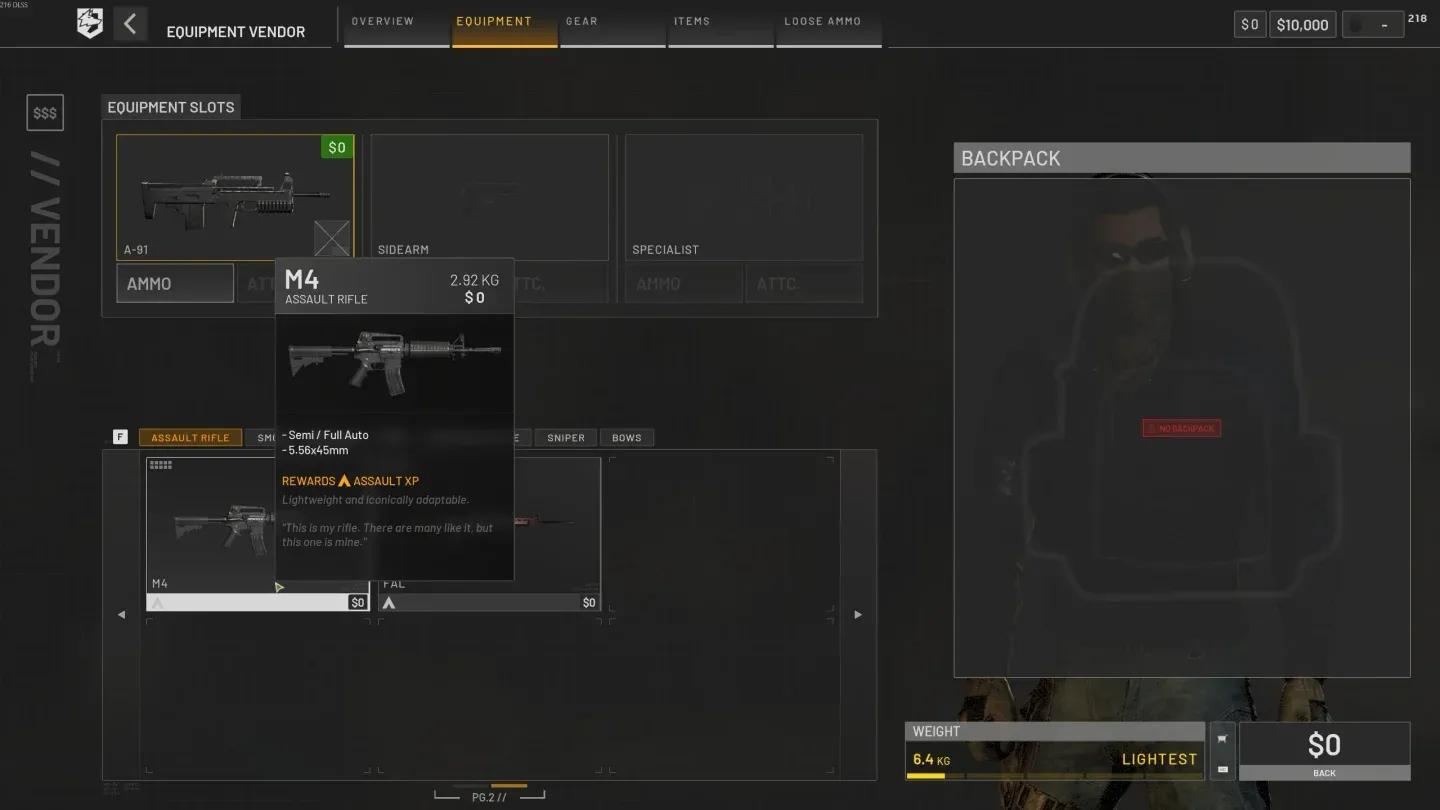
The M4 unlocks at Assault level 20 and is the lightest 5.56 assault rifle at 2.92 kg with a measured fire rate of around 786 RPM, faster than the T-21 at 727 and the Galil at 641. Every 5.56 rifle hits for the same 30.82 chest damage with FMJ against an unarmored target, so the M4 wins on handling, not raw damage.
Pair it with the AFG Angled Foregrip (strong horizontal recoil reduction, strong spread reduction, moderate ADS improvement with no listed downside) and the Hexagon Brake (strong horizontal recoil reduction for a minor ADS penalty). Switch to 5.56 HP ammo as soon as it unlocks at WARDOG level 10. HP rounds measured at exactly 2.0x FMJ damage against unarmored targets.
Current community pricing puts the M4 around $2,800, Medium Armor around $1,000, and the Medium Helmet around $500.
Late game: FAL heavy hitter
The FAL unlocks at Assault level 35, costs around $6,500, and hits for 66.01 chest damage per FMJ round compared to 30.82 for any 5.56 rifle. Its time-to-kill in testing sits around 85 ms to the chest against an unarmored target, the fastest measured rifle in the game. The trade-off is 4.25 kg and a slower 635 RPM.
This is not a recovery build. Do not buy a FAL when your cash reserve is barely above the weapon price. Use it when you understand positioning, survive consistently, and can absorb expensive deaths without spiraling.
wardogs M4 assault rifle weapon stats screen
Best Medic loadout
Why mobility beats maximum armor for Medics
A Medic has three simultaneous jobs: survive near the frontline, win enough gunfights to stay alive, and carry enough medical equipment to matter. Heavy armor fails the first requirement. If you cannot reach the body, the medical kit is irrelevant.
The AMP-9 is the best starting point. It weighs just 1.4 kg, the lightest primary firearm in the game, and measured around 868 RPM in firing range tests. It is available at Medic level 0.
For attachments, the Four Reticle Reflex gives moderate ADS speed improvement with no listed downside, and the Dual Port Brake adds moderate vertical recoil reduction for a minor ADS penalty.
The medical kit is where the role earns its value:
- Field Resuscitator (~$500): faster teammate revives
- Individual First Aid Kit (~$800): heals back to full health
- Defibrillator (~$1,600): instant revives, requires a Battery charge
- Medical Bag (~$2,000): heals over time, faster revives
Smoke grenades are not optional for Medics. Before running toward a downed teammate, check why they died and whether the enemy still has eyes on the body. Smoke the angle, then revive.
Late game: Super-45 upgrade
At Medic level 35 the Super-45 becomes available. It measured the highest fire rate of any primary in testing at around 1,137 RPM and hits harder per bullet than 9mm SMGs at 34.67 chest damage. Its base magazine is 13 rounds, so prioritize the 30-round magazine at Medic level 38 before anything else.
For a deeper look at building a budget-friendly first kit for this role, the WARDOGS best beginner loadout guide covers the AK74 entry path with the right attachments and healing to survive early fights.
Best Recon loadout
SVD: the practical marksman choice
The strongest Recon build is not the most expensive sniper rifle available. Recon needs enough firepower to punish exposed enemies while staying light enough to reposition after firing, follow the Control Zone, and escape flanks from the third faction.
The SVD unlocks at Recon level 12, costs around $4,800, weighs approximately 5.3 kg, and measured 78.67 chest damage and 137.51 head damage per FMJ round in semi-automatic fire. It is the sweet spot between damage and flexibility.
Key attachments:
- SVD Bipod (Recon 14): strong ADS speed, spread, recoil, and sway reduction when deployed, at the cost of reduced mobility
- 6-10x Scope MRAD (Recon 18, ~$40,000 unlock cost): zeros from 100 to 1,000 m with a strong ADS speed penalty
Spotting equipment matters as much as the rifle. Binoculars are available from the start at around $75, the Range Finder unlocks at Recon level 8 and adds accurate distance readings, and the Infrared Range Finder at Recon level 32 is the late-game upgrade.
Budget Recon: SKS
The SKS costs around $2,400 and weighs approximately 3.85 kg. It is the right choice when the SVD budget is not there yet. The Mosin-Nagant at around $4,500 one-shots most unhelmeted heads, but against Level 4 armor the time-to-kill stretches past a second, so the enemy's helmet and armor tier decide every sniper duel.
Ghillie build
Ghillie Armor costs around $3,000 and the Ghillie Helmet around $2,500. The purpose of this setup is information, concealment, and repositioning, not kill count. Watch roads, spot vehicle movement, identify enemy defensive positions, and communicate. A Recon player who marks the right target at the right moment can influence a battle more than someone collecting isolated kills on the map edge.
Best Support loadout
M249 SAW: the lane controller
Support is the widest role in the game, covering LMGs, shotguns, four launcher types, and all construction and repair tools. The M249 SAW unlocks at Support level 15, costs around $3,200, weighs approximately 7.5 kg, and measured around 824 RPM. It takes STANAG magazines as well as its own 100-round fabric magazine and 200-round box, which means it shares ammo with Assault teammates.
The M249 Bipod at Support level 18 gives strong ADS speed, spread, recoil, and sway reduction when deployed. The Spectr 4x optic at Support level 21 pairs well with it for medium-range lane control.
The PKM unlocks at Support level 30 and measured around 865 RPM on 7.62x54R with a 100-round box magazine. The M249 vs PKM choice comes down to caliber, fire rate, and magazine compatibility rather than raw damage, since LMG damage values were not captured in firing range testing.
Choosing a launcher
| Launcher | Unlock | Weight | Best Against |
|---|---|---|---|
| RPG-7 | Support 5 | 6.3 kg | Infantry, light vehicles |
| MAAWS | Support 20 | 7.0 kg | Light and armored vehicles |
| 9K333 Verba | Support 16 | 17.25 kg | Aircraft (infrared lock-on) |
| MGL-40 | Support 35 | 5.3 kg | Infantry, unarmored vehicles |
For anti-vehicle work, stay light enough to reach side angles. The MAAWS at around $2,600 paired with an inexpensive rifle, Light or Medium Armor, and smoke creates a mobile hunter. The biggest mistake is combining a heavy launcher, maximum armor, and a full infantry kit until movement becomes impossible.
Builder variant
The Medium Hammer costs around $800 and builds large and basic structures at moderate speed. The Large Hammer costs around $2,400 at the vendor (with a $75,000 unlock cost) and builds everything at maximum speed. The Forward Operating Base purchase price sits at $7,500 as of Season 1. Construction builds get expensive fast, so only carry building equipment when there is a clear plan for where it gets used.
For players focused on the support path, the WARDOGS best ways to level up Support role fast covers every XP source including FOB construction, vehicle repairs, and key unlock milestones.
Free and recovery loadouts
When the cash reserve takes a hit, the smartest play is often the one that risks almost nothing. The A-91, Bushmaster M17S, and KH-2002 are free primary rifles, all measuring 28 base damage. The Pouch backpack costs $0. Binoculars run around $75.
A free rifle, basic backpack, minimal ammunition, cheap binoculars, and basic revive equipment can still generate positive cash through combat and support actions. Players report these near-free lives as viable income runs, not just survival mode.
Stop the cycle of dying, rebuying the same expensive kit, dying again. Resetting with a free loadout is sometimes the highest-value decision available.
Backpack selection: carry what the job needs
Larger backpacks encourage players to fill slots with items they never use. Let the role decide the size.
| Backpack | Slots | Cost |
|---|---|---|
| Pouch | 6 | $0 |
| Scout Backpack | 8 | Low |
| Field Backpack | 12 | ~$650 |
| Operator Backpack | 15 | Mid |
| Assault Backpack | 21 | ~$1.3 kg weight |
A standard Assault player rarely needs 21 slots. A Medic carrying deep medical supplies might. A Support gunner hauling belt ammunition definitely does. Match the backpack to the actual inventory, not the maximum available.
Common loadout mistakes
Building a kit that does everything
A rifle, sniper tool, medical kit, launcher, construction gear, heavy armor, large backpack, grenades, and premium pistol sounds versatile. In practice it creates an expensive, overweight character that performs every role worse than a specialized teammate. Choose one primary job. Add one secondary capability if weight and budget allow. Stop there.
Rebuying the same failed loadout
WARDOGS lets you rebuy your previous setup with one click, which is convenient but can become a trap. Before rebuying, ask: why did that life end? Was the build too heavy? Was the weapon wrong for the engagement range? Did the enemy have vehicles that needed a different response? A saved build is a convenience, not a command.
Overspending on sidearms
Premium pistols often stay holstered for the entire life. Unless the primary has an obvious weakness requiring a strong backup, the M1911 at around $300 handles most emergencies. Spend that budget on armor or utility instead.
Quick role comparison
| Role | Best Primary | Armor Level | Key Utility |
|---|---|---|---|
| Assault (budget) | T-21 | Level 1–2 | Smoke, frag |
| Assault (core) | M4 | Level 2 | Smoke, frag |
| Assault (late) | FAL | Level 2 | Smoke, frag |
| Medic | AMP-9 / Super-45 | Level 1–2 | Smoke, Defibrillator |
| Recon | SVD / SKS | Level 1–2 | Rangefinder, smoke |
| Support (LMG) | M249 SAW / PKM | Level 2–3 | RPG-7 or MAAWS |
| Anti-vehicle | MAAWS + cheap rifle | Level 1–2 | Smoke, AT Mine |
| Driver / Pilot | Free rifle or T-21 | Level 1 | Smoke |
FAQ
What is the best overall loadout in WARDOGS?
For general infantry, an M4 or T-21 with Level 2 armor, basic medical supplies, a Field Backpack, smoke, and enough ammunition for several engagements covers most situations. Use the T-21 when economy matters, the M4 when you can comfortably afford the upgrade.
What is the best beginner loadout in WARDOGS?
T-21 with Level 1 or 2 armor, a Light Helmet, basic backpack, bandages, and modest ammunition. Free rifles are even better when finances are tight. Prioritize armor over a better weapon at the start.
Does HP ammo always beat FMJ?
No. HP ammo measured at 2.0x FMJ against unarmored targets, but against Level 4 armor the same shot can require an enormous number of rounds. FMJ is the safe default. Switch to AP when enemies are consistently wearing Level 3 or 4 armor. Never run HP into armored targets.
How heavy is too heavy for a Medic?
Level 2 armor at 4.5 kg is the practical ceiling for most Medic builds. Jumping to Level 3 at 10.5 kg adds 6 kg before the weapon, medical kit, and backpack are considered. That weight costs you the speed needed to reach downed teammates.
Should Drivers and Pilots buy expensive infantry gear?
No. Their primary investment is the vehicle. A free rifle and Level 1 armor is enough to defend during an emergency. Spending thousands on personal infantry equipment and then driving recklessly into a destroyed vehicle wastes both the kit and the transport.
For more on the full game, check out our WARDOGS guides collection covering everything from PC settings to helicopter controls and role leveling.