


CONTROL Resonant handles progression through a web of crafting materials, but Living Shards sit at the top of that hierarchy. They're what you spend to unlock new Aberrant forms for Dylan Faden, and since you're locked into your first choice of Primary and Secondary Aberrant form for a significant stretch of the game, knowing where to find these items early makes a real difference. The supply is finite, so spending them wisely matters just as much as collecting them.
What are Living Shards used for?
Living Shards are the premium upgrade currency tied directly to the Aberrant, Dylan's shapeshifting melee weapon. Specifically, they're spent to:
- Unlock new Primary and Secondary Aberrant forms
- Purchase Combo Finishers at the Gap hub area
- Unlock the final tier upgrades within each form's upgrade tree
They are not used for standard crafting or Artifact creation. Those systems rely on more common materials. Living Shards are reserved for the big-ticket unlocks that change how Dylan plays entirely.
How to get Living Shards in Control Resonant
Quest rewards
The most reliable way to get Living Shards is by completing story quests and side quests. Major narrative milestones hand them out as direct rewards, and this cadence picks up noticeably in the late game. The Fault sequences, where Dylan works through traversal challenges while searching for his sister Jesse, are a confirmed source. Hunting down powerful enemies known as Resonants also yields them.
The game is designed so that a player who completes the main story and engages with side content will accumulate enough Living Shards to unlock most of what they want. You won't be left permanently locked out of key forms, but you may need to prioritize.
Vendors
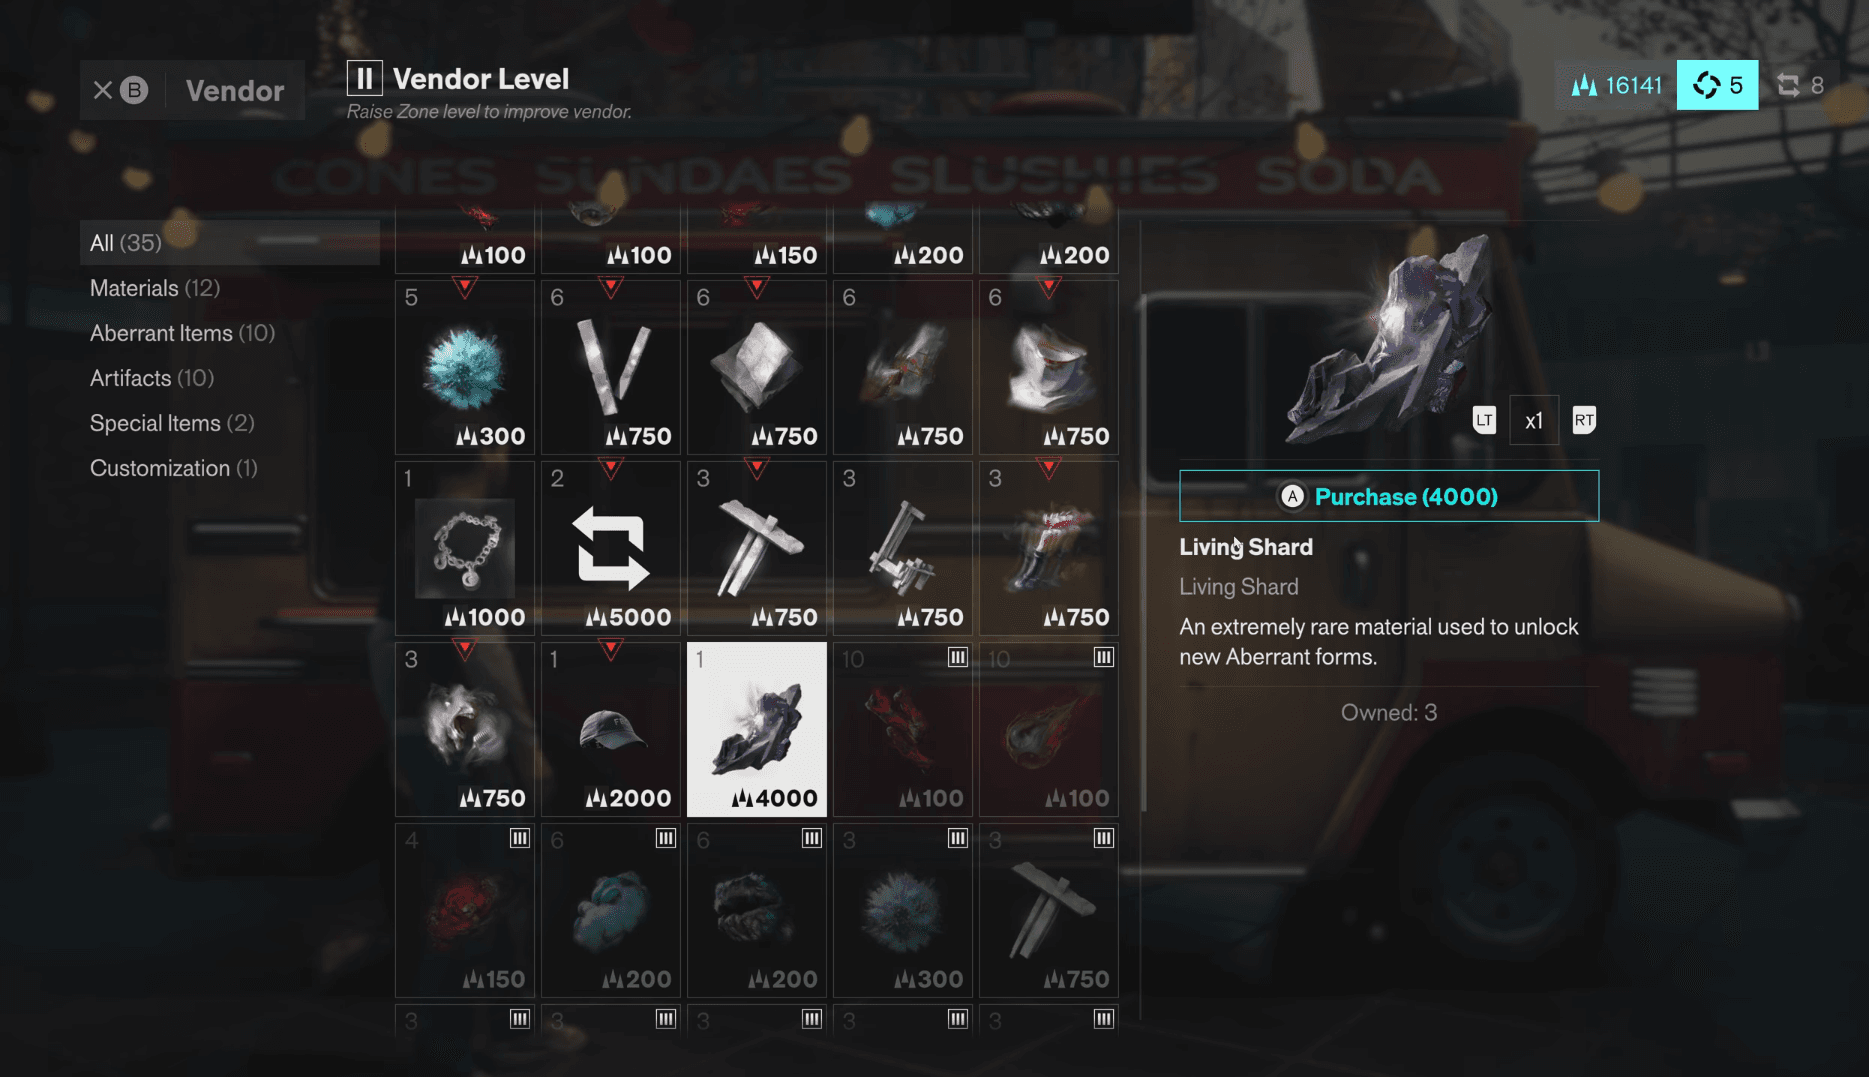
Every Zone in Control Resonant has a Vendor who sells a mix of materials, cosmetics, and base crafting components. Vendors also carry Living Shards, each priced at 4,000 Source. That's not a trivial amount, but if you're clearing Hiss enemies and exploring thoroughly on each Resonant Cycle, Source accumulates fast enough to make a few purchases viable.
Vendor stock is limited by default, but raising the Zone level of a given area expands what that Zone's Vendor carries. This is a meaningful incentive to invest in Zone progression beyond the obvious combat benefits.
Can you farm Living Shards?
No. There is no repeatable farm for Living Shards. They cannot be looted from enemies or found in the open world as random drops. The total supply available through quests and Vendor purchases is fixed, which means every Shard counts.
This is a deliberate design choice that pushes players toward the story rather than grinding. The good news is that the total pool, across all quest rewards and all Vendor stock unlocked through Zone progression, is enough to cover the majority of Aberrant upgrades before the credits roll.
All Living Shard sources at a glance
How to maximize your Living Shard income
Since you can't farm them, the strategy is about extracting every available Shard from the systems that do offer them:
- Complete all side quests as you go. Don't save them for later. Resonant hunts and optional missions hand out Living Shards alongside other rewards, and having them early opens up Aberrant form choices sooner.
- Level every Zone you clear. The Vendor stock expansion is directly tied to Zone level, so a Zone you've leveled to the cap gives you more purchasing options than one you've neglected.
- Defeat Hiss consistently. Source from combat is what funds Vendor purchases. Clearing enemies during each Resonant Cycle keeps your Source balance healthy enough to buy from Vendors without waiting.
- Don't ignore the Gap hub. Combo Finishers bought with Living Shards at the Gap can dramatically change your damage output, so factor those into your spending plan alongside form unlocks.
What should you spend Living Shards on first?
The answer depends on your build direction, but a few principles hold regardless. New Aberrant forms open entirely new movesets and playstyles, so if the form you started with isn't clicking, that's where your first Shard should go. Combo Finishers are powerful but layer on top of your existing forms, making them a strong second priority once you've committed to a primary style. The final upgrade tier on each form's tree costs Living Shards too, but those are late investments you'll naturally reach after the bigger unlocks.
For a full breakdown of every trophy and achievement you can earn along the way, including ones tied to Aberrant progression, check out the Control Resonant trophy and achievement guide. If you're still deciding whether to jump in, the Control Resonant pre-order and editions guide covers everything about getting into the game.
For puzzles and secrets that reward exploration alongside your Shard hunting, the Evacuation Zone Art Gallery puzzle solution is worth a look. The full Control Resonant guides collection has everything else you'll need as you work through Dylan's story.