

Beat Malenia, Blade of Miquella by dodging her healing strikes, saving space for Waterfowl Dance, and punishing recovery with bleed, frostbite, or stance damage. This optional ELDEN RING boss rewards controlled aggression: attack during an opening, then disengage before she regains control.
Your setup should provide safe damage, not just a high damage number. A weapon that interrupts her, a spell she will not automatically evade, or an agile summon can create better opportunities than trading blows. Learn the first phase’s combo endings, then carry that discipline into the second phase’s rot explosions and phantom attacks.
Prepare for Malenia at Haligtree Roots
Malenia waits at the bottom of Elphael, Brace of the Haligtree. Her arena is immediately down the stairs from the Haligtree Roots Site of Grace, so you can adjust equipment between attempts without another long run through Elphael.
Aim for level 130 or higher and a +25 standard weapon if you use that upgrade path. Before entering, check the following:
- Physical protection: Dragoncrest Greatshield Talisman helps against her sword attacks. Opaline Hardtear is another defensive option for your Flask of Wondrous Physick.
- Rot treatment: Carry Preserving Boluses or equip Flame, Cleanse Me for the second phase.
- Quick access: Place your chosen consumables where you can select them without searching through several items.
- Arena positioning: Keep open ground behind you. Fighting against a wall removes your easiest escape from her longest attack.

Malenia waits below Haligtree Roots


Why blocking loses progress
Blocking is an emergency option in this soulslike fight because Malenia restores health whenever a hit connects, including against a shield. Her healing uses a percentage of her maximum HP, so the increased boss health from co-op scaling also increases the amount restored.
A shield can still save an attempt when dodging fails. Repeatedly absorbing entire combos, however, prolongs the fight. Albinauric Pots do not disable her healing.
How to dodge Waterfowl Dance
Malenia unlocks Waterfowl Dance after dropping below roughly 75% HP in phase one. Watch for her distinctive airborne pause with her sword held ready. Stop attacking immediately when you recognize it.
The response depends on your starting distance. Sprinting works best when you already have room; a close-range windup needs a different escape plan.
Escape from medium or long range
- Sprint directly away as she rises. Keep her in view and commit to creating distance.
- Keep running through the early flurries. With enough starting space, the first two rushes fall short. If she closes the gap, prepare to dodge the second.
- Roll toward her through the later tracking rush. Continuing backward lets her follow your retreat.
- Stay clear of the finishing cuts. Do not turn the first successful dodge into an immediate counterattack.
If the attack catches you, rolling toward Malenia offers a better chance of escaping than repeatedly rolling backward through the outer slashes. The full sequence is not one continuous opportunity to dodge in the same direction.
Counter a close-range windup
A Freezing Pot can interrupt Waterfowl Dance when its hit triggers frostbite. Throw it during the airborne windup, before Malenia starts rushing forward.
Bloodhound’s Step is another useful counter. Use it to escape the early flurries, then pass toward her through the later tracking rush. It gives a melee setup an evasive option when an ordinary sprint starts too late, but you still need to read the sequence.
Phase one: punish complete combos
Malenia, Blade of Miquella begins with 18,473 HP in a first playthrough. Her walking pauses invite attacks, but her kick, rapid slashes, and sudden lunges can punish an attack started without enough room to recover.
Use the attack’s ending, not the first apparent pause, to decide when to retaliate.
| Attack | What to watch for | Response |
|---|---|---|
| Rapid slashes | Three quick cuts followed by a delayed fourth | Wait for the delayed cut before committing |
| Kick and follow-up | A spinning kick that can lead into different sword attacks or a grab | Dodge the kick, then read the follow-up |
| Thrust | A committed forward stab with long reach | Dodge sideways and punish its recovery |
| Grab | Her empty hand pulls back before she lunges | Dodge to the side; the grab cannot be blocked or parried |
| Upward and downward slash | She rises with her blade, then cuts downward | Let the downward attack finish before closing in |
Use stagger without chasing it
Attack after a completed combo. If your hit makes her flinch, you can continue briefly, but stop when she side-hops. That movement breaks your pressure and can lead straight into a counterattack.
Malenia has 80 stance and can take a critical hit after a stance break. Some attack animations resist interruption, so ordinary hit-stagger does not guarantee that your next swing will stop her. Charged heavy attacks and high-stance-damage skills belong in clear recovery windows.
Parrying also works, but it takes three successful parries to create a critical opening. Choose it if you can consistently recognize her sword timings, not as a shortcut around learning them.
Best builds and weapons against Malenia
Bleed, frostbite, and stance-focused setups all have useful tools for this fight. Fire is also a favorable damage choice: Malenia has 0% fire negation outside the arena’s shallow water and 10% while standing in it. Holy damage faces 40% negation.
| Setup | Main tools | Strength against Malenia | Main limitation |
|---|---|---|---|
| Bleed katana | Rivers of Blood, Corpse Piler | Physical and fire damage with bleed buildup | Long attack commitments can expose you to retaliation |
| Dual curved swords | Scavenger’s Curved Sword and a Blood-affinity curved sword | Dual-wielded jumping attacks hit four times for fast buildup | Requires close-range openings |
| Strength/Faith stance damage | Ordovis’s Greatsword, Ordovis’s Vortex | Charged skill supports repeated stance pressure | Needs enough recovery time to charge safely |
| Intelligence sorcery | Night Comet, Staff of Loss | Night sorceries do not trigger her projectile-evasion response | Casting still leaves you vulnerable to a rush |
| Faith casting | Flame of the Fell God, Giantsflame Take Thee | Delayed explosions and knockdown opportunities in phase one | Slow casts need space or a distraction |
Complete Strength/Faith setup
Build this late-game loadout around a +10 Ordovis’s Greatsword, with 50 Strength and 35 Faith. Its purpose is to convert a clear opening into stance damage, then capitalize on the resulting critical opportunity.
| Component | Selection |
|---|---|
| Weapon | Ordovis’s Greatsword +10 |
| Weapon skill | Ordovis’s Vortex, fully charged when the opening allows |
| Offensive talisman | Godfrey Icon |
| Defensive talisman | Dragoncrest Greatshield Talisman |
| Stamina talisman | Green Turtle Talisman |
| Fourth talisman | Shard of Alexander |
| Wondrous Physick | Stonebarb Cracked Tear and Opaline Hardtear |
| Buffs | Golden Vow and Black Flame’s Protection, which stack |
| Armor priority | Physical protection while retaining a comfortable dodge |
| Spirit Ash | Black Knife Tiche |
The Elden Ring Alexander quest rewards Shard of Alexander if you still need the fourth talisman. Check your weapon and talisman slots in Equipment before entering.
Use ordinary attacks when an opening is too short for a full charge. Save Ordovis’s Vortex for longer recoveries, especially after the second phase’s opening attack. Do not assume that beginning a stance-damage sequence guarantees a permanent lock on Malenia.
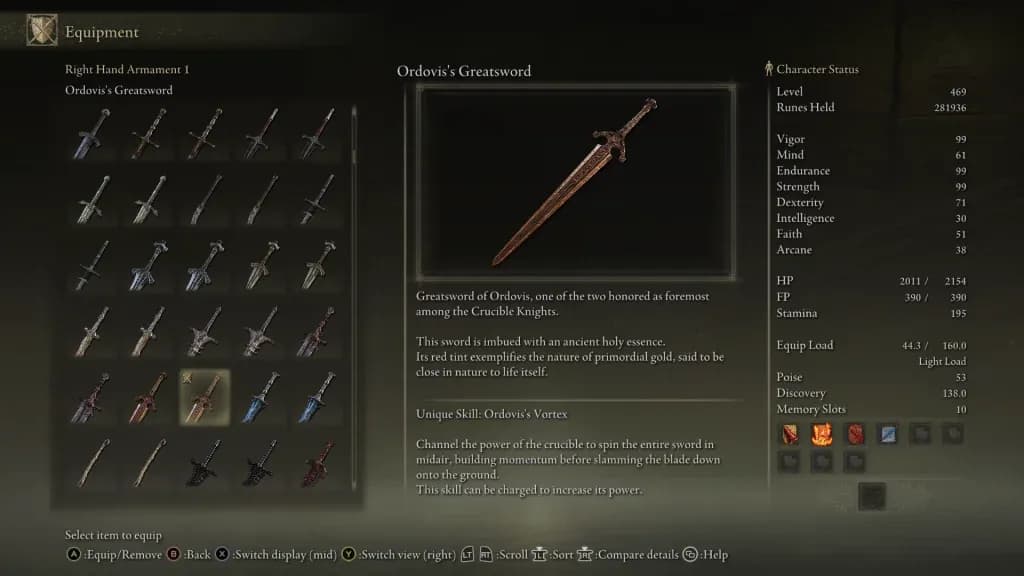
Ordovis’s Greatsword in the equipment menu
Bleed and casting alternatives
For the curved-sword setup, Raptor’s Black Feathers and Claw Talisman support jumping attacks, while Rotten Winged Sword Insignia rewards successive hits. Land the jump attack during recovery, then reassess instead of automatically chaining another.
Mohgwyn’s Sacred Spear offers a Strength/Arcane alternative through Bloodboon Ritual. The Elden Ring White Mask Varré quest opens access to Mohgwyn Palace if that is your next equipment destination.
For sorcery, Staff of Loss boosts Night Comet. Ranni’s Dark Moon can also contribute frost buildup and reduce Malenia’s magic resistance. Avoid repeatedly firing ordinary projectiles while she is free to sidestep and rush you.
Faith builds can exploit Flame of the Fell God’s delayed detonation: Malenia can dodge the cast and still be caught by the later explosion. Poison and Scarlet Rot are less attractive primary plans because her resistance to both is much higher than her initial bleed and frostbite resistance.
Best summons for Malenia
Black Knife Tiche is the strongest general recommendation here because her evasive movement helps her avoid becoming an easy healing target. Redmane Knight Ogha offers a different advantage: ranged attacks that can stagger Malenia while you hold her attention.
| Spirit Ash | Reason to choose it | How to support it |
|---|---|---|
| Black Knife Tiche | Agile movement helps limit incoming hits | Attack during the openings her distraction creates |
| Redmane Knight Ogha | Great arrows can stagger Malenia and interrupt phantom attacks | Keep Malenia engaged away from his firing position |
| Mimic Tear +10 | Strong support for an effective equipped setup | Watch whether its damage outweighs the hits it takes |
| Latenna the Albinauric | Persistent ranged pressure | Summon near the entrance and keep Malenia away from her |
A summon focused only on absorbing damage is a poor fit for this encounter. If Malenia repeatedly recovers the damage your ally helps deal, switch to an evasive or ranged option.
Player summons are also allowed. Coordinate pressure around her recovery instead of having everyone trade attacks at once.

Black Knife Tiche as a summon
Phase two: survive Scarlet Aeonia and rot follow-ups
Malenia, Goddess of Rot starts with 14,778 HP, 80% of her maximum, and can heal above that starting amount. She keeps her earlier attacks and gains rot-based moves, including Scarlet Aeonia, which always opens this phase.
Turn Scarlet Aeonia into an opening
As Malenia prepares her dive, run toward her, underneath her position, and continue past her. Keep moving out of the landing area so the flower’s bloom does not catch you.
The flower remains dangerous after impact. Stay outside its active area and use the recovery for healing or ranged damage. You have roughly five to seven seconds to act before she becomes active again, making this a useful opportunity for Comet Azur or another substantial ranged attack.
Melee builds should wait for the bloom to become safe before approaching. Spending part of the opening on positioning is better than taking rot damage to force an extra hit.

Scarlet Aeonia opens phase two
Read the new follow-ups
Her second-phase combos flow into additional attacks, so an ending you punished in phase one may now lead into a rot burst.
- Scarlet Plunge: She jumps and drives her sword into the ground, creating an explosion in front of her. Avoid both the slam and the eruption before retaliating.
- Scarlet Phantoms: Leave the damaging area beneath her, track the approaching copies, and time lateral dodges to their attacks. Keep watching for Malenia’s own finishing dive.
- Rot-inflicting attacks: Watch your buildup meter while defending. Use your prepared cure during a real opening, not while another combo is approaching.
Stay near full health when an opening lets you heal. Her second-phase combinations can deal well over 1,000 damage quickly, even against heavy armor.
Malenia rewards and the arena flower
Defeating both phases awards 480,000 runes, Malenia’s Great Rune, and the Remembrance of the Rot Goddess in a first playthrough. Enia at Roundtable Hold can exchange the Remembrance for its rewards.
If you have the Unalloyed Gold Needle from completing Millicent’s questline, interact with the large Scarlet Aeonia left in the arena. Giving it the needle awards Miquella’s Needle and a Somber Ancient Dragon Smithing Stone.