
To build a building in Minecraft, plan its purpose and footprint, mark the outline, then construct the floor, frame, walls, roof, lighting, and interior.
Start with a rectangle to make room layout and roof construction easier. Choose materials you can supply in your chosen mode, and reserve space for entrances and room access before enclosing the shell. The process below uses a small practice building to explain each stage, but you can apply the same order to a workshop, house, or larger decorative structure. Work from the main shape to the small details.
Plan the building before construction


Choose its purpose, mode, and location
Decide what you need the building to do. A storage building needs room for storage and movement between it. A decorative tower needs a readable silhouette. A home needs an interior you can actually use. Write down those functions before choosing the exterior shape.
Your mode changes the preparation. Creative removes the need to gather building resources. In Survival, choose blocks you can collect consistently, and prepare tools, armor, food, and access equipment such as scaffolding before starting a tall structure.
Generally flat terrain, such as plains, reduces the amount of clearing and leveling. A Superflat world also works for a Creative practice build. If the terrain is part of your design, mark the building's position before reshaping the ground so you only alter the area you need.
Leave space outside the walls for the entrance, a connecting path, and any planned extension. A building that fits its plot exactly leaves little room for balconies, roof edges, or neighboring structures.
Pick a footprint and scale
A footprint is the building's outline when viewed from above. Its shape affects the rooms, walls, and roof, so settle it before placing permanent materials.
| Footprint | Useful for | Planning trade-off |
|---|---|---|
| Rectangle | Houses, workshops, and long halls | Straight walls make room layouts and connections straightforward |
| Square | Compact rooms and symmetrical buildings | Equal sides give you a simple starting shape |
| Circle | Towers and curved features | You need a consistent stepped outline to represent the curve |
For a simple practice building, choose a 9×11 outer footprint with one-block-thick walls. This leaves a 7×9 interior before partitions. Keep it to one story, and plan corner posts four blocks above the finished floor. These dimensions are a suggested layout, so enlarge it if your planned interior needs more room.
If you are recreating a real building, choose a scale before translating its measurements into blocks. Keep the same ratio for width, length, and height so the model retains its proportions.
Mark the foundation and choose materials
Lay out a temporary blueprint
Use colored wool, terracotta, concrete, or another plentiful block to sketch the footprint. Temporary markers let you change the plan without dismantling finished walls.
- Mark the outside corners, then connect them into the full perimeter.
- Use a different color to identify the entrance and any internal partitions.
- Mark space for stairs or other access if you plan additional floors.
- Walk through the outline at ground level, following the route between the entrance and each planned room.
- Move markers wherever furniture, storage, or access would make the interior too tight.
Count both opposite sides before continuing. A misplaced corner is easier to fix while the building is still a line on the ground.
Give each material a job
Choose blocks for the floor, frame, main walls, roof, and accents. A small palette makes it easier to repeat details consistently and estimate what you need to gather.
| Building style | Main materials | Supporting choices |
|---|---|---|
| Medieval | Stone variants and wood | Limited glass and contrasting wooden framing |
| Rustic | Planks and logs | Small windows and irregular room shapes |
| Modern | Concrete, quartz, or iron blocks | Large cyan or light blue glass windows and sea lanterns |
| Aquatic | Prismarine | Glass windows and sponge decorations |
For the practice building, use a stone floor, log corner posts, and plank walls. Place a small sample wall beside the plot to compare the frame, wall, and roof materials together before collecting a full supply.
Reserve rare materials such as diamond, emerald, or gold blocks for selected accents, including an entrance or spire. Making them the main wall material increases the resource demand and can overwhelm the other textures.
For an ice-themed variation, use Minecraft Packed Ice Bricks only if your version includes them, and compare their stairs or slabs with the main wall before committing to the palette.
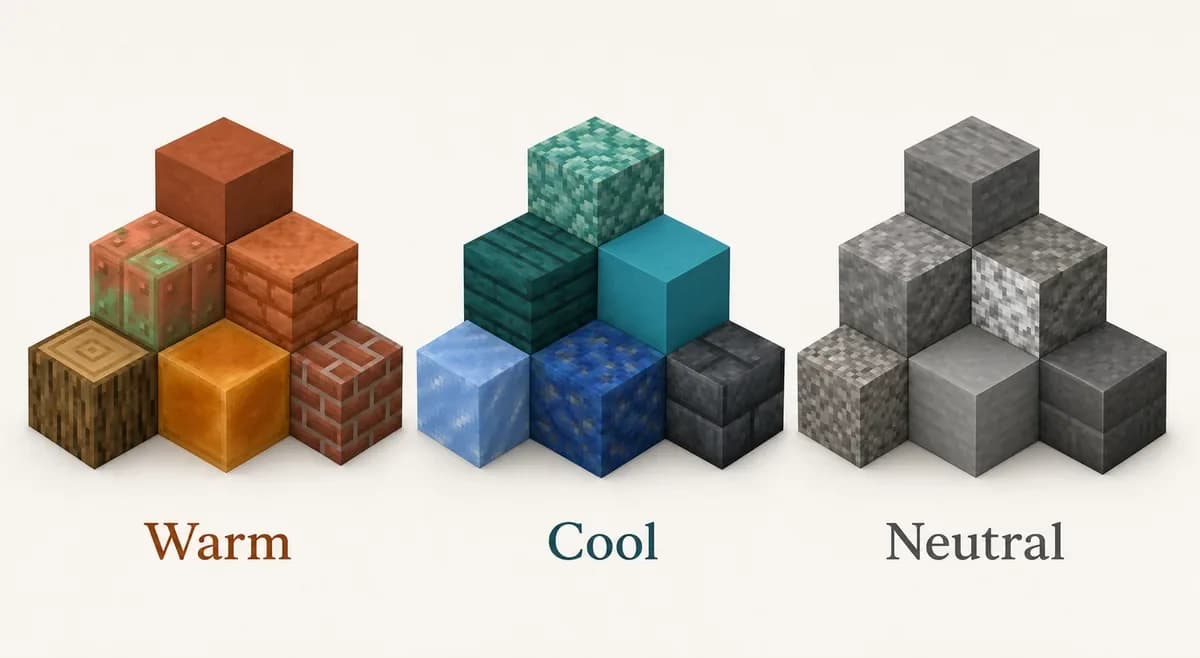
Choose blocks by their building role
Construct the floor, frame, and walls
Replace the markers with the permanent base
Set the finished floor level, then clear or fill the ground within the marked footprint. Replace temporary foundation markers with the chosen permanent blocks, preserving the entrance position.
Build the floor across the planned area. For the practice layout, keep the exterior wall line on the outside edge, leaving the interior space clear. Check the room size from inside before raising the walls.
Keep the blocks for your current stage together on the hotbar. Finish the base before switching to wall details, so you can check the entire outline without an unfinished doorway or window frame hiding a counting mistake.
Raise a frame before filling the walls
Build the corner posts to the planned height, then connect their tops with temporary markers or your chosen frame material. This creates a three-dimensional skeleton of the building.
Step away and inspect it from the entrance side and a corner. Check whether the height suits the width, whether nearby terrain hides part of the structure, and whether the planned roof has enough space. Change the frame now if the proportions feel wrong.
Fill the wall sections between the posts, working around the building in layers. Leave the planned entrance and window openings empty instead of placing a solid wall and removing it later. Fit doors and glass once the surrounding openings are settled.
If you add a loft or another floor, reserve its access before furnishing the room. For a compact climbing route, craft a ladder in Minecraft and leave its supporting wall clear.
Build the roof before adding trim
Choose a roof that matches the footprint
A flat roof is the simplest option for the practice building: cover the top of the rectangular shell at a consistent height. Inspect its edge from outside before adding decoration.
A pitched roof introduces a triangular profile, forming a triangular prism along the building's length. Use this when you want a visible roof slope or an attic-shaped space. Establish the profile before filling the roof so you can change its height without rebuilding both slopes.
Complete the main roof shape
For a pitched roof, follow this construction order:
- Build a triangular outline above one end wall.
- Repeat the outline at the opposite end, matching its width and height.
- Connect the highest points with a ridge along the building's length.
- Fill the two slopes between the end outlines, using stairs where you want stepped roof edges.
- Inspect both sides before adding roof trim.
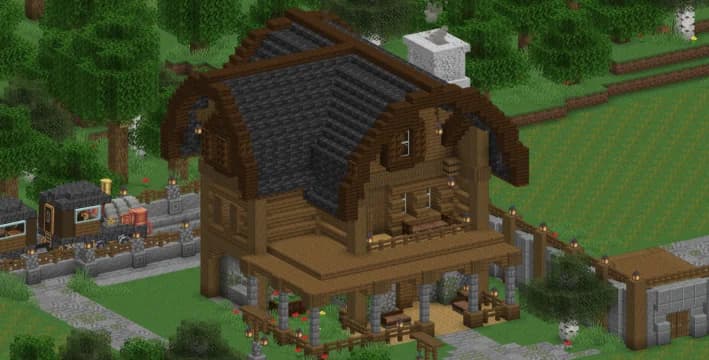
Establish the roof shape before trim
Check the roof from ground level, not just from your construction position. You should be able to see how it meets the walls and whether its shape suits the rest of the building. Save chimneys, roof borders, and other small features until this shape is settled.
Finish the lighting, interior, and exterior
Add light and usable rooms
Place lighting where it serves the interior. Torches are a straightforward indoor option. You can also put a light source beneath carpet to hide the source while allowing its light through.
Place the largest interior features first, then add partitions and smaller decorations around them. Walk the route from the entrance to each feature as you work. Move a partition or furnishing if it blocks that route.
Plan functional additions before sealing decorative panels. If the entrance will use a musical doorbell, leave space for Minecraft Note Blocks and their redstone before finishing the nearby walls.
Break up large surfaces with selected details
Use details to give plain walls depth without covering every block. Choose a few features that suit the building:
- Window frames: Separate openings from the surrounding wall material.
- Pillars and indents: Break up a long, flat surface.
- Roof trim: Make the roof edge more distinct.
- Balconies or arches: Add a larger feature where the structure has room for it.
- Accent strips: Divide broad areas using a contrasting color from the palette.
Connect the entrance to its surroundings with a usable path. Match the path's width to the building and neighboring structures, and keep the route reasonably flat for easy travel.
Inspect the finished building from the approach path, each outside corner, and inside every room. Remove temporary markers and construction access, correct mismatched details, and check the lighting after dark. Complete those repairs before starting an extension.